
Laravel 12 provides powerful mechanisms for creating custom validation rules that depend on values from other fields in the request. When built-in conditional rules like required_if or required_with aren’t sufficient for your complex business logic, custom cross-field validation becomes essential.
Form validation is a crucial part of any Laravel project, and Laravel 12 makes it easy to handle. However, sometimes the built-in validation rules are not enough for your specific requirements. That’s where custom validation rules become essential.
Table of Contents
Understanding Conditional Validation With Other Fields
Conditional validation with other fields occurs when the validation of one input depends on the value, presence, or state of another field. Common scenarios include password confirmation checks, making fields required based on user roles, handling multi-step form dependencies, or enforcing business rules across related inputs. In Laravel, this can be implemented using DataAware custom rules or built-in conditional rules like required_if, required_with, and exclude_if.
Creating Conditional Validation With Other Fields Using DataAwareRule Interface
The DataAwareRule interface provides the cleanest approach for accessing all request data within custom validation rules.
Step 1: Generate a DataAware Custom Rule
Laravel provides a way to create custom validation rules using Artisan. To make a custom validation rule run the command given below :
php artisan make:rule DateRangeRule
This will create a file app/Rules/DateRangeRule.php. Open it and modify it like this:
<?php

namespace App\Rules;

use Closure;
use Carbon\Carbon;
use Illuminate\Contracts\Validation\ValidationRule;
use Illuminate\Contracts\Validation\DataAwareRule;

class DateRangeRule implements DataAwareRule,ValidationRule
{
    protected $data = [];
    protected $maxDays;
    protected $minDays;

    public function __construct(int $minDays = 10,int $maxDays = 30)
    {
        $this->maxDays = $maxDays;
        $this->minDays = $minDays;
    }

    public function setData(array $data): static
    {
        $this->data = $data;
        return $this;
    }

    /**
     * Run the validation rule.
     *
     * @param  \Closure(string, ?string=): \Illuminate\Translation\PotentiallyTranslatedString  $fail
     */
    public function validate(string $attribute, mixed $value, Closure $fail): void
    {
        $startDate = $this->data['start_date'] ?? null;

        if (!$startDate) {
            $fail("The start date field is required for {$attribute} validation.");

            return;
        }

        try {
            $start = Carbon::parse($startDate);
            $end = Carbon::parse($value);


            // End date must be after start date
            if ($end->lessThan($start)) {
                $fail("The {$attribute} must be after the start date.");
                return;
            }

            // Check min range
            if ($start->diffInDays($end) < $this->minDays) {
                $fail("The date range must be at least {$this->minDays} days after the start date.");
                return;
            }

            // Check maximum range
            if ($start->diffInDays($end) > $this->maxDays) {
                $fail("The date range cannot exceed {$this->maxDays} days.");
                return;
            }

        } catch (\Exception $e) {
            $fail("The {$attribute} must be a valid date.");
        }
    }
}
Explanation
When you need your custom validation rule to have access to all input data being validated, you can make your rule class implement the Illuminate\Contracts\Validation\DataAwareRule interface.
The rule implements two interfaces:
ValidationRule : makes it a valid Laravel custom rule.
DataAwareRule : allows this rule to access all form input data, not just the field it’s validating.
$data : will store all form input values.
$minDays : minimum allowed days between start & end (default = 10).
$maxDays : defines the maximum allowed days between start and end (default = 30).
Allows you to configure the minimum and maximum days when using the rule. Example: new DateRangeRule(15, 60) : range must be at least 15 days and no more than 60 days.
setData() : comes from DataAwareRule. Laravel automatically calls this method and passes all request data before validation.
The main method that checks if validation passes or fails.
$attribute : the field name (example: end_date).
$value : the actual value of that field.
$fail() : function used to trigger a validation error.
Check if start_date exists : If the user didn’t provide start_date, validation fails immediately.
Parse Dates : Converts start_date and end_date strings into Carbon date objects. This allows easy comparison (lessThan, diffInDays, etc.).
Minimum Range : Checks that the difference between start_date and end_date is not shorter than minDays.
Maximum Range : Ensures the date range does not exceed the maximum allowed limit.
If Carbon::parse() fails (invalid format), validation fails with a “must be a valid date” error.
Read Also : Laravel 12 Custom Validation Rules Example
Step 2: Use Validation Rule in Controller
In this step, we’ll create a custom conditional validation rule that checks one field based on another. For example, the end date depends on the start date, and the difference between them must fall within a defined range. Using a date range rule, we can enforce a minimum of 5 days and a maximum of 20 days (‘end_date’ => [ ‘required’, ‘date’,new DateRangeRule(5,20),). Custom rules work like Laravel’s built-in validation; the only difference is that you reference your rule class with new, and you can pass parameters through its constructor when needed.
<?php

namespace App\Http\Controllers;

use Illuminate\Http\Request;
use Illuminate\Http\RedirectResponse;
use App\Rules\DateRangeRule;
use Illuminate\View\View;

class UserController extends Controller
{
     /**
     * Show the application dashboard.
     *
     * @return \Illuminate\Http\Response
     */
    public function create(): View
    {
        return view('form');
    }

     /**
     * Show the application dashboard.
     *
     * @return \Illuminate\Http\Response
     */
    public function store(Request $request): RedirectResponse
    {
        $validatedData = $request->validate([
                'start_date' => ['required', 'date','after_or_equal:today'],
                'end_date'   => ['required','date',new DateRangeRule(5,20),
                ],


            ]);

        return back()->with('success', 'User created successfully.');
    }
}
Step 3: Add Routes
In this step, we’ll define the routes needed to test our custom conditional validation rule that depends on other fields. The first route will display the form, while the second route will handle the form submission and run the validation. Open routes/web.php and add the following routes:
<?php

use Illuminate\Support\Facades\Route;
use App\Http\Controllers\UserController;

Route::get('custom-validation', [UserController::class, 'create']);
Route::post('custom-validation', [UserController::class, 'store'])->name('validate');
Step 4: Create Blade to Test Validation
In this step, we’ll create a simple Blade view at resources/views/form.blade.php. For styling, we’ll use Bootstrap 5.3:
<!DOCTYPE html>
<html lang="en">
<head>
    <title>Laravel 12 Custom Conditional Validation With Other Fields - ItStuffSolutiotions</title>
    <meta charset="utf-8">
    <meta http-equiv="X-UA-Compatible" content="IE=edge">
    <meta name="viewport" content="width=device-width, initial-scale=1">

    <!-- Bootstrap 5.3.8 CSS -->
    <link href="https://cdn.jsdelivr.net/npm/bootstrap@5.3.8/dist/css/bootstrap.min.css" rel="stylesheet">
</head>
<body>
<div class="container">
    <div class="card mt-5 shadow-lg border-0">
        <h3 class="card-header p-3 bg-primary text-white">
            Laravel 12 Custom Conditional Validation With Other Fields - ItStuffSolutiotions
        </h3>
        <div class="card-body">
            @session('success')
            <div class="alert alert-success alert-dismissible fade show" role="alert">
                    {{ session('success') }}
                    <button type="button" class="btn-close" data-bs-dismiss="alert" aria-label="Close"></button>
                </div>
            @endsession
            <form method="POST" action="{{ route('validate') }}">
                @csrf

                <div class="mb-3">
                    <label class="form-label" for="start_date">Start Date:</label>
                    <input
                        type="date"
                        name="start_date"
                        id="start_date"
                        class="form-control @error('start_date') is-invalid @enderror"
                        placeholder="dd-mm-yyyy">

                    @error('start_date')
                        <div class="invalid-feedback">{{ $message }}</div>
                    @enderror
                </div>
                 <div class="mb-3">
                    <label class="form-label" for="end_date">End Date:</label>
                    <input
                        type="date"
                        name="end_date"
                        id="end_date"
                        class="form-control @error('end_date') is-invalid @enderror"
                        placeholder="dd-mm-yyyy">

                    @error('end_date')
                        <div class="invalid-feedback">{{ $message }}</div>
                    @enderror
                </div>


                <div class="mb-3">
                    <button class="btn btn-success btn-submit">Submit</button>
                </div>
            </form>
        </div>
    </div>
</div>

<!-- Bootstrap 5.3.8 JS (with Popper) -->
<script src="https://cdn.jsdelivr.net/npm/bootstrap@5.3.8/dist/js/bootstrap.bundle.min.js"></script>
</body>
</html
Read Also : Laravel 12 Custom Validation Rule with Parameters
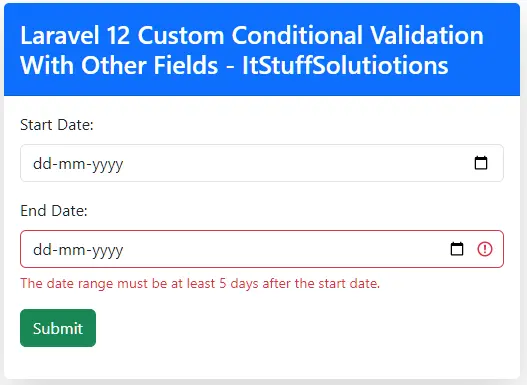
Step 5: Testing the Custom Conditional Validation
We have completed all the steps , Now Start the Laravel development server by running the folowing command given below:
php artisan serve
After starting the server, open http://127.0.0.1:8000/custom-validation in your browser. If the end date does not fall within the specified range from the start date (for example, less than 5 days or more than 20 days apart), the validation error will be displayed, as shown in the example below.
When to Use DataAware Validation
Use DataAware rules when:
- You need to access other fields in your validation logic.
- The validation depends on dynamic conditions.
- Built-in rules like required_if are not enough.
Examples include:
- Field required only if another field is selected.
- Conditional date ranges.
- Dynamic form validations with multiple dependent fields.
Conclusion
Laravel 12 provides a robust and flexible system for creating custom validation rules, especially when one field’s validation depends on another. While built-in conditional rules like required_if, required_with cover many common scenarios, custom DataAware rules allow you to implement more complex cross-field validations.
By using the DataAwareRule interface, your custom validation can access all request data, making it possible to handle scenarios such as conditional date ranges, dynamic form requirements, and business-specific rules. This approach keeps your validation logic clean, reusable, and easy to maintain.
With the steps outlined in this tutorial generating a custom rule, using it in a controller, defining routes, creating a Blade form, and testing you can confidently implement custom conditional validation in any Laravel 12 project.
Frequently Asked Questions(FAQs)
Q1: What is DataAwareRule and why use it?
DataAwareRule is an interface that lets a custom rule access all validated input via setData(), enabling safe cross-field logic without relying on global helpers or manual injection.
Q2: When should a custom rule be preferred over required_if?
A custom rule should be used over required_if when validation depends on multiple fields, complex logic, calculations, or dynamic conditions that built-in rules can’t handle, and when you want reusable, maintainable, and customizable error messages.
Q3: Can I pass parameters to a custom validation rule?
Yes. You can pass parameters through the rule’s constructor. For example: new DateRangeRule(5, 20)
This sets a minimum of 5 days and a maximum of 20 days for the end date.
Q4: How do I trigger a validation error in a custom rule?
Use the $fail callback inside your rule’s validate() method. For example:
$fail(“The end date must be at least {$this->minDays} days after the start date.”);
Q5: Can I use DataAware rules for fields other than dates?
Absolutely. DataAware rules can be used for any scenario where validation depends on other fields, such as passwords, user roles, or dynamic form inputs.
