
In this laravel tutorial titled “laravel 12 select2 ajax autocomplete search example”, you willl learn how to implement Select2 AJAX autocomplete search in Laravel 12.
Laravel 12 Select2 Ajax Autocomplete lets you load large datasets on demand with a smooth, searchable dropdown using jQuery Select2 and a JSON endpoint in Laravel. Below is a complete, Vite-friendly setup with routes, controller, Blade, and JavaScript that you can copy and adapt.
This step-by-step guide will help you integrate Select2 with AJAX to search data directly from your database in real-time.
Table of Contents
What is Select2?
Select2 is a jQuery-based replacement for standard elements. It supports searching, remote data sets, infinite scrolling, and many other features. It’s a great way to make dropdowns more interactive and user-friendly.
What you’ll build
A Select2 field that queries the database as the user types and shows paginated results, returning JSON in the exact format Select2 expects.
Step 1: Install Laravel 12 Project
If you haven’t created a Laravel 12 project yet, use the following command:
composer create-project laravel/laravel select2-example
Go to your project directory:
cd select2-example
Step 2: Create Database and Configure .env
Create a new database and update your .env file with correct credentials:
DB_DATABASE=select2_db
DB_USERNAME=root
DB_PASSWORD=
Then, migrate the default tables:
php artisan migrate
Read Also : Laravel 12 Bootstrap Multiselect Dropdown with Checkbox Example
Step 3: Add Dummy Data
To quickly populate your database with sample data, you can use Laravel’s built-in seeder feature. Navigate to the database/seeders directory and open the DatabaseSeeder.php file.
<?php

namespace Database\Seeders;

use App\Models\User;
// use Illuminate\Database\Console\Seeds\WithoutModelEvents;
use Illuminate\Database\Seeder;

class DatabaseSeeder extends Seeder
{
    /**
     * Seed the application's database.
     */
    public function run(): void
    {
       // User::factory(10)->create();

        User::factory()->create([
            'name' => 'Test User',
            'email' => 'test@example.com',
        ]);
    }
}
Locate and uncomment the following line:
User::factory(10)->create();
This will generate 10 dummy user records using Laravel’s model factory. You can increase the number of records (e.g., 20, 50, or more) as needed. Finally, run the command below to execute the seeder:
php artisan db:seed
This command will insert the dummy data into your users table, providing sample records for testing and demonstration purposes.
Step 4: Create Controller
Now, Run the command given below to create a UserController:
php artisan make:controller UserController
Now, open app/Http/Controllers/UserController.php and add:
<?php

namespace App\Http\Controllers;

use Illuminate\Http\Request;
use App\Models\User;

class UserController extends Controller
{
    /**
     * Display form.
     *
     * @return \Illuminate\Http\Response
     */
    public function index()
    {
        return view('form');
    }

    /**
     * Display a users via search term.
     *
     * @return \Illuminate\Http\Response
     */
    public function search(Request $request)
    {
        $users = [];
        $query = $request->get('query');

        if($query){
            $users = User::select("name", "id")
                        ->where('name', 'LIKE', '%'. $query. '%')
                        ->take(10)
                        ->get();
        }

        return response()->json($users);
    }

     /**
     * Get form data.
     *
     * @return \Illuminate\Http\Response
     */
    public function store(Request $request)
    {
        dd($request->all());

    }
}
Step 5: Define Routes
Now, Open routes/web.php and add:
<?php

use Illuminate\Support\Facades\Route;

use App\Http\Controllers\UserController;

Route::get('user-search', [UserController::class, 'index']);
Route::get('search-autocomplete', [UserController::class, 'search'])->name('search');
Route::post('save-form', [UserController::class, 'store'])->name('store');
Read Also : Laravel 12 SweetAlert2 Delete Confirmation Example
Step 6: Create Blade View
Create a new file resources/views/form.blade.php and add the following code:
<!DOCTYPE html>
<html>
<head>
    <title>Laravel 12 Select2 Ajax Autocomplete Search Example - ItStuffSolutiotions.io</title>
     <link href="https://cdn.jsdelivr.net/npm/bootstrap@5.3.8/dist/css/bootstrap.min.css" rel="stylesheet">
      <link href="https://cdn.jsdelivr.net/npm/select2@4.1.0-rc.0/dist/css/select2.min.css" rel="stylesheet" />
    <style>
        .select2-container .select2-selection--single {
            height: 45px !important; /* custom height */
            display: flex;
            align-items: center; /* vertically center text */
                }
    </style>
</head>
<body>

<div class="container">
    <div class="card mt-5">
        <h3 class="card-header p-3">Laravel 12 Select2 Ajax Autocomplete Search Example - ItStuffSolutiotions.io</h3>
        <div class="card-body">

            <form action="{{route('store')}}" method="POST" enctype="multipart/form-data" class="mt-2">
                @csrf
                <div class="mb-3">
                     <label for="user-search" class="form-label">Select User:</label>
                    <select class="form-control" id="search" style="width:50%;" name="user_id" ></select>
                </div>

                <div class="mb-3">
                    <button class="btn btn-success"  type="submit">Submit</button>
                </div>


            </form>
        </div>
    </div>

</div>
  <script src="https://cdnjs.cloudflare.com/ajax/libs/jquery/3.6.0/jquery.min.js"></script>
  <script src="https://cdn.jsdelivr.net/npm/bootstrap@5.3.8/dist/js/bootstrap.bundle.min.js"></script>
 <script src="https://cdn.jsdelivr.net/npm/select2@4.1.0-rc.0/dist/js/select2.min.js"></script>

<script type="text/javascript">

    $('#search').select2({
        placeholder: 'Search for a user...',
        minimumInputLength: 1 ,// only start searching when the user has input 1 or more characters
        maximumInputLength: 20, // only allow terms up to 20 characters long
        ajax: {
          url: "{{ route('search') }}",
          dataType: 'json',
          delay: 250,
          data: function (params) {
                    return { query: params.term };
                },
          processResults: function (data) {
            return {
              results:  $.map(data, function (item) {
                    return {
                        text: item.name,
                        id: item.id
                    }
                })
            };
          },
          cache: true
        }
      });

</script>

</body>
</html>
The following line is important for implementing the Select2 AJAX autocomplete search feature in Laravel 12. The id=”search” is used by the Select2 JavaScript function to fetch and display user data dynamically through AJAX:
<select class="form-control" id="search" style="width:50%;" name="user_id"></select>
Here, the style=”width:50%;” attribute is used to customize the width of the Select2 dropdown. You can easily adjust the width value according to your layout — for example, use width:100%; for full width or width:30%; for a smaller dropdown.
To customize the height and alignment of the Select2 dropdown, you can add the following CSS inside your <head> tag:
  <style>
        .select2-container .select2-selection--single {
            height: 45px !important; /* custom height */
            display: flex;
            align-items: center; /* vertically center text */
                }
    </style>
You can modify the height or styling as per your design requirements to achieve a clean and consistent look across your form fields.
Understanding minimumInputLength and maximumInputLength in Select2
The minimumInputLength and maximumInputLength options in Select2 are used to control how much a user must type before the AJAX request is triggered and how long their search term can be.
You can easily change both values according to your project’s requirements to balance performance and user experience.
Understanding AJAX Delay in Select2
The delay: 250, option controls how long Select2 waits after the user stops typing before sending an AJAX request.
Why delay: 250 is important:
- Reduces server load: Without a delay, an AJAX request would be sent for every keystroke, which can overload the server if many users are typing simultaneously.
- Improves performance: Waiting 250 milliseconds ensures that requests are only sent when the user pauses typing, which makes the search smoother.
- Enhances user experience: Users won’t see flickering results or unnecessary dropdown updates while typing quickly.
Understanding cache: true in Select2 AJAX
The cache option determines whether previous AJAX responses are stored locally to avoid repeated requests for the same search term.
Why cache: true is useful:
- Reduces repeated requests: If the user types the same search term multiple times, Select2 retrieves results from the cache instead of making a new AJAX call.
- Improves performance: Caching reduces server load and speeds up the response for repeated searches.
Using cache: true along with delay, minimumInputLength, and maximumInputLength makes your Select2 AJAX autocomplete fast, responsive, and efficient for any Laravel Blade form.
Understanding processResults in Select2 AJAX
the processResults function is used to format the data returned from the server so that Select2 can display it correctly in the dropdown. You can map any server fields to text and id, depending on your database structure.
Step 7: Run the Application
Start the Laravel development server:
php artisan serve
Now open your browser and visit:
http://127.0.0.1:8000/products
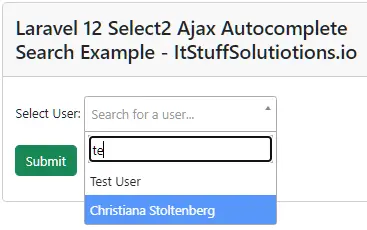
Start typing in the Select2 search box — you’ll see product suggestions loaded dynamically from your database using AJAX.
Conclusion
In this tutorial, you learned how to integrate Select2 AJAX Autocomplete Search in Laravel 12. We used the Select2 plugin to dynamically fetch and display users names from the database via AJAX without reloading the page.
This approach can be applied to any Laravel model — such as products, categories, or tags — and is especially useful for forms with large datasets.
