
In this laravel tutorial titled “Laravel 12 REST API Authentication Using Sanctum with Password Reset” , you will learn how to implement User Registration, Login, Logout, and Password Reset APIs using Laravel 12 Sanctum.
Laravel Sanctum is a featherweight authentication package that offers a simple way to authenticate SPAs, mobile applications, and basic token-based APIs. It allows each user to generate multiple API tokens with specific abilities or scopes, providing fine-grained access control for your application.
Table of Contents
What is Laravel Sanctum?
Laravel Sanctum provides a simple token-based authentication system for APIs.
Key Features:
- Simple token-based authentication
- Support for multiple tokens per user
- Token abilities and scopes
- Secure password reset functionality
- Easy integration with Laravel’s built-in authentication
Step 1: Install Laravel 12
composer create-project laravel/laravel api-app
Configure your database connection in the .env file:
DB_CONNECTION=mysql
DB_HOST=127.0.0.1
DB_PORT=3306
DB_DATABASE=laravel_sanctum_auth
DB_USERNAME=root
DB_PASSWORD=your_password
Step 2: Install and Configure Laravel Sanctum
In Laravel 12, installing Sanctum is straightforward with the install:api command:
php artisan install:api
This command automatically:
- Installs Laravel Sanctum package
- Creates the api.php routes file
- Publishes Sanctum configuration
- Creates the personal_access_tokens migration table
Run the migrations to create necessary database tables:
php artisan migrate
Step 3: Configure User Model
Update your User model to use the HasApiTokens trait from Sanctum. To make a model capable of issuing and managing these tokens, Sanctum requires you to use this trait:
app/Models/User.php:
<?php

namespace App\Models;

// use Illuminate\Contracts\Auth\MustVerifyEmail;
use Illuminate\Database\Eloquent\Factories\HasFactory;
use Illuminate\Foundation\Auth\User as Authenticatable;
use Illuminate\Notifications\Notifiable;
use Laravel\Sanctum\HasApiTokens;

class User extends Authenticatable
{
    /** @use HasFactory<\Database\Factories\UserFactory> */
    use HasFactory, Notifiable,HasApiTokens;

    /**
     * The attributes that are mass assignable.
     *
     * @var list<string>
     */
    protected $fillable = [
        'name',
        'email',
        'password',
    ];

    /**
     * The attributes that should be hidden for serialization.
     *
     * @var list<string>
     */
    protected $hidden = [
        'password',
        'remember_token',
    ];

    /**
     * Get the attributes that should be cast.
     *
     * @return array<string, string>
     */
    protected function casts(): array
    {
        return [
            'email_verified_at' => 'datetime',
            'password' => 'hashed',
        ];
    }
}
HasApiTokens adds helper methods like:
- createToken()
- tokens()
- currentAccessToken()
- withAccessToken()
HasApiTokens is mandatory in your user model when using Laravel Sanctum because it provides all token-related features—generation, storage, validation, and permissions.
Step 4: Create Authentication Controller
Generate the authentication controller:
php artisan make:controller API/AuthController
app/Http/Controllers/API/AuthController.php:
<?php

namespace App\Http\Controllers\API;

use App\Http\Controllers\Controller;
use Illuminate\Http\Request;
use App\Models\User;
use Illuminate\Support\Facades\Auth;
use Validator;
use Illuminate\Http\JsonResponse;
use Illuminate\Database\QueryException;

class AuthController extends Controller
{
    /**
     * Register api
     *
     * @return \Illuminate\Http\Response
     */
    public function register(Request $request): JsonResponse
    {
        $validator = Validator::make($request->all(), [
            'name' => 'required',
            'email' => 'required|email',
            'password' => 'required|string|min:8|confirmed',
        ]);

        if($validator->fails()){
            return response()->json([
            'status' => false,
            'message' => 'Validation Error',
            'errors' => $validator->errors()
        ], 422);
        }

        try{

        $data = $request->all();
        $data['password'] = bcrypt($data['password']);
        $user = User::create($data);

        $result['token'] =  $user->createToken('MyApp')->plainTextToken;
        $result['name'] =  $user->name;

        return response()->json([
        'status' => true,
        'message' => 'User registered successfully.',
        'data' => $result
        ], 200);


        } catch (QueryException  $e) {
              return response()->json([
                'status' => false,
                'message' => $e->getMessage(),
            ],500);
        }
    }

    /**
     * Login api
     *
     * @return \Illuminate\Http\Response
     */
    public function login(Request $request): JsonResponse
    {
        if(Auth::attempt(['email' => $request->email, 'password' => $request->password])){
            $user = Auth::user();
            $result['token'] =  $user->createToken('MyApp')->plainTextToken;
            $result['name'] =  $user->name;

             return response()->json([
                'status' => true,
                'message' => 'User login successfully.',
                'data' => $result
            ], 200);

        }
        else{
             return response()->json(['result'=>'Unauthorised.'], ['error'=>'Unauthorised']);
        }
    }


      /**
     * User Profile API
     */
    public function profile(Request $request): JsonResponse
    {
         return response()->json([
                'status' => true,
                'message' => 'User data fetched successfully.',
                'data' => $request->user()
            ], 200);


    }

    /**
     * Logout API
     */
    public function logout(Request $request): JsonResponse
    {
        $request->user()->currentAccessToken()->delete();

         return response()->json([
                'status' => true,
                'message' => 'User logged out successfully.',
            ], 200);

    }
}
register() – User Registration API
This method validates the incoming request (name, email, password, password_confirmation ).
If valid, it creates a new user, encrypts the password, and generates a Sanctum API token using createToken() helper method. Returns a success response with the user’s token and name.
login() – User Login API
This method checks the user credentials using Auth::attempt(). If login succeeds, it generates a new API token for the user and returns user name and token. If login fails, it returns an “Unauthorized” error.
profile() – Get Authenticated User Data
This method returns the details of the currently authenticated user. It only works when the request has a valid Sanctum token (protected route).
logout() – Logout API
This method deletes the user’s current API token, effectively logging them out. After deleting the token, it returns a logout success message.
Read Also : Laravel 12 CORS Middleware Configuration Example
Step 5: Create Password Reset Controller
Laravel provides this feature using Password::sendResetLink(). Generate a password reset controller:
php artisan make:controller API/PasswordResetController
app/Http/Controllers/API/PasswordResetController.php:
<?php

namespace App\Http\Controllers\API;

use App\Http\Controllers\Controller;
use Illuminate\Http\Request;
use App\Models\User;
use Illuminate\Support\Facades\Auth;
use Illuminate\Support\Facades\Password;
use Validator;
use Illuminate\Http\JsonResponse;
use Illuminate\Auth\Events\PasswordReset;
use Illuminate\Support\Str;

class PasswordResetController extends Controller
{

     /**
     * Send password reset link
     */
    public function forgotPassword(Request $request): JsonResponse
    {
        $validator = Validator::make($request->all(), [
            'email' => 'required|email|exists:users,email',
        ]);

        if($validator->fails()){
                return response()->json([
                'status' => false,
                'message' => 'Validation Error',
                'errors' => $validator->errors()
            ], 422);
        }

         $status = Password::sendResetLink(
            $request->only('email')
        );

         if($status === Password::RESET_LINK_SENT){
              $response = [
                'success' => true,
                'message' => 'Password reset link sent to your email.',
            ];

        return response()->json($response, 200);
        }

         $response = [
            'success' => false,
            'message' => 'Unable to send reset link.',
        ];


        return response()->json($response, 500);

    }


        /**
     * Reset password
     */
    public function resetPassword(Request $request): JsonResponse
    {
        $validator = Validator::make($request->all(), [
            'token' => 'required',
            'email' => 'required|email|exists:users,email',
            'password' => 'required|string|min:8|confirmed',
        ]);

        if($validator->fails()){

           if($validator->fails()){
                return response()->json([
                'status' => false,
                'message' => 'Validation Error',
                'errors' => $validator->errors()
            ], 422);
             }
        }
        $status = Password::reset(
            $request->only('email', 'password', 'password_confirmation', 'token'),
            function ($user, $password) {
                $user->forceFill([
                    'password' => bcrypt($password)
                ])->save();

            }
        );

        if($status === Password::PASSWORD_RESET){
            $response = [
                'success' => true,
                'message' => 'Password reset successfully.'
            ];
            return response()->json( $response,200);
        }

        $response = [
                'success' => false,
                'message' => 'Invalid token or email.'
            ];
            return response()->json( $response,400);


    }
}
Here Explanation of the methods:
forgotPassword() – Send Password Reset Link
- Validates that the provided email exists in the users table.
- Uses Password::sendResetLink() to send a password reset email.
- If the email is successfully sent, it returns a success message.
- If sending fails, it returns an error response.
resetPassword() – Set a New Password
- Validates the incoming token, email, and new password.
- Uses Password::reset() to verify the token and update the user’s password.
- If the token is valid, the password is updated and a success message is returned.
- If the token or email is invalid, it returns an error response.
Step 6: Configure API Routes
Define API routes in the routes/api.php file.
routes/api.php:
<?php

use Illuminate\Http\Request;
use Illuminate\Support\Facades\Route;
use App\Http\Controllers\API\AuthController;
use App\Http\Controllers\API\PasswordResetController;

// Public routes
Route::post('register', [AuthController::class, 'register']);
Route::post('login', [AuthController::class, 'login']);
Route::post('forgot-password', [PasswordResetController::class, 'forgotPassword']);
Route::post('reset-password', [PasswordResetController::class, 'resetPassword'])->name('password.reset');

// Protected routes
Route::middleware('auth:sanctum')->group(function () {
    Route::get('profile', [AuthController::class, 'profile']);
    Route::post('logout', [AuthController::class, 'logout']);
});
When using Laravel’s built-in password reset functionality, the framework expects the password reset route to be named password.reset by default. If this route is missing, you will receive the error: “Route [password.reset] not defined.”
To avoid this issue, make sure your route is defined with the correct name, like so:
Route::post('reset-password', [PasswordResetController::class, 'resetPassword'])->name('password.reset');
Read Also : How to Send Mail in Laravel 12 Using Gmail SMTP Step-by-Step Tutorial
Step 7: Configure Email Settings
For password reset functionality, configure email settings in your .env file:
MAIL_MAILER=smtp
MAIL_SCHEME=null
MAIL_HOST=smtp.gmail.com
MAIL_PORT=587
MAIL_USERNAME=itstuffsolutions@gmail.com
MAIL_PASSWORD=chxuxkirrhkcsbus
MAIL_FROM_ADDRESS="itstuffsolutions@gmail.com"
MAIL_FROM_NAME=itstuffsolutions
Step 8: Test API with Postman
Start your Laravel development server:
php artisan serve
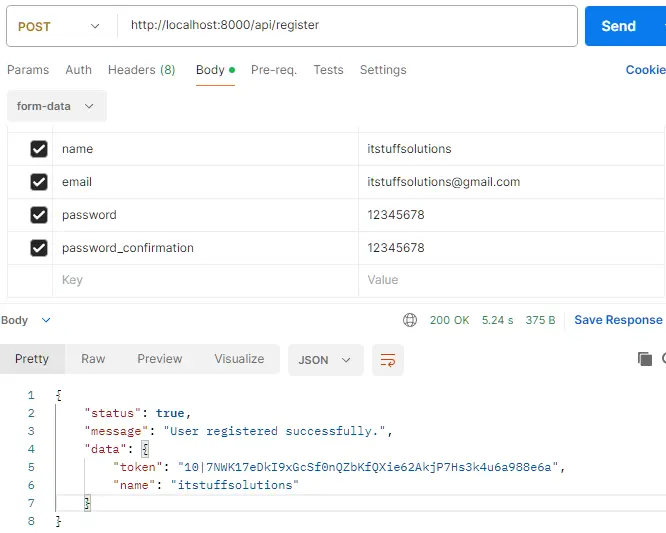
Test User Registration API
Endpoint: POST http://localhost:8000/api/register
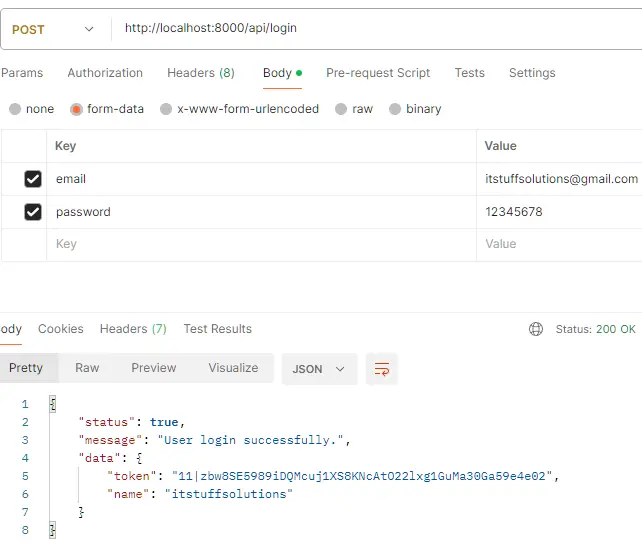
Test User Login API
Endpoint: POST http://localhost:8000/api/login
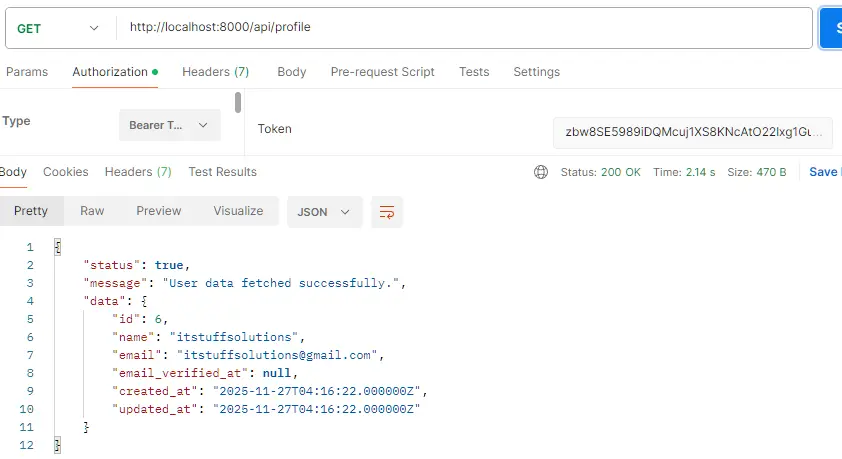
Test User Profile (Protected Route)
Endpoint: GET http://localhost:8000/api/profile
Headers:
Authorization: Bearer {your_token_here}
Accept: application/json
Test Forgot Password API
Endpoint: POST http://localhost:8000/api/forgot-password
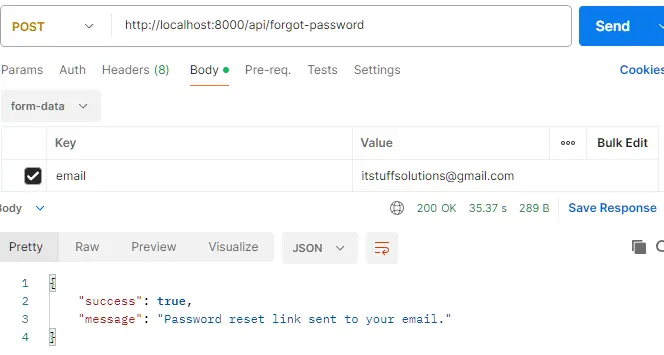
As you can see in the Forgot Password API response, the reset password link was generated successfully. The link sent to the user looks like this:
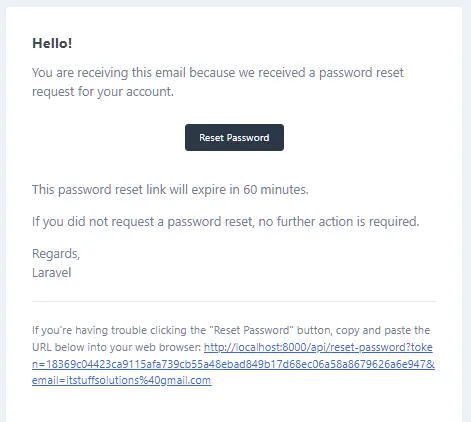
When the user clicks this link, they are redirected to your frontend’s password reset page.
The frontend extracts the token and email from the URL query parameters. These values are required to verify the request and allow the user to create a new password.
Once the user enters their new password, the frontend will call your Reset Password API, passing the token, email, and new password to complete the process.
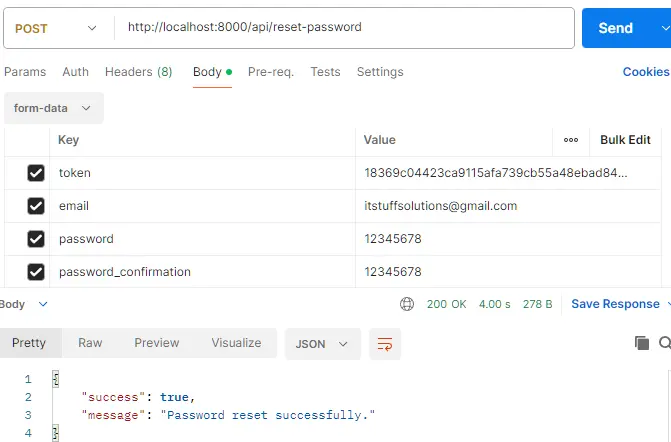
Now let’s proceed with testing the Reset Password API.
Test Reset Password API
Endpoint: POST http://localhost:8000/api/reset-password
Test Logout API (Protected Route)
Endpoint: POST http://localhost:8000/api/logout
Headers:
Authorization: Bearer {your_token_here}
Accept: application/json
The Logout API is similar to the Login API, with the main difference being that it uses the POST request method.
Token Abilities and Scopes
Sanctum supports token abilities (scopes) for fine-grained access control:
// Create token with specific abilities
$token = $user->createToken('MyAppToken', ['posts:create', 'posts:read'])->plainTextToken;

// Check token abilities in routes
Route::middleware(['auth:sanctum', 'ability:posts:create'])->group(function () {
    Route::post('posts', [PostController::class, 'store']);
});

// Check abilities in controller
if ($request->user()->tokenCan('posts:create')) {
    // User has permission to create posts
}
Error Handling Best Practices
Implement proper error handling for robust APIs.
Common HTTP Status Codes:
- 200 – Success
- 201 – Resource created
- 401 – Unauthorized
- 422 – Validation error
- 404 – Not found
- 500 – Server error
Security Best Practices
- Always use HTTPS in production to protect tokens during transmission
- Set token expiration for enhanced security
- Revoke tokens on logout to prevent unauthorized access
- Use strong password validation rules
- Implement rate limiting on authentication endpoints
- Sanitize user input to prevent SQL injection and XSS attacks
Common Issues and Solutions
Token working after logout
Ensure you’re deleting the current access token using currentAccessToken()->delete().
Password Reset Email Not Sending
Configure email settings properly and check your mail server credentials.
GitHub Repository: https://github.com/itstuffsolutions/laravel-12-rest-api-authentication-using-sanctum-with-password-reset
Conclusion
In this tutorial, we explored how to build a complete Laravel 12 REST API Authentication System using Sanctum, including User Registration, Login, Logout, Profile, and a fully functional Password Reset workflow.
Laravel Sanctum provides a simple yet powerful token-based authentication mechanism that works seamlessly with mobile apps, SPAs, and standard APIs. By using features like HasApiTokens, secure token generation, token abilities, and Laravel’s built-in password reset services, you can build scalable and secure authentication for any modern application.
We also configured email settings, handled common validation errors, and tested all the essential endpoints using Postman, ensuring the entire process—from creating a user to resetting the password—works smoothly.
With this setup, you now have:
- A secure and production-ready authentication system
- Token-based API protection using Sanctum
- Password reset via email, including token verification
- Complete error handling and validation
- A clean, scalable API structure
This foundation can be extended further with role-based access control, token scopes, user verification, social login, and more advanced security features.
