
In this laravel 12 tutorial, you will learn in laravel 12 Validate Forms on Client Side with jQuery Step by Step with example.
Form validation is a crucial part of any web application. It helps ensure that users submit correct and complete data before it is sent to the server. While Laravel provides powerful server-side validation, adding client-side validation improves user experience by giving instant feedback without reloading the page.
In this tutorial, you will learn how to validate forms on the client side using jQuery in Laravel 12, step by step with a simple and practical example.
Table of Contents
Why Client-Side Validation?
Client-side validation offers several benefits:
- Faster feedback for users
- Reduces unnecessary server requests
- Improves overall user experience
- Works together with Laravel server-side validation
Important Note: While client-side validation improves the user experience, you must always implement server-side validation as well. Client-side validation can be bypassed in modern browsers, so never rely on it alone to protect your application.
Step 1: Set Up Your Laravel 12 Project
Start by creating a new Laravel 12 project or use an existing one:
composer create-project laravel/laravel laravel-client-validation
cd laravel-client-validation
Ensure you have a basic Laravel installation with a controller and routes configured.
Step 2: Create Route
Open routes/web.php and add the following route:
<?php

use Illuminate\Support\Facades\Route;
use App\Http\Controllers\RegisterController;

Route::get('/', [RegisterController::class,'index']);
Route::post('/register', [RegisterController::class,'store'])->name('register');
Read Also : Laravel 12 Custom Validation Error Messages Example
Step 3: Create Blade View
Create a new Blade file at resources/views/register.blade.php
Add the following code:
<!DOCTYPE html>
<html>
<head>
    <title>Laravel 12 Validate Forms Client Side with jQuery Step by Step</title>
    <meta name="csrf-token" content="{{ csrf_token() }}">

    <!-- Bootstrap CSS -->
    <link href="https://cdn.jsdelivr.net/npm/bootstrap@5.3.2/dist/css/bootstrap.min.css" rel="stylesheet">

    <!-- jQuery -->
    <script src="https://code.jquery.com/jquery-3.7.1.min.js"></script>

    <!-- Include jQuery Validation Plugin -->
    <script src="https://cdn.jsdelivr.net/npm/jquery-validation@1.19.5/dist/jquery.validate.min.js"></script>

</head>
<body>

<div class="container mt-5">
    <h3>Laravel 12 Validate Forms Client Side with jQuery Step by Step</h3>

    @session('success')
      <div class="alert alert-success alert-dismissible fade show">
          <strong>Success!</strong> {{ $value }}
        <button type="button" class="btn-close" data-bs-dismiss="alert" aria-label="Close"></button>

      </div>
     @endsession

    <form id="registrationForm" method="POST" action="{{route('register')}}">
    @csrf

    <div class="form-group mb-3">
        <label for="name">Full Name</label>
        <input type="text" class="form-control @error('name') is-invalid @enderror"
               id="name" name="name" value="{{ old('name') }}" placeholder="Enter your full name">
        @error('name')
            <div class="invalid-feedback">{{ $message }}</div>
        @enderror
    </div>

    <div class="form-group mb-3">
        <label for="email">Email Address</label>
        <input type="email" class="form-control @error('email') is-invalid @enderror"
               id="email" name="email" value="{{ old('email') }}" placeholder="Enter your email">
        @error('email')
            <div class="invalid-feedback">{{ $message }}</div>
        @enderror
    </div>

    <div class="form-group mb-3">
        <label for="password">Password</label>
        <input type="password" name="password" class="form-control @error('password') is-invalid @enderror" id="password" placeholder="Enter your password">
        @error('password')
            <div class="invalid-feedback">{{ $message }}</div>
        @enderror
        <span class="text-danger error-password"></span>
    </div>

    <div class="form-group mb-3">
        <label for="Confirm Password">Confirm Password</label>
        <input type="password" name="password_confirmation" class="form-control @error('password_confirmation') is-invalid @enderror" id="password_confirmation" placeholder="Enter confirm password">
        @error('password_confirmation')
            <div class="invalid-feedback">{{ $message }}</div>
        @enderror
        <span class="text-danger error-password"></span>
    </div>


    <!-- Repeat similar structure for other fields -->

    <button type="submit" class="btn btn-primary">Register</button>
</form>

</div>

<script type="text/javascript">
    $(document).ready(function(){
        $("#registrationForm").validate({
                rules: {
                    name: {
                        required: true,
                        minlength: 3,
                        maxlength: 50
                    },
                    email: {
                        required: true,
                        email: true,
                        maxlength: 50
                    },
                    password: {
                        required: true,
                        minlength: 8
                    },
                    password_confirmation: {
                        required: true,
                        equalTo: "#password"
                    },
                },
                messages: {
                    name: {
                        required: "Please enter your full name",
                        minlength: "Your name must be at least 3 characters long",
                        maxlength: "Your name cannot exceed 50 characters"
                    },
                    email: {
                        required: "Please enter your email address",
                        email: "Please enter a valid email address",
                        maxlength: "Email field cannot exceed 50 characters",
                    },
                    password: {
                       required: "Please enter a password",
                       minlength: "Password must be at least 8 characters long"
                    },
                    password_confirmation: {
                        required: "Please confirm your password",
                        equalTo: "Passwords do not match"
                    }
                },
                errorClass: "is-invalid",
                validClass: "is-valid",
                errorElement: "div",
                errorPlacement: function(error, element) {
                    error.addClass("invalid-feedback");
                    element.closest(".form-group").append(error);
                }
            });
    });
</script>
</body>
</html>
In this example, the jQuery Validation CDN (jquery.validate.min.js) is used to handle client-side form validation, while the Bootstrap CDN is used to design a responsive and user-friendly UI.
In this form, we have used the ID registrationForm, which is referenced by jQuery for form validation. If you change the form ID, make sure to update the same ID in the jQuery validation script as well.
In Jquery Script element.closest(“.form-group”).append(error); is used to place validation error messages within the .form-group wrapper. Ensure that each form field is wrapped with the .form-group class; otherwise, validation errors will not be visible.
The @error directive is used to display server-side validation error messages for form fields, while @session(‘success’) is used to show a success message after successful user registration.
Read Also : Laravel 12 Conditional Validation required_if,nullable And More
Step 4: Create Register Controller
Create a controller to handle form submission with server-side validation:
<?php

namespace App\Http\Controllers;

use Illuminate\Http\Request;
use App\Models\User;

class RegisterController extends Controller
{
    public function index(){
        return view('register');
    }

    public function store(Request $request){
            $request->validate([
                'name' => 'required|min:3|max:50',
                'password' => 'required|min:8',
                'email' => 'required|email|unique:users|max:50'
            ]);


        $data = $request->all();
        $data['password'] = bcrypt($request['password']);
        $user = User::create($data);

        return back()->withSuccess('User Register successfully.');

    }
}
This controller displays the registration form and handles form submission. It validates user input on the server, encrypts the password using bcrypt(), creates a new user record, and returns a success message after successful registration.
Step 5: Run The Application
Now that the form and client-side validation using jQuery are ready, it’s time to run the Laravel 12 application and test the validation in the browser.
Start the Laravel development server by running the following command in your project directory:
php artisan serve
Once the server starts, you will see an output url similar to this:
http://127.0.0.1:8000
Open your web browser and visit the following URL: http://127.0.0.1:8000
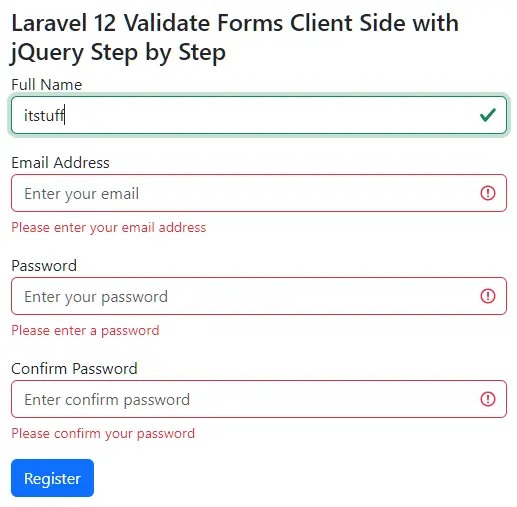
Now try the following to verify client-side validation:
- Submit the form with empty fields to see required field errors
- Enter an invalid email format to test email validation
- Enter a password shorter than 8 characters to check length validation
- Fill all fields correctly and submit the form
You will notice that validation errors appear instantly without page reload, confirming that client-side validation using jQuery is working correctly in Laravel 12.
Conclusion
In this Laravel 12 tutorial, you learned how to validate forms on the client side using jQuery step by step. Client-side validation enhances user experience by providing instant feedback, while Laravel’s server-side validation ensures data security and integrity.
By combining jQuery client-side validation with Laravel 12 server-side validation, you can build fast, user-friendly, and secure web applications.
