In this Laravel tutorial titled “laravel 12 import large csv file using queue step-by-step guide”, you’ll learn how to efficiently import large CSV files using batch processing and queues with a complete, practical example.
Laravel 12 applications frequently encounter challenges when importing massive CSV files containing tens of thousands of records. Standard synchronous processing leads to timeouts, memory exhaustion, and poor user experience. This step-by-step guide demonstrates production-ready CSV import using Laravel 12‘s enhanced queue system, batch processing, and memory optimization techniques.
Table of Contents
Why Queue-Based CSV Import is Essential
Processing large CSV files synchronously creates three critical problems:
- HTTP Timeouts: Web requests fail after 30-60 seconds
- Memory Limits: PHP crashes when loading 50,000+ rows into memory
- Database Bottlenecks: Individual INSERT queries overwhelm MySQL
Queued processing solves these issues by offloading work to background workers, processing data in chunks, and batching database operations. A 100,000-row CSV file that fails synchronously completes in under 2 minutes using queues.
Step 1: Install Laravel Project
In this step, we will create a new, fresh Laravel project. If you already have a Laravel 12 application set up, you can safely skip this step and move on to the next one.
composer create-project laravel/laravel import-csv-demo
cd import-csv-demo
Step 2: Configure Database and Queue
Next, configure the Laravel 12 queue system using the database driver. Open the .env file and update the database and queue settings as shown below.
QUEUE_CONNECTION=database
Configure Database Credentials
DB_CONNECTION=mysql
DB_HOST=127.0.0.1
DB_PORT=3306
DB_DATABASE=laravel
DB_USERNAME=root
DB_PASSWORD=
After updating the configuration, run the following command to create the required database tables:
php artisan migrate
Read Also : How to Import Large Excel and CSV Files in Laravel 12 Complete Guide
Step 3: Create Queue Job for CSV Processing
In this step, we will create a queue job responsible for processing and importing the CSV file data. Run the following Artisan command to generate a new job class.
php artisan make:job ProcessCSVChunk
Open the file app/Jobs/ProcessCSVChunk.php and update it with the following code:
<?php

namespace App\Jobs;

use App\Models\Product;
use Illuminate\Bus\Batchable;
use Illuminate\Bus\Queueable;
use Illuminate\Contracts\Queue\ShouldQueue;
use Illuminate\Foundation\Bus\Dispatchable;
use Illuminate\Queue\InteractsWithQueue;
use Illuminate\Queue\SerializesModels;
use Illuminate\Support\Facades\DB;

class ProcessCSVChunk implements ShouldQueue
{
    use Batchable, Dispatchable, InteractsWithQueue, Queueable, SerializesModels;

    protected $chunkData;

    public function __construct(array $chunkData)
    {
        $this->chunkData = $chunkData;
    }

    public function handle()
    {
        // Disable query logging for performance
        DB::disableQueryLog();

        $users = collect($this->chunkData)->map(function ($row) {

           return[
                'name' => $row[0],
                'password' =>$row['password'],
                'email'=>$row[1],
                'created_at'=>$row['date'],
                'updated_at'=>$row['date'],
                ];
        })->toArray();

        // Batch insert for maximum performance
        DB::table('users')->insert($users);
    }
}

Explanation
- Imports
- Uses queue, database, and batch processing features.
- Class ProcessCSVChunk
- Implements ShouldQueue, so it runs asynchronously in the queue.
- Property $chunkData
- Stores a chunk of CSV rows passed to the job.
- Constructor
- Receives CSV chunk data as an array.
- Saves it for later processing.
- handle() Method
- Main logic executed when the job runs.
- Disable Query Log
- DB::disableQueryLog() improves performance for large inserts.
- Data Transformation
- Converts CSV rows into an array matching the
userstable structure:- name from $row[0]
- email from $row[1]
- password from $row[‘password’]
- created_at and updated_at from $row[‘date’]
- Converts CSV rows into an array matching the
- Batch Insert
- Inserts all users at once using DB::table(‘users’)->insert($users).
- Faster than inserting records one by one.
Purpose
- Efficiently process large CSV files by splitting them into chunks.
- Uses Laravel queues to reduce memory usage and improve speed.
Read Also : Laravel 12 How to Import Large CSV Files 10x Faster
Step 4: Create Import Form
In this step, we will build a simple form that allows users to upload a CSV file for import and view the imported records.
Now, create the Blade template resources/views/import.blade.php for the CSV import form.
<!DOCTYPE html>
<html>
<head>
    <title>How to Import Large Excel and CSV Files in Laravel 12 Complete Guide</title>
    <link href="https://cdn.jsdelivr.net/npm/bootstrap@5.3.8/dist/css/bootstrap.min.css" rel="stylesheet">
</head>
<body>
    <div class="container mt-5">
        <div class="card">
            <h5 class="card-header">How to Import Large Excel and CSV Files in Laravel 12 Complete Guide - ItStuffSolutiotions</h5>
            <div class="card-body">
                 <!-- Success/Error Messages -->
            @if(session('success'))
                <div class="alert alert-success">{{ session('success') }}</div>
            @endif
            @if(session('error'))
                <div class="alert alert-danger">{{ session('error') }}</div>
            @endif
            @if($errors->any())
                <div class="alert alert-danger">
                    <ul class="mb-0">
                        @foreach($errors->all() as $error)
                            <li>{{ $error }}</li>
                        @endforeach
                    </ul>
                </div>
            @endif

            <!-- Import Form -->
            <form action="{{ route('users.import') }}" method="POST" enctype="multipart/form-data" class="mb-4 border p-4 rounded bg-light">
                @csrf
                <div class="row align-items-end">
                    <div class="col-md-5">
                        <label class="form-label fw-bold">Select File (CSV)</label>
                        <input type="file" name="file" class="form-control" required>
                    </div>
                    <div class="col-md-3">
                        <button type="submit" class="btn btn-primary w-100">Import Users</button>
                    </div>

                </div>
            </form>
                <table class="table table-bordered data-table">
                    <thead>
                        <tr>
                            <th>#</th>
                            <th>Name</th>
                            <th>Email</th>
                            <th>Created At</th>
                            <th>Updated At</th>
                        </tr>
                    </thead>
                     @forelse($users as $user)
                    <tr>
                        <td>{{ $user->id }}</td>
                        <td>{{ $user->name }}</td>
                        <td>{{ $user->email }}</td>
                       <td>{{ $user->created_at->format('d M Y') }}</td>
                        <td>{{ $user->updated_at->format('d M Y') }}</td>
                    </tr>
                    @empty
                    <tr>
                        <td colspan="5" class="text-center">No Users Found!!</td>
                    </tr>
                    @endforelse
                </table>
                 <!-- Pagination -->
            <div class="d-flex justify-content-center">
                {{ $users->links() }}
            </div>
            </div>
        </div>
    </div>
    <script src="https://cdn.jsdelivr.net/npm/bootstrap@5.3.8/dist/js/bootstrap.bundle.min.js"></script>


</body>

</html>
Step 5: Create Import Controller
In this step, we will create a controller to handle the user import logic. Run the following Artisan command to generate the controller.
php artisan make:controller UserController
After creating the controller, open the file: app/Http/Controllers/UserController.php
<?php

namespace App\Http\Controllers;

use Illuminate\Http\Request;
use Illuminate\Support\Facades\Bus;
use Illuminate\Support\Facades\Log;
use App\Jobs\ProcessCSVChunk;
use App\Models\User;

class UserController extends Controller
{
    public function index(){

        $users = User::orderBy("id")->paginate(10);
        return view('import',compact('users'));
    }

    public function import(Request $request)
    {
        $request->validate([
            'file' => 'required|file|mimes:csv|max:51200' // 50MB max
        ]);

        $csvFile = $request->file('file');

         $filePath = addslashes(
                str_replace('\\', '/', $request->file('file')->getRealPath())
            );
        $batchJobs = [];

        // Read CSV and create chunks
        $handle = fopen($filePath, 'r');
        $header = fgetcsv($handle); // Skip header row
        $chunkSize = 1000;
        $chunkData = [];
        $password = bcrypt('password1234');
        $date = now()->format('Y-m-d H:i:s');


        while (($row = fgetcsv($handle, 1000, ',')) !== false) {

            $row['password']  = $password;
            $row['date']  = $date;
            $chunkData[] = $row;

            if (count($chunkData) === $chunkSize) {
                $batchJobs[] = new ProcessCSVChunk($chunkData);
                $chunkData = [];
            }
        }

        // Process remaining data
        if (!empty($chunkData)) {
            $batchJobs[] = new ProcessCSVChunk($chunkData);
        }

        fclose($handle);

        // Dispatch batch with callbacks
        $batch = Bus::batch($batchJobs)
            ->then(function (){
                Log::info('CSV import batch completed successfully');
            })
            ->catch(function ($batch, $e) {
                Log::error('CSV import batch failed: ' . $e->getMessage());
            })
            ->dispatch();

        session()->flash('success', 'CSV Import added on queue. will update you once done! Batch ID: ' . $batch->id);

        return redirect()->route('users.index');
    }


}
Explanation
UserController handles user listing and CSV import
- index() fetches users with pagination (10 per page)
- Validates uploaded file as CSV (max 50MB)
- Gets CSV file path for reading
- Opens CSV file and skips header row
- Reads CSV rows using fgetcsv
- Splits data into chunks of 1000 rows
- Adds default encrypted password for password field
- Adds current date & time for created_at and updated_at rows
- Creates ProcessCSVChunk jobs for each chunk
- Handles remaining rows after loop
- Dispatches jobs as a batch queue
- Logs success or failure of import
- Shows success message with batch ID and redirects back
Step 6: Create Routes
In this step, we define routes to manage the CSV import workflow. One route is used to upload the CSV file and trigger the import process, while another route is responsible for displaying the imported users after the background job starts processing.
<?php

use Illuminate\Support\Facades\Route;
use App\Http\Controllers\UserController;

Route::controller(UserController::class)->group(function(){
    Route::get('users', 'index')->name('users.index');
    Route::post('users/import', 'import')->name('users.import');

});
Step 7: Run Laravel Application
Run the following command to start the Laravel development server:
php artisan serve
Next, start queue processing in a separate terminal to handle background jobs:
php artisan queue:work
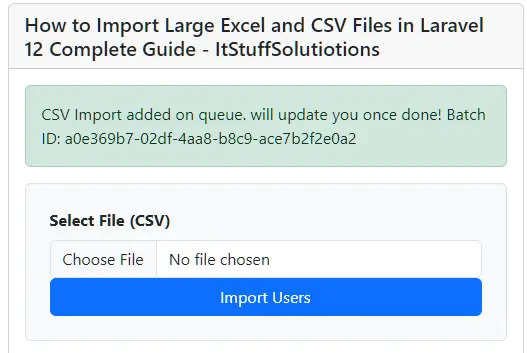
This ensures the application runs normally while queued tasks are processed continuously in the background. The image below shows the CSV import form.
How To Check When CSV Import Failed
The success or failure of the CSV import can be verified in the storage/app/laravel.log file, as implemented in the UserController.php controller.

Laravel automatically logs failed jobs to the failed_jobs table.
Check Failed Jobs:
php artisan queue:failed
It displays a list of all failed jobs.
Conclusion
In this Laravel 12 tutorial, you learned how to import large CSV files efficiently using queues and batch processing instead of traditional synchronous methods. By leveraging Laravel’s powerful queue system, you can safely handle tens or even hundreds of thousands of records without running into HTTP timeouts, memory exhaustion, or database performance issues.
We walked through the complete, real-world implementation—from setting up the queue and database configuration to creating queue jobs, chunking CSV data, dispatching batch jobs, and building a simple UI for file uploads. This approach ensures that your application remains responsive while heavy CSV processing runs smoothly in the background.
This Laravel 12 tutorial provides a complete, production-ready solution for importing massive CSV files using queues, batch processing, and memory optimization. By offloading heavy processing to background workers, developers can handle 100,000+ row imports without timeouts or crashes, transforming unreliable uploads into scalable data pipelines. Implement these techniques to boost your application’s performance and deliver superior user experiences when dealing with large datasets.
FAQ
Q1: What makes queue-based CSV import better than synchronous processing?
Queue processing eliminates HTTP timeouts, prevents memory exhaustion, and reduces database load by batching inserts. A 100,000-row file completes in under 2 minutes asynchronously versus failing synchronously.
