In this laravel tutorial, we’ll show you how to integrate Google login in a Laravel 12 application using Laravel Socialite. Social login is one of the most popular ways to improve user experience by allowing users to sign in with their existing accounts, and Google is the most widely used provider.In this tutorial, we’re using Laravel’s Bootstrap authentication scaffolding to implement OAuth login with a Gmail account. Alternatively, you can use Laravel Jetstream or Laravel Breeze, both of which support social login integration. Laravel Socialite also supports various other platforms, including Facebook, Twitter, LinkedIn, GitHub, and more — making it easy to add multiple social media login options to your application.
With Laravel Socialite, adding Google authentication becomes fast and secure. This step-by-step guide covers everything: installing Laravel Socialite, setting up Google OAuth credentials, creating routes and controllers, and handling the login callback. You’ll also learn how to automatically register users and log them in using their Google account.
By the end of this guide, you’ll have a working example of Laravel 12 Google login ready to use in your own project.
Steps For Laravel 12 Socialite Login with Google Account Example
- Step 1: Install Laravel 12
- Step 2: Install Laravel UI
- Step 3: Install Laravel Socialite
- Step 4: Configure Google OAuth Credentials
- Step 5: Add google_id Column to Users Table
- Step 6: Update User Model
- Step 7: Create Controller for Google Login
- Step 8: Create Route
- Step 9: Add Google Login Button in Blade
- Step 10: Run the Laravel Application
Step 1: Install Laravel 12
In this step, we’ll create a new Laravel project. If you’ve already installed Laravel, feel free to skip this step. Otherwise, run the command below to create a fresh Laravel application:
composer create-project laravel/laravel laravel-12-socialite-login-with-google
Go to project folder:
cd laravel-12-socialite-login-with-google
Step 2: Install Laravel UI
Before we integrate Socialite, we’ll set up basic login and registration using Laravel’s built-in Bootstrap authentication scaffolding. This will provide the UI and routes needed for standard login, which we’ll then extend with Google login.
Install the laravel UI via Composer:
composer require laravel/ui
Install the Bootstrap auth scaffolding:
php artisan ui bootstrap --auth
Install npm dependencies and build assets:
npm install && npm run dev
This will Generate login, register, and password reset routes & views ,Set up Bootstrap-based frontend UI, Prepare your app for integrating Socialite.
Note: If your application is using a frontend scaffolding package like Laravel Jetstream or Laravel Breeze, you can skip the Bootstrap UI installation steps mentioned above. These starter kits already include pre-built authentication features.
Step 3: Install Laravel Socialite
In this step we will Install the Socialite package via Composer to handle Google OAuth . This package is provide an API to authenticate with any social like google ,facebook, twitter etc :
composer require laravel/socialite
Step 4: Configure Google OAuth Credentials
To integrate Google login in Laravel using Socialite, you must first generate OAuth 2.0 credentials from the Google Cloud Console. These credentials allow your Laravel application to communicate securely with Google’s authentication servers.
Follow the steps below to create your Google app:
- Visit the Google Developer Console.
- Create a New Project (eg. Laravel Google Login)
- Go to APIs & Services > Credentials > Create Credentials > OAuth Client ID.
- Choose Web Application as the application type
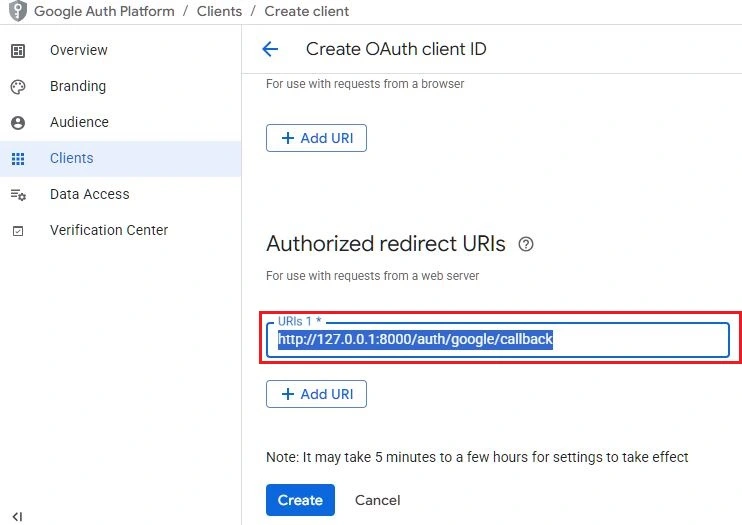
- Configure Authorized Redirect URI
- Under Authorized redirect URIs, add You application callback URI (e.g.,
http://localhost:8000/auth/google/callback) used by Laravel to handle the OAuth callback :
If you’re creating a Google OAuth app for the first time and need to set up a project, follow these steps:
visit https://console.developers.google.com/ — you’ll see a screen similar to the one shown below.

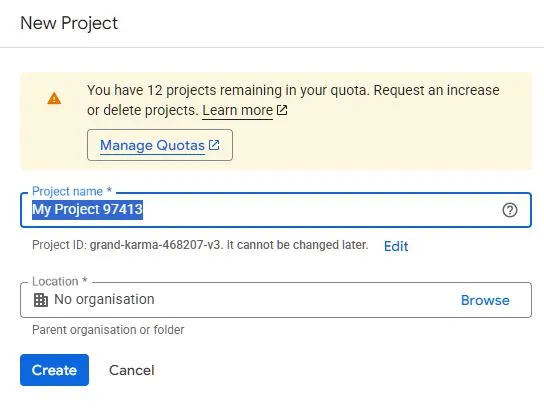
Click the “Create Project” button. You’ll see a screen similar to the one below. You can either rename the project or keep the default name, then click the “Create” button.
Now, click on “OAuth Consent Screen” from the side navigation. You’ll see the project configuration page, which includes 4 steps. Complete all the required fields. After that, go to “Credentials (https://console.cloud.google.com/apis/credentials)” in the side menu and click on “OAuth Client ID“. You’ll then see a screen similar to the one shown below.

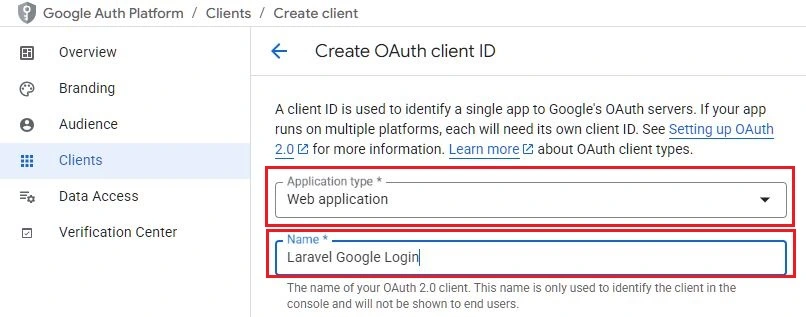
Now, select the application type as “Web Application” and enter a name for your project — for example, “Laravel Google Login” or any name you prefer. The screen will look similar to the image below.
Scroll down to the “Authorized redirect URIs” section. Here, add your callback URL — this is where Google will redirect the user after successful authorization.
Click the “Create” button to generate your Laravel Google Login app. A popup will appear showing your credentials — you can either copy them or download the file by clicking the available options.
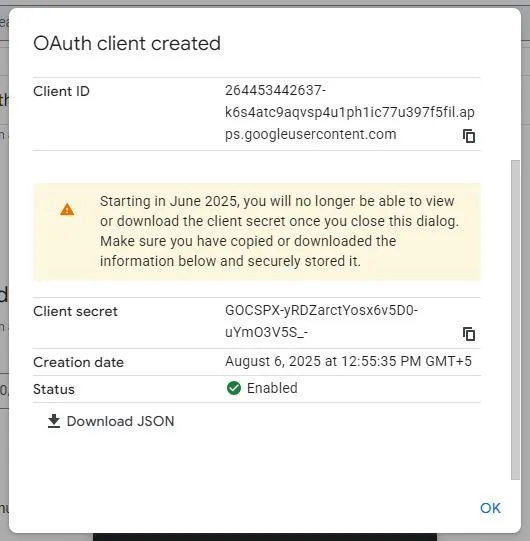
Now, copy the generated Client ID and Client Secret, then paste them into your Laravel project’s .env file under the appropriate keys. Also, make sure to add the redirect URL in the same file.
Open .env File
GOOGLE_CLIENT_ID=264453442637-k6s4atc9aqvsp4u1ph1ic77u397f5fil.apps.googleusercontent.com
GOOGLE_CLIENT_SECRET=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
GOOGLE_REDIRECT_URL=http://127.0.0.1:8000/auth/google/callback
⚠️ Make sure the redirect URI in your .env file exactly matches what you configured in Google Cloud, or the OAuth request will fail. Also, ensure there are no spaces around the = sign in your credentials.
Next, configure the Client ID, Client Secret, and Redirect URI in your Laravel project’s config/services.php file to complete the setup.
<?php

return [
..................................................................
..................................................................

    'google' => [
    'client_id' => env('GOOGLE_CLIENT_ID'),
    'client_secret' => env('GOOGLE_CLIENT_SECRET'),
    'redirect' => env('GOOGLE_REDIRECT_URL'),
             ],
];
Step 5: Add google_id Column to Users Table
In this step, we will add a google_id column to the users table to store the unique Google ID for users who authenticate via Google.
To create the migration, run the following Artisan command:
php artisan make:migration add_google_id_in_users_table
This command will generate a new migration file in the database/migrations directory. Open the newly created file and define the necessary schema changes.
Once the migration file is created Open it and add the following:
database/migrations/2025_08_08_050957_add_google_id_to_users_table.php
<?php

use Illuminate\Database\Migrations\Migration;
use Illuminate\Database\Schema\Blueprint;
use Illuminate\Support\Facades\Schema;

return new class extends Migration
{
    /**
     * Run the migrations.
     */
    public function up(): void
    {
        Schema::table('users', function (Blueprint $table) {
            $table->string('google_id')->nullable()->after('email');
        });
    }

    /**
     * Reverse the migrations.
     */
    public function down(): void
    {
        Schema::table('users', function (Blueprint $table) {
             $table->dropColumn('google_id');
        });
    }
};
After updating ,run the command given below:
php artisan migrate
Step 6: Update User Model
Open app/Models/User.php and add the google_id column in $fillable property.This way, the google_id will be properly stored in the database whenever a user logs in using their Google account.
<?php

namespace App\Models;

// use Illuminate\Contracts\Auth\MustVerifyEmail;
use Illuminate\Database\Eloquent\Factories\HasFactory;
use Illuminate\Foundation\Auth\User as Authenticatable;
use Illuminate\Notifications\Notifiable;

class User extends Authenticatable
{
    /** @use HasFactory<\Database\Factories\UserFactory> */
    use HasFactory, Notifiable;

    /**
     * The attributes that are mass assignable.
     *
     * @var list<string>
     */
    protected $fillable = [
        'name',
        'email',
        'password',
        'google_id'
    ];

    /**
     * The attributes that should be hidden for serialization.
     *
     * @var list<string>
     */
    protected $hidden = [
        'password',
        'remember_token',
    ];

    /**
     * Get the attributes that should be cast.
     *
     * @return array<string, string>
     */
    protected function casts(): array
    {
        return [
            'email_verified_at' => 'datetime',
            'password' => 'hashed',
        ];
    }
}
Step 7: Create Controller for Google Login
In this step, we’ll create a controller named GoogleAuthController.Run the following command to create new controller.
php artisan make:controller Auth/GoogleAuthController
Open App/Http/Controllers/Auth/GoogleAuthController.php controller and add the code given below :
<?php

namespace App\Http\Controllers\Auth;

use Laravel\Socialite\Facades\Socialite;
use App\Http\Controllers\Controller;
use Illuminate\Support\Facades\Auth;
use Illuminate\Http\Request;
use App\Models\User;
use Exception;

class GoogleAuthController extends Controller
{
    public function redirectToGoogle(){
        //redirect to google
     return Socialite::driver('google')->redirect();
    }

    public function loginWithGoogle(Request $request){
        try{

         $googleUser = Socialite::driver('google')->user();

          // If the user exists, update their record; otherwise, create a new one
          $user = User::updateOrCreate([
        'google_id' => $googleUser->id,
        ], [
            'name' => $googleUser->name,
            'email' => $googleUser->email,
            'password' => bcrypt('1234test'),
        ]);

         Auth::login($user);
         return redirect()->route('home');

    } catch (Exception $e) {
            dd('Error Message ', $e->getMessage());
        }
    }
}
In this controller, we will write the redirectToGoogle() method to redirect users to Google, and another method to loginWithGoogle() to callback after authentication to save the user data in the database. This method will update the user record if the user already exists, if user not exists it will create a new one .
Step 8: Create Route
In this step, we will add two new routes for Google login: one to redirect users to Google and another to handle the callback. The remaining authentication routes are already provided by Laravel Bootstrap auth scaffolding.
Open routes/web.php
<?php
use Illuminate\Support\Facades\Route;
use App\Http\Controllers\Auth\GoogleAuthController;

Route::get('/', function () {
    return view('welcome');
});

Auth::routes();

Route::get('/home', [App\Http\Controllers\HomeController::class, 'index'])->name('home');


Route::get('/auth/google', [GoogleAuthController::class,'redirectToGoogle'])->name('auth.google');

Route::get('/auth/google/callback',[GoogleAuthController::class,'loginWithGoogle']);
Read Also : Laravel 12 Authentication with Breeze Tutorial
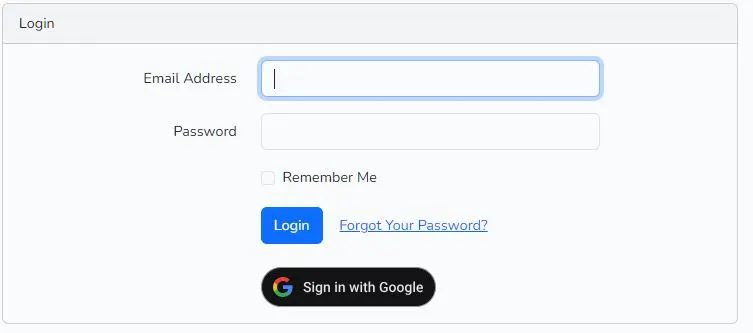
Step 9: Add Google Login Button in Blade
In this step, we will add a Google login button inside the login Blade view. You can choose any Google login button style you prefer; here, we are using a Google login image link as shown in the code. Add the following snippet to your login Blade file — it uses the auth. google route name to send the user to Google for authentication.
                        <div class="row mb-0">
                            <div class="col-md-8 offset-md-4">
                                <br/>
                                <a href="{{ route('auth.google') }}">
                                    <img src="https://developers.google.com/static/identity/images/branding_guideline_sample_dk_rd_lg.svg">
                                </a>
                            </div>
                        </div>
Open the resources/views/auth/login.blade.php file and add the Google login button inside it.
@extends('layouts.app')

@section('content')
<div class="container">
    <div class="row justify-content-center">
        <div class="col-md-8">
            <div class="card">
                <div class="card-header">{{ __('Login') }}</div>

                <div class="card-body">
                    <form method="POST" action="{{ route('login') }}">
                        @csrf

                        <div class="row mb-3">
                            <label for="email" class="col-md-4 col-form-label text-md-end">{{ __('Email Address') }}</label>

                            <div class="col-md-6">
                                <input id="email" type="email" class="form-control @error('email') is-invalid @enderror" name="email" value="{{ old('email') }}" required autocomplete="email" autofocus>

                                @error('email')
                                    <span class="invalid-feedback" role="alert">
                                        <strong>{{ $message }}</strong>
                                    </span>
                                @enderror
                            </div>
                        </div>

                        <div class="row mb-3">
                            <label for="password" class="col-md-4 col-form-label text-md-end">{{ __('Password') }}</label>

                            <div class="col-md-6">
                                <input id="password" type="password" class="form-control @error('password') is-invalid @enderror" name="password" required autocomplete="current-password">

                                @error('password')
                                    <span class="invalid-feedback" role="alert">
                                        <strong>{{ $message }}</strong>
                                    </span>
                                @enderror
                            </div>
                        </div>

                        <div class="row mb-3">
                            <div class="col-md-6 offset-md-4">
                                <div class="form-check">
                                    <input class="form-check-input" type="checkbox" name="remember" id="remember" {{ old('remember') ? 'checked' : '' }}>

                                    <label class="form-check-label" for="remember">
                                        {{ __('Remember Me') }}
                                    </label>
                                </div>
                            </div>
                        </div>

                        <div class="row mb-0">
                            <div class="col-md-8 offset-md-4">
                                <button type="submit" class="btn btn-primary">
                                    {{ __('Login') }}
                                </button>

                                @if (Route::has('password.request'))
                                    <a class="btn btn-link" href="{{ route('password.request') }}">
                                        {{ __('Forgot Your Password?') }}
                                    </a>
                                @endif
                            </div>
                        </div>

                        <div class="row mb-0">
                            <div class="col-md-8 offset-md-4">
                                <br/>
                                <a href="{{ route('auth.google') }}">
                                    <img src="https://developers.google.com/static/identity/images/branding_guideline_sample_dk_rd_lg.svg">
                                </a>
                            </div>
                        </div>
                    </form>
                </div>
            </div>
        </div>
    </div>
</div>
@endsection
Read Also : Laravel 12 Custom Login with Remember Me Feature
Step 10: Run the Laravel Application
Now open the command line or terminal, and type the Artisan command below to start the Laravel development server:
http://localhost:8000/login
Copy the URL and open it in your browser. You will see the Google login button — click it, and you’ll be prompted to choose an account. After selecting your account, Google will display a message in next screen stating that the Google will allow “test “app name” to access this info about you. If you click the Continue button, you will be logged in successfully and Redirect to laravel application dashboard ‘/home‘.
Download the complete Laravel 12 Socialite Google Login example from GitHub:
🔗 GitHub Repository: laravel-12-socialite-login-with-google
Conclusion
Adding Google login to a Laravel 12 app with Socialite is quite easy and reliable when set up correctly. You just need to install Socialite, configure Google OAuth in the Cloud Console, add a google_id column, and create the redirect and callback routes. This lets users log in quickly with their Google account, improving the overall user experience.
It also works smoothly with Laravel’s authentication tools (UI, Breeze, or Jetstream). The system can automatically create or link users by email and provider ID while keeping the usual session-based login and redirect flow. With proper redirect URIs and environment settings, common issues like redirect_uri_mismatch can be avoided.
You can extend this setup further by adding more providers (like GitHub or Twitter), saving tokens for Google API use, enforcing unique google_id, and handling cases like canceled consent or missing email. For better testing, you can mock Socialite to make sure everything works even after updates. Overall, Laravel 12 + Socialite offers a simple, scalable, and user-friendly way to add Google login to your app.
Frequently Asked Questions (FAQs)
Q1: Is this guide specific to Laravel 12?
Yes, this tutorial is written with Laravel 12 in mind, so the steps and code examples are tested on that version. However, most of the concepts—like installing Socialite, setting up Google OAuth, and handling redirects—are similar in recent Laravel versions as well. If you are on Laravel 10 or 11, you can still follow along with minor adjustments.
Q2: What are the prerequisites?
Laravel 12 app installed, PHP 8.2+, Composer, a Google Cloud project with OAuth 2.0 Client ID, and HTTPS enabled for production
Q3: Should I use Socialite stateless mode?
Use ->stateless() for API-only or when session state isn’t available. For typical web apps, stateful mode is fine.
Q4: How do I implement the redirect and callback?
- Redirect: return Socialite::driver(‘google’)->redirect();
- Callback: fetch user, find/create local user, log them in, then redirect to dashboard.
Q5: What routes are required?
- GET /auth/google → redirect to Google
- GET /auth/google/callback → handle callback
Q6: How do I link Google users to existing accounts?
Match by email. If a user with the same email exists, attach google_id to that user and log them in.
Q7: How do I prevent duplicate accounts?
Always check for existing user by email before creating a new record.
Q8: How do I handle duplicate google_id?
Enforce a unique index on google_id and handle constraint violations cleanly.
Q9: How do I log and debug OAuth issues?
Log exceptions during callback. Enable APP_DEBUG in local, and inspect request params, error codes, and messages.
Q10: Can I test without a public domain?
Yes, use localhost redirect URI. For devices or team testing, use a tunnel (e.g., ngrok) and add that URL to Google.
Q11: Can I add GitHub/Twitter later?
Yes. Add provider configs in config/services.php, create routes and callbacks per provider, and store provider-specific IDs.
Q12: How do I support multiple social providers for one user?
Create a social_accounts table with user_id, provider, provider_id, token; or add separate columns per provider.
Q13: Why do I get redirect_uri_mismatch?
The actual callback URL must match the one configured in Google exactly, including scheme, host, path.
