
In this tutorial, we’ll show you How to Send Mail in Laravel 12 Using Gmail SMTP Step-by-Step Tutorial.
Laravel supports multiple email drivers including SMTP, Mailgun, Postmark, Resend, Amazon SES, and Send mail. This flexibility allows you to send emails through both local and cloud-based services. This tutorial focuses only on sending emails using Gmail SMTP with Laravel 12.
In this step-by-step guide, you will learn:
- How to configure Gmail SMTP with Laravel 12
- How to create a custom HTML email template
- How to send an email using this template
- And we’ll include screenshots along the way to help you follow along easily
Whether you’re just starting out or already have some experience, this guide will help you implement email functionality in your Laravel project with ease.
Steps for How to Send Mail in Laravel 12 Using Gmail SMTP
- Step 1: Install Laravel 12
- Step 2: Set Up Gmail App for SMTP
- Step 3: Add Mail Configuration
- Step 4: Create Mail Class
- Step 5: Create Controller
- Step 6: Create Routes
- Step 7: Create Blade View
- Step 8: Run Laravel App
Step 1: Install Laravel 12
If you’ve already installed Laravel, you can skip this step. To create a new Laravel project, run the following command:
composer create-project laravel/laravel send-mail-using-gmail-smtp
Step 2: Set Up Gmail App for SMTP
When the Laravel project is installed successfully, the next step is:
- Sign in with your Gmail account.
- Go to My Account
- On the sidebar, click Security.
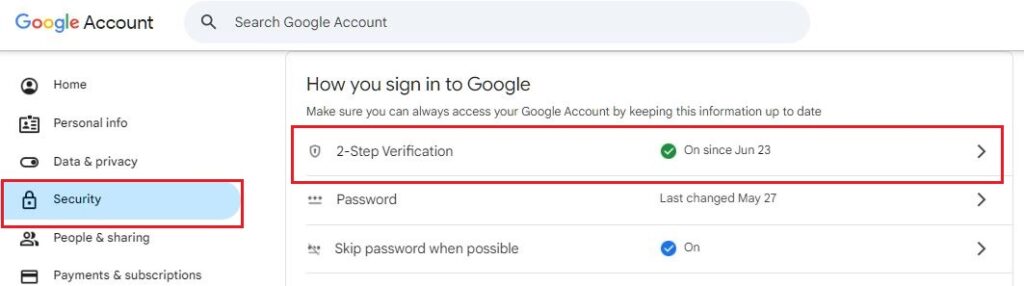
- Check 2-Step Verification. If it’s not enabled, enable it first. If 2-Step Verification is already enabled, proceed to the next step.
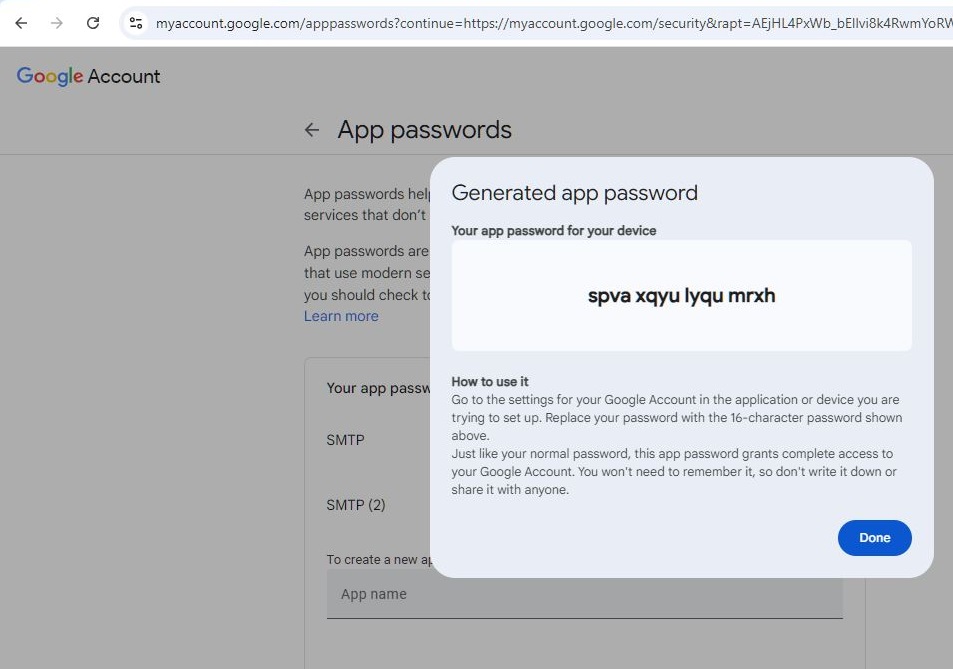
- Search for App Passwords in the top search bar and go to the App Passwords page.

- Enter your app name (I am using SMTP) and click the Create button. A password will be generated—copy this password.

Step 3: Add Mail Configuration
Open the .env file ,Add the copied password to the MAIL_PASSWORD variable. Make sure there are no spaces between the password characters, as this can cause an error. Add the other details as shown below:
MAIL_MAILER=smtp
MAIL_SCHEME=null
MAIL_HOST=smtp.gmail.com
MAIL_PORT=587
MAIL_USERNAME=itstuffsolutions@gmail.com
MAIL_PASSWORD=spvaxqyulyqumrxh
MAIL_FROM_ADDRESS="itstuffsolutions@gmail.com"
MAIL_FROM_NAME=itstuffsolutions
Step 4: Create Mail Class
In this step, we will create a laravel mail class. The mail class is used to handle the process of sending emails. We’ll pass the user’s email data and the view path for the email template in this class. To generate the mail class, run the command below:
php artisan make:mail sendEmail
This command will create a SendEmail class. I have modified this file by adding a $mailData parameter to the constructor and specifying the view path for the email.
<?php

namespace App\Mail;

use Illuminate\Bus\Queueable;
use Illuminate\Contracts\Queue\ShouldQueue;
use Illuminate\Mail\Mailable;
use Illuminate\Mail\Mailables\Content;
use Illuminate\Mail\Mailables\Envelope;
use Illuminate\Queue\SerializesModels;

class sendEmail extends Mailable
{
    use Queueable, SerializesModels;
    public $mailData;
    /**
     * Create a new message instance.
     */
    public function __construct($mailData)
    {
        $this->mailData = $mailData;
    }

    /**
     * Get the message envelope.
     */
    public function envelope(): Envelope
    {
        return new Envelope(
            subject: 'Send Email Testing',
        );
    }

    /**
     * Get the message content definition.
     */
    public function content(): Content
    {
        return new Content(
            view: 'mail.send_Email',
        );
    }

    /**
     * Get the attachments for the message.
     *
     * @return array<int, \Illuminate\Mail\Mailables\Attachment>
     */
    public function attachments(): array
    {
        return [];
    }
}
Step 5: Create Controller
Now, create a controller to send the mail. Run the below command to create the SendEmailController:
php artisan make:controller SendEmailController
In this controller, I have created a function named sendMail(). Inside this function, I added a mailData variable containing the user’s email data and passed this data to the SendEmail class.
Now open App\Http\Controllers\SendEmailController.
<?php

namespace App\Http\Controllers;

use Illuminate\Http\Request;
use Mail;
use App\Mail\sendEmail;

class SendEmailController extends Controller
{
    public function sendMail()
    {
        $mailData = [
        'title'=>"Welcome to Itstuffsolutions.io",
        'name'=>'Itstuffsolutions',
        'url'=>'https://itstuffsolutiotions.io/post/',
        ];

        Mail::to("testuser@example.com")->send(new sendEmail( $mailData));

        return "Email Send Successfully";


    }
}
Step 6: Create Routes
In this step, we will create a route to send the email. Open the web.php file:
routes/web.php
<?php

use Illuminate\Support\Facades\Route;
use App\Http\Controllers\SendEmailController;

Route::get('send', [SendEmailController::class, 'sendMail']);
Step 7: Create Blade View
In this step, we will create the email view and define the content we want to send.
resources\views\mail\send_Email.blade.php
<!DOCTYPE html>
<html>
<head>
    <title>{{$mailData['title']}}</title>
</head>
<body>
    <h1>Hello, {{ $mailData['name'] }}</h1>
    <p>Thank you for registering on our site.</p>
    <p><a href="{{ $mailData['url']}}">Click here to visit your dashboard</a></p>
    <p>Regards,<br>{{ config('app.name') }}</p>
</body>
</html>
Step 8: Run Laravel App
When all the steps are completed, run the command below to start the Laravel development server:
php artisan serve
Open your browser, copy and paste the URL shown below, and hit Enter.
http://127.0.0.1:8000/send
You will see the output displayed.


