
When building modern web applications, smooth user interaction is everything. Nobody likes page reloads after submitting a simple form. That’s where Laravel 12 Ajax Form Submit With Validation comes into play. It allows users to submit forms without refreshing the page while ensuring strong backend validation.
This guide walks through a complete, practical example of “Laravel 12 Ajax Form Submit With Validation” using jQuery Ajax and Laravel’s built-in validation.
In this tutorial, we will learn:
- How to submit a form using AJAX in Laravel 12
- How to validate form data
- How to show validation errors dynamically
- How to display success messages without page reload
Table of Contents
Step 1: Install a Fresh Laravel 12 Project (Optional)
If you don’t already have a project:
composer create-project laravel/laravel laravel-12-ajax-form
cd laravel-12-ajax-form
Configure your database in .env:
DB_CONNECTION=mysql
DB_HOST=127.0.0.1
DB_PORT=3309
DB_DATABASE=laravel_12_ajax
DB_USERNAME=root
DB_PASSWORD=
Read Also : Laravel 12 Create, Skip, Run and Rollback Migrations
Step 2: Create Migration and Model
Create a Post model with migration:
php artisan make:model Post -m
Open the generated migration database/migrations/xxxx_xx_xx_create_posts_table.php and update the up() method:
<?php

use Illuminate\Database\Migrations\Migration;
use Illuminate\Database\Schema\Blueprint;
use Illuminate\Support\Facades\Schema;

return new class extends Migration
{
    /**
     * Run the migrations.
     */
    public function up(): void
    {
        Schema::create('posts', function (Blueprint $table) {
            $table->id();
             $table->string('title');
            $table->text('description')->nullable();
            $table->string('slug')->unique();
            $table->string('status')->default('draft'); // draft, published
            $table->timestamps();
        });
    }

    /**
     * Reverse the migrations.
     */
    public function down(): void
    {
        Schema::dropIfExists('posts');
    }
};
Run the migration:
php artisan migrate
Now update the Post model app/Models/Post.php to allow mass assignment:
<?php

namespace App\Models;

use Illuminate\Database\Eloquent\Model;
use Illuminate\Database\Eloquent\Factories\HasFactory;

class Post extends Model
{

   use HasFactory;

    protected $fillable = [
        'title'       ,
        'description'  ,
        'slug'         ,
        'status'     ,
        'created_at'   ,
        'updated_at'   ,
    ];
}
Step 3: Creating the Controller with Validation
Create controller:
php artisan make:controller PostController
Open app/Http/Controllers/PostController.php:
<?php

namespace App\Http\Controllers;

use App\Models\Post;
use App\Models\User;
use Illuminate\Http\Request;
use Illuminate\Support\Str;

class PostController extends Controller
{
    /**
     * Show the form for creating a new resource.
     */
    public function index(Request $request)
    {
        $posts = Post::latest()->get();

        if($request->ajax())
        {
            return view('posts.list', compact('posts'))->render();
        }

        return view('posts.index',compact('posts'));
    }

    /**
     * Store a newly created resource in storage.
     */
    public function store(Request $request)
    {
        $request->validate([
            'title' => 'required',
            'description' => 'required',
            'status' =>'required'
        ]);

        Post::create([
            'title' => $request->title,
            'description' => $request->description,
            'slug' =>Str::slug($request->title),
            'status' =>$request->status
        ]);

        return response()->json(['success' => 'Post created successfully.']);
    }


}
Key points:
- index() loads the view and passes existing posts.
- store() validates the form and returns a JSON response.
- On validation failure, Laravel will return a 422 JSON response with errors.
Step 4: Define Routes
Add routes in routes/web.php:
<?php

use Illuminate\Support\Facades\Route;

use App\Http\Controllers\PostController;

Route::get('posts', [ PostController::class, 'index' ])->name('posts.index');
Route::post('posts', [ PostController::class, 'store' ])->name('posts.store');
Read Also : Laravel 12 Pagination Using jQuery AJAX Step-by-Step Guide
Step 5: Create Blade View With Ajax Form
Create the view at resources/views/posts/index.blade.php.
This example uses Bootstrap 5 and jQuery from CDNs, but you can adapt it to your stack.
<!DOCTYPE html>
<html>
<head>
    <title>Laravel 12 Ajax Form Submit With Validation (Step-by-Step Guide)</title>
    <link href="https://cdn.jsdelivr.net/npm/bootstrap@5.3.8/dist/css/bootstrap.min.css" rel="stylesheet">
</head>
<body>
    <div class="container mt-5">
          {{-- Success alert --}}
      <div class="alert alert-success d-none" id="success-alert"></div>

        <div class="card">
            <h5 class="card-header bg-primary text-white">Laravel 12 Ajax Form Submit With Validation (Step-by-Step Guide) - ItStuffSolutiotions</h5>
            <div class="card-body ">
                  <button class="btn btn-primary btn-sm mb-3" data-bs-toggle="modal" data-bs-target="#create_post_modal"><i class='fa-regular fa-plus'></i> Create Post
                </button>
                <div class="table_data">
                  @include('posts.list')
               </div>
            </div>
        </div>
    </div>
      <!--Create modal -->
     <div class="modal fade" id="create_post_modal" tabindex="-1" aria-labelledby="exampleModalLabel" aria-hidden="true">
        <div class="modal-dialog">
            <div class="modal-content">
            <div class="modal-header">
                <h1 class="modal-title fs-5" id="exampleModalLabel">Create Post</h1>
                <button type="button" class="btn-close" data-bs-dismiss="modal" aria-label="Close"></button>
            </div>
            <div class="modal-body">
                <form method="post" enctype="multipart/form-data" id="add_post_form">
                    @csrf

                <div class="mb-3">
                    <label>Post Title</label>
                        <input type="text" name="title" class="form-control" value=""/>
                         <span class="text-danger error-text title_error"></span>
                </div>

                <div class="mb-3">
                    <label>Status</label>
                      <select class="form-control" name="status">
                        <option value="draft">draft</option>
                        <option value="publish">publish</option>
                      </select>
                       <span class="text-danger error-text status_error"></span>
                </div>
                <div class="mb-3">
                    <label>Description</label>
                    <textarea  name="description" class="form-control">
                    </textarea>
                     <span class="text-danger error-text description_error"></span>
                </div>
                <div class="mb-3 text-center">
                    <button class="btn btn-success btn-submit savebtn" type="submit" ><i class="fa fa-save"></i> Save Post</button>
                </div>
             </form>
            </div>

            </div>
        </div>
    </div>
     <!-- End -->
    <script src="https://cdn.jsdelivr.net/npm/bootstrap@5.3.8/dist/js/bootstrap.bundle.min.js"></script>
    <script src="https://code.jquery.com/jquery-3.6.0.min.js"></script>


  <script type="text/javascript">

     //fetch all posts
    function fetch_all_data()
    {
        $.ajax({
            url:"{{route('posts.index')}}",
            success:function(data)
            {
                $('.table_data').html(data);
            }
       });
    }
     // save post form
    $('#add_post_form').submit(function(e) {
        e.preventDefault();

        var url = "/posts";
        let formData = new FormData(this);

        // Clear previous errors
        $(this).find('.error-text').text('');
        $('#success-alert').addClass('d-none').text('');

         // Disable button
        $('.savebtn').attr('disabled', true);

            $.ajax({
                type:'POST',
                url: url,
                data: formData,
                contentType: false,
                processData: false,
                success: (response) => {
                    $('#create_post_modal').modal('hide');
                    // Show success message
                    $('#success-alert').removeClass('d-none').text(response.success);
                    $('#add_post_form').trigger("reset");
                    fetch_all_data();
                },
                error: function(response){
                     if (response.status === 422) {
                        let errors = response.responseJSON.errors;
                        $.each( errors, function( key, value ) {
                            $('.' + key + '_error').text(value[0]);
                        });
                      }else {
                    alert('Something went wrong. Please try again.');
                }
             },
              complete: function () {
                // Re-enable button
                $('.savebtn').attr('disabled', false);
            }
           });
    });
    </script>


</body>

</html>
Explanation:
- The form has <span class=”… title_error”></span> and <span class=”… description_error”></span> placeholders for validation messages.
- @include(‘posts.list’)
- Loads posts table dynamically.
- Updated via AJAX after form submission via fetch_all_data().
- On submit:
- Default form submission is prevented.
- Form data is sent via $.ajax to posts.store.
- On 422 error, server-side validation messages are displayed under the appropriate fields.
- On success, the form is cleared, a success alert is shown <div class=”alert alert-success d-none” id=”success-alert”></div>, and the new post is added to the table.
Create the view at resources/views/posts/list.blade.php.
  <table class="table table-bordered ">
    <thead>
        <tr>
            <th>#</th>
            <th>Title</th>
            <th>Status</th>
            <th>Slug</th>
        </tr>
    </thead>
        @forelse($posts as $key=> $post)
    <tr>
        <td>{{ ++ $key }}</td>
        <td>{{ $post->title }}</td>
        <td>{{ $post->status }}</td>
        <td>{{ $post->slug }}</td>
    </tr>
    @empty
    <tr>
        <td colspan="4" class="text-center">No Posts Found!!</td>
    </tr>
    @endforelse
</table>
Step 6: Run and Test the Application
Start the Laravel development server:
php artisan serve
Visit: http://127.0.0.1:8000/posts
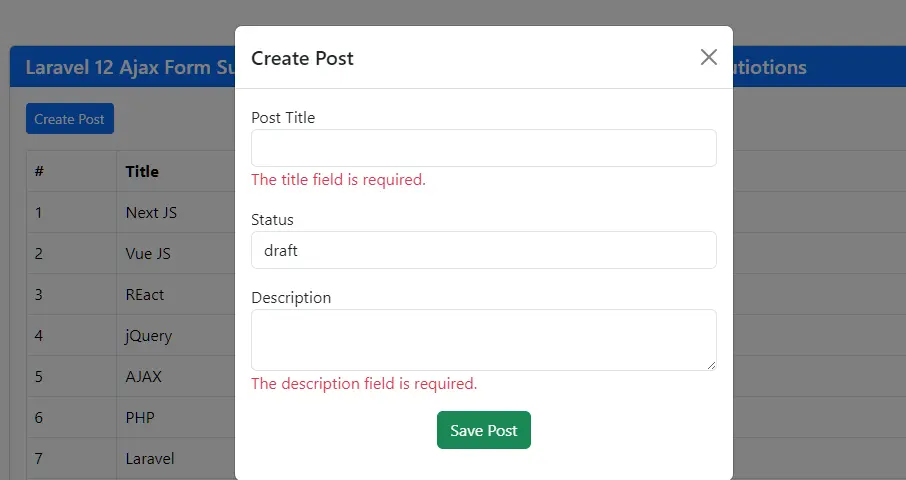
Test the flow:
- Click “Create Post” to open post form modal.
- Click “Submit” with empty fields.
- Validation errors should appear under Title and Description.
- Fill valid values and submit:
- The form should not reload.
- A success alert should appear.
- New post should be added to the table.
You now have a working Laravel 12 Ajax form with server-side validation.
Conclusion
Implementing Laravel 12 Ajax Form Submit With Validation is one of the smartest ways to modernize your web application. It enhances speed, boosts user experience, and keeps your application secure.
You’ve now mastered a production-ready pattern that scales from simple contact forms to complex multi-step wizards. Key takeaways:
- Always validate on the server – Ajax doesn’t replace Laravel’s validation, it enhances delivery
- JSON responses are automatic – Laravel detects Ajax requests and returns structured
errorson 422 status - FormData handles everything – Files, text, and complex data work out-of-the-box
FAQ: Laravel 12 Ajax Form Submit With Validation
Q1: Do I still need server-side validation if I use JavaScript validation?
Yes. JavaScript (client-side) validation is optional and can improve UX, but it is not secure on its own. Users can bypass JS completely. Ajax just changes how you send/display the result; it does not replace server-side validation.
Q2: Why am I getting a “419 Page Expired” or CSRF token mismatch error?
This usually happens because the CSRF token is missing or not sent correctly with the Ajax request.
Q3: Can I use Fetch API or Axios instead of jQuery Ajax?
Absolutely. The backend (controller, routes, validation) remains the same. Only the frontend code for sending the request changes.
Q4: How do I handle file uploads with Ajax in Laravel 12?
Use FormData and keep processData: false and contentType: false (as in the example).
On the frontend, ensure the <input type=”file” name=”image”> is part of the form, and you do not manually serialize the form (let FormData handle it).
