In this laravel tutorial you will learn how to create custom validation error messages with example in laravel 12 application.
Laravel makes it easy to validate incoming form data using built-in rules (e.g. required, email, min:8, etc.). By default, when a validation rule fails, Laravel returns a standard error message (e.g. “The email field is required.”). In many cases you’ll want to customize these messages to be more user-friendly or context-specific. Laravel 12 offers two common approaches: inline validation in a controller and form request validation. In both cases you can supply a custom messages array that overrides the defaults. Below we demonstrate each approach with a user registration form (fields: name, email, password,confirm_password,avatar), showing how to add rules and custom error messages for each field.
Table of Contents
Method 1: Inline Custom Validation Error Messages in Controller
The quickest way to implement custom validation messages is by passing them directly to the validate() method in your controller:
Step 1: Create a Controller
Run the command given below to createa new controller :
php artisan make:controller UserController
This will generate a UserController inside the app\Http\Controllers folder.
Step 2: Implement Controller with Custom Messages
Now, open the app/Http/Controllers/UserController.php file and add the following code:
<?php

namespace App\Http\Controllers;

use Illuminate\Http\Request;
use Illuminate\Http\RedirectResponse;
use Illuminate\View\View;

class UserController extends Controller
{
     /**
     * Show the application form.
     *
     * @return \Illuminate\Http\Response
     */
    public function create(): View
    {
        return view('form');
    }

     /**
     * Store data.
     *
     * @return \Illuminate\Http\Response
     */
    public function store(Request $request): RedirectResponse
    {
        $validatedData = $request->validate([
                'name' => 'required|string|max:55',
                'email' => 'required|email|unique:users,email',
                'password' => 'required|min:8|confirmed',
                'phone' => 'nullable|digits:10',
                'avtar' => 'required|mimes:jpeg,png,jpg|max:2048'
            ],[
                // Custom error messages
                'name.required' => 'Hey! We need your name to get started.',
                'name.max' => 'Your name is too long! Keep it under 55 characters.',
                'email.required' => 'Please provide your email address.',
                'email.email' => 'That doesn\'t look like a valid email address.',
                'email.unique' => 'This email is already registered. Try logging in instead!',
                'password.required' => 'You\'ll need a password to secure your account.',
                'password.min' => 'Your password should be at least 8 characters long.',
                'password.confirmed' => 'Password confirmation doesn\'t match.',
                'phone.digits' => 'Phone number must be exactly 10 digits.',
                'avtar.required' => 'Please upload your profile picture.',
                'avtar.mimes'    => 'Only JPEG, PNG, or JPG image formats are allowed.',
                'avtar.max'      => 'The image size must not exceed 2MB.',
            ]);


        return back()->with('success', 'User created successfully.');
    }
}
In this UserController, we’ve added two methods one to display the form view and another to handle form submissions and validation. In the store() method, we receive the form request data and perform validation. If any required input is missing or invalid, the user will be redirected back to the form with custom validation error messages.
The first argument to $request->validate([…]) is the validation rules array (Laravel’s standard syntax). We require name and email, password, avtar and phone is optional it allow empty value.
The second argument is an associative array of custom messages. Each key is in the form “field.rule” and the value is the custom message string. For example, ’email.email’ => ‘That doesn\’t look like a valid email address.‘ replaces the default “The email must be a valid email address.” message.
When validation fails, Laravel automatically redirects back and flashes the error messages. In Blade you can display them (e.g. using @error(‘field’) or looping through $errors->all()).
This inline approach is quick and keeps the validation logic next to the controller. As shown above, you list each rule and then override its message by referencing the field and rule. For example, in the code above ‘password.min’ => ‘Your password should be at least 8 characters long.’ customizes the message when the password is too short.
Step 3: Define Routes
In this step, we’ll define the routes needed to test our custom validation error messages.
<?php

use Illuminate\Support\Facades\Route;
use App\Http\Controllers\UserController;

Route::get('custom-validation', [UserController::class, 'create']);
Route::post('custom-validation', [UserController::class, 'store'])->name('validate');
Step 4: Create the Blade View
In this step, we’ll create a Blade file named form.blade.php inside the resources/views directory. This form will be used to test our custom validation error messages.
<!DOCTYPE html>
<html lang="en">
<head>
    <title>Laravel 12 Custom Validation Error Messages Example - ItStuffSolutiotions</title>
    <meta charset="utf-8">
    <meta http-equiv="X-UA-Compatible" content="IE=edge">
    <meta name="viewport" content="width=device-width, initial-scale=1">

    <!-- Bootstrap 5.3.8 CSS -->
    <link href="https://cdn.jsdelivr.net/npm/bootstrap@5.3.8/dist/css/bootstrap.min.css" rel="stylesheet">
</head>
<body>
<div class="container">
    <div class="card mt-5 shadow-lg border-0">
        <h3 class="card-header p-3 bg-primary text-white">
            Laravel 12 Custom Validation Error Messages Example - ItStuffSolutiotions
        </h3>
        <div class="card-body">
            @session('success')
            <div class="alert alert-success alert-dismissible fade show" role="alert">
                    {{ session('success') }}
                    <button type="button" class="btn-close" data-bs-dismiss="alert" aria-label="Close"></button>
                </div>
            @endsession
             <form method="POST" action="{{ route('validate') }}" enctype="multipart/form-data">
                @csrf

                <div class="mb-3">
                    <label class="form-label">Name:</label>
                    <input
                        type="text"
                        name="name"
                        placeholder="Enter your full name"
                        class="form-control @error('name') is-invalid @enderror"
                        >

                    @error('name')
                        <div class="invalid-feedback">{{ $message }}</div>
                    @enderror
                </div>
                <div class="mb-3">
                    <label class="form-label">Email:</label>
                    <input
                        type="email"
                        name="email"
                        placeholder="Enter your email"
                        class="form-control @error('email') is-invalid @enderror"
                        >

                    @error('email')
                        <div class="invalid-feedback">{{ $message }}</div>
                    @enderror
                </div>
                <div class="mb-3">
                    <label class="form-label">Password:</label>
                    <input
                        type="password"
                        name="password"
                        placeholder="Create a secure password"
                        class="form-control @error('password') is-invalid @enderror"
                        >

                    @error('password')
                        <div class="invalid-feedback">{{ $message }}</div>
                    @enderror
                </div>
                <div class="mb-3">
                    <label class="form-label">Confirm Password:</label>
                     <input type="password"
                                       class="form-control @error('password_confirmation') is-invalid @enderror"
                                       id="password_confirmation"
                                       name="password_confirmation"
                                       placeholder="Confirm your password">

                    @error('password_confirmation')
                        <div class="invalid-feedback">{{ $message }}</div>
                    @enderror
                </div>
                <div class="mb-3">
                    <label class="form-label">Phone:</label>
                    <input
                        type="text"
                        name="phone"
                        placeholder="Enter your phone number"
                        class="form-control @error('phone') is-invalid @enderror"
                        >

                    @error('phone')
                        <div class="invalid-feedback">{{ $message }}</div>
                    @enderror
                </div>
                <div class="mb-3">
                    <label class="form-label">Profile Picture:</label>
                    <input
                        type="file"
                        name="avtar"
                        placeholder="Choose your profile picture"
                        class="form-control @error('avtar') is-invalid @enderror"
                        >

                    @error('avtar')
                        <div class="invalid-feedback">{{ $message }}</div>
                    @enderror
                </div>

                <div class="mb-3">
                    <button class="btn btn-success btn-submit">Submit</button>
                </div>
            </form>
        </div>
    </div>
</div>

<!-- Bootstrap 5.3.8 JS (with Popper) -->
<script src="https://cdn.jsdelivr.net/npm/bootstrap@5.3.8/dist/js/bootstrap.bundle.min.js"></script>
</body>
</html>
⚠️ Important Note
If you forget to include enctype=”multipart/form-data” in your form tag, Laravel will not actually receive the uploaded file. As a result, you may see a misleading validation error like:
“Only JPEG, PNG, or JPG image formats are allowed.”
This happens because the file input is technically not empty (it has file name value), so Laravel doesn’t trigger the “image is required” message instead, it fails the mimes validation rule.
Fix: Always ensure your form includes the correct enctype attribute when handling file uploads.
Step 5: Run the App
Now that we’ve completed all the required steps, run the following command to start the Laravel development server:
php artisan serve
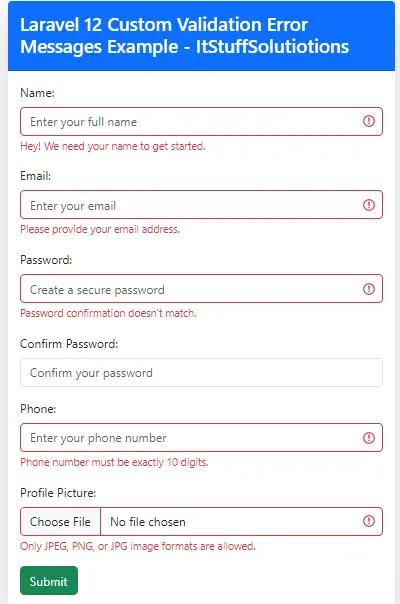
Open your browser and visit the link below. You’ll see the form submit it without entering any data, and you’ll receive validation errors as shown in the image below:
Step 4: Create the Blade View
Read Also : Laravel 12 Custom Validation Rule with Parameters
Method 2: Using Form Request Classes
For complex applications with reusable validation logic, Form Request classes provide better organization and maintainability. All the steps are similar to Method 1, but here we are using a Form Request class. The custom validation messages are defined inside the request class and automatically applied when the request is passed to the store() method.
Step 1: Create a Form Request
Run the command given below to create a new form request:
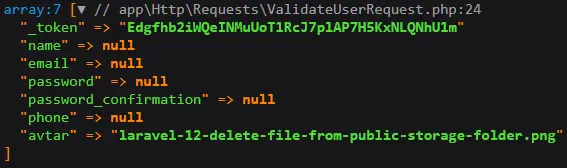
php artisan make:request ValidateUserRequest
This will generate a ValidateUserRequest.php class inside the app/Http/Requests directory. Inside this class, you define the rules() method and an optional messages() method. For example:
<?php

namespace App\Http\Requests;

use Illuminate\Foundation\Http\FormRequest;

class ValidateUserRequest extends FormRequest
{
    /**
     * Determine if the user is authorized to make this request.
     */
    public function authorize(): bool
    {
        return false;
    }

    /**
     * Get the validation rules that apply to the request.
     *
     * @return array<string, \Illuminate\Contracts\Validation\ValidationRule|array<mixed>|string>
     */
    public function rules(): array
    {
        return [
            //
        ];
    }
}
Update Form Request Class
<?php

namespace App\Http\Requests;

use Illuminate\Foundation\Http\FormRequest;

class ValidateUserRequest extends FormRequest
{
    /**
     * Determine if the user is authorized to make this request.
     */
    public function authorize(): bool
    {
        return true; // Allow all users or add custom auth logic
    }

    /**
     * Get the validation rules that apply to the request.
     *
     * @return array<string, \Illuminate\Contracts\Validation\ValidationRule|array<mixed>|string>
     */
    public function rules(): array
    {

        return [
                'name' => 'required|string|max:55',
                'email' => 'required|email|unique:users,email',
                'password' => 'required|min:8|confirmed',
                'phone' => 'nullable|digits:10',
                'avtar' => 'required|mimes:jpeg,png,jpg|max:2048'
        ];
    }

    /**
     * Get the error messages for the defined validation rules.
     *
     * @return array<string, string>
     */
    public function messages(): array
    {
        return [
                'name.required' => 'Hey! We need your name to get started.',
                'name.max' => 'Your name is too long! Keep it under 55 characters.',
                'email.required' => 'Please provide your email address.',
                'email.email' => 'That doesn\'t look like a valid email address.',
                'email.unique' => 'This email is already registered. Try logging in instead!',
                'password.required' => 'You\'ll need a password to secure your account.',
                'password.min' => 'Your password should be at least 8 characters long.',
                'password.confirmed' => 'Password confirmation doesn\'t match.',
                'phone.digits' => 'Phone number must be exactly 10 digits.',
                'avtar.required' => 'Please upload your profile picture.',
                'avtar.mimes'    => 'Only JPEG, PNG, or JPG image formats are allowed.',
                'avtar.max'      => 'The image size must not exceed 2MB.',
        ];
    }
}
Here, the authorize() method checks whether the logged-in user has permission to carry out the requested action, The rules() method returns the same validation rules as before. The messages() method returns an array mapping “field.rule” to custom strings. Laravel’s documentation specifically notes that you can “customize the error messages used by the form request by overriding the messages method”. The example above matches that, overriding messages like ‘name.required’.
Step 2: Update Controller to Use Form Request
In this step we need to update UserController, use this request class in your controller by type-hinting (ValidateUserRequest $request) it. Laravel will automatically validate the incoming request against your rules before the controller method runs:
<?php

namespace App\Http\Controllers;

use Illuminate\View\View;
use Illuminate\Http\Request;
use Illuminate\Http\RedirectResponse;
use App\Http\Requests\ValidateUserRequest;


class UserController extends Controller
{
     /**
     * Show the application form.
     *
     * @return \Illuminate\Http\Response
     */
    public function create(): View
    {
        return view('form');
    }

     /**
     * Store data.
     *
     * @return \Illuminate\Http\Response
     */
    public function store(ValidateUserRequest $request): RedirectResponse
    {

        // At this point, data is already validated.
        $data = $request->validated();


        return back()->with('success', 'Hi, ('.$data['name'].') Profile created successfully.');
    }
}
No manual $request->validate() call is needed here. If validation fails, Laravel redirects back with errors (as usual). Since we defined custom messages in messages(), those are shown instead of the defaults. You will recieve all data inside $data variable you can access single attribute like $data[‘name’].
Read Also : Laravel 12 Validation Rule Sometimes vs Nullable
Conclusion
In this Laravel 12 tutorial, we explored two effective ways to create custom validation error messages directly in the controller and through Form Request classes. Both methods allow you to replace Laravel’s default validation messages with clear, user-friendly, and context-specific ones that improve the overall user experience.
The inline controller approach is perfect for quick validations or small projects where you want everything in one place. On the other hand, using a Form Request class provides a cleaner, reusable, and more maintainable structure ideal for larger applications where multiple controllers may share similar validation logic.
By customizing your validation messages, you not only make your forms more intuitive but also help users understand exactly what needs to be fixed. Whether you choose inline validation or Form Requests, Laravel’s flexibility makes it easy to tailor your error messages to fit your application’s tone and needs.
