In this Laravel 12 tutorial, you’ll learn how to generate fake data using model factories and Tinker. In Laravel 12, you can use Model::factory()->count(10)->create() with Tinker to generate dummy users using Faker. This approach is ideal for testing your application without manually inserting records into the database.
When you’re developing or testing your Laravel application, it’s often necessary to populate the database with sample data. Rather than manually entering each field’s value, Laravel offers a cleaner approach through model factories, which allow you to define default attributes for your Eloquent models. You can read from laravel official website.
You can find an example of factory in your newly installed laravel project at database/factories/UserFactory.php. This file demonstrates how to configure a factory to generate fake data. Laravel factories utilize the Faker PHP library, accessed via the fake() helper, making it simple to produce random names, emails, text, and more for your test or seed data.
However, Laravel also includes a helpful REPL tool called Tinker, which lets you interact with your application through the command line. Using Tinker, you can easily generate dummy records for any model. Since the User model already comes with a factory, it’s a great example to demonstrate how quickly you can create test records using a single command.
Steps For Laravel 12 Generate Fake Data using Factory Tinker
- Step 1: Install Laravel 12
- Step 2: Create Model and Migration
- Step 3: Create a Custom Factory
- Step 4: Define Fake Data in Factory
- Step 5: Use Tinker to Generate Fake Records
- Step 5: Verify the Records in Database
Step 1: Install Laravel 12
If you haven’t already created a Laravel 12 project, create the laravel project using the command given below:
composer create-project laravel/laravel laravel12-faker
Now set up your .env file:
DB_CONNECTION=mysql
DB_HOST=127.0.0.1
DB_PORT=3306
DB_DATABASE=test
DB_USERNAME=root
DB_PASSWORD=
Read Also : Laravel 12 Cron Job Task Scheduling Example Using Email
Step 2: Create Model and Migration
Run the command below to create both the model and its corresponding migration file.
php artisan make:model Category -m

Update the migration file (database/migrations/2025_08_01_081305_create_categories_table.php):
<?php

use Illuminate\Database\Migrations\Migration;
use Illuminate\Database\Schema\Blueprint;
use Illuminate\Support\Facades\Schema;

return new class extends Migration
{
    /**
     * Run the migrations.
     */
    public function up(): void
    {
        Schema::create('categories', function (Blueprint $table) {
            $table->id();
            $table->string('name');
            $table->timestamps();
        });
    }

    /**
     * Reverse the migrations.
     */
    public function down(): void
    {
        Schema::dropIfExists('categories');
    }
};
When using Laravel factories, make sure your model includes the HasFactory trait to enable factory support. Also, define the $fillable property to allow mass assignment of attributes.
- Without
HasFactory, calling thefactory()method will throw an error. - Without
$fillable, data generated by the factory will not be saved to the database.
Always ensure both are properly configured in your model when working with factories.

Update the model file (App/Models/Category.php).
<?php

namespace App\Models;

use Illuminate\Database\Eloquent\Factories\HasFactory;
use Illuminate\Database\Eloquent\Model;

class Category extends Model
{
    /** @use HasFactory<\Database\Factories\CategoryFactory> */
    use HasFactory;

    /**
     * The attributes that are mass assignable.
     *
     * @var list<string>
     */
     protected $fillable = [
        'name',
    ];

}
Now,Run the migration:
php artisan migrate
Step 3: Create a Custom Factory
By default, database/factories/UserFactory.php is included in every new Laravel project. It is pre-configured for the User model and can be used to generate fake user data. If you need to create a new factory for a different model, use the command below:
php artisan make:factory CategoryFactory --model=Category

Step 4: Define Fake Data in Factory
Open database/factories/CategoryFactory.php and update with the following code:
<?php

namespace Database\Factories;

use Illuminate\Database\Eloquent\Factories\Factory;

/**
 * @extends \Illuminate\Database\Eloquent\Factories\Factory<\App\Models\Category>
 */
class CategoryFactory extends Factory
{
    /**
     * Define the model's default state.
     *
     * @return array<string, mixed>
     */
    public function definition(): array
    {
        return [
             'name' => fake()->name(),
        ];
    }
}
In my Category model, I have only the id, name, and timestamp columns. Since I need each name to be unique, I have defined a fake value for the name column using the factory.
Step 5: Use Tinker to Generate Fake Records
Laravel Tinker allows you to run PHP code interactively in your app’s context. Launch it with:
php artisan tinker
Then run this command to generate 10 fake categories:
\App\Models\Category::factory()->count(10)->create();
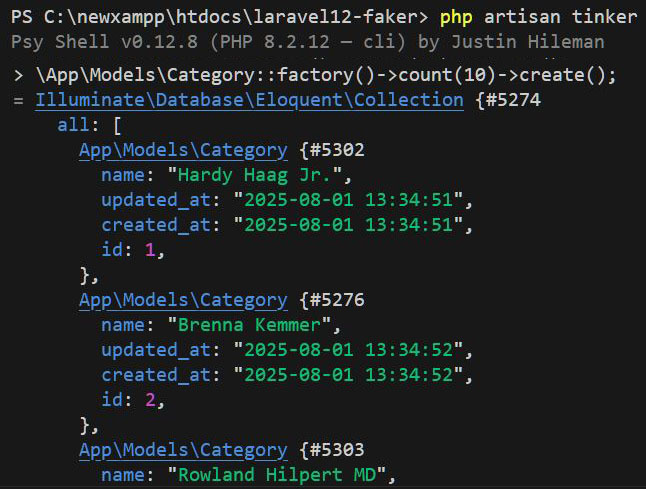
That’s it! Your categories table now has 10 records with fake data.
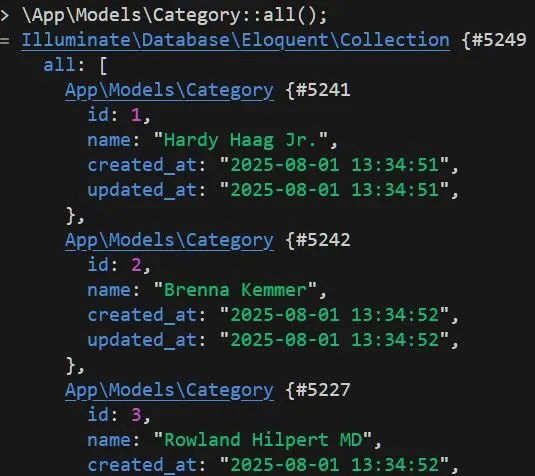
Step 6: Verify the Records in Database
You can verify this in your DB client (like phpMyAdmin or TablePlus), or directly in Tinker:
\App\Models\Category::all();
Read Also : Laravel 12 Clear Cache, Route, Config, Event Command
Optional: Seed Fake Data Using Seeder
Instead of using Tinker every time, you can also generate data using a seeder:
php artisan make:seeder CategorySeeder

Update Database/Seeders/CategorySeeder.php:
<?php

namespace Database\Seeders;

use App\Models\Category;
use Illuminate\Database\Console\Seeds\WithoutModelEvents;
use Illuminate\Database\Seeder;

class CategorySeeder extends Seeder
{
    /**
     * Run the database seeds.
     */
    public function run(): void
    {
        Category::factory(10)->create();
    }
}
Then run the following command:
php artisan db:seed --class=CategorySeeder

Now check the records directly from phpMyAdmin or using the command below for tinker.
\App\Models\Category::all();
You can use DatabaseSeeder.php to seed any number of tables, here I am seeding only Category and Users Table.
<?php

namespace Database\Seeders;

use App\Models\User;
// use Illuminate\Database\Console\Seeds\WithoutModelEvents;
use Illuminate\Database\Seeder;

class DatabaseSeeder extends Seeder
{
    /**
     * Seed the application's database.
     */
    public function run(): void
    {
        \App\Models\Category::factory(50)->create();

        User::factory()->create([
            'name' => 'Test User',
            'email' => 'test@example.com',
        ]);
    }
}
Run the given command to generate fake data.
php artisan db:seed

Conclusion
Using Laravel factories with Tinker is the fastest way to generate fake data for testing and development. You can easily create dummy users, posts, products, or any model data in seconds.
Frequently Asked Questions(FAQs)
Q1: What is Laravel Tinker in Laravel 12?
Laravel Tinker is a powerful REPL (Read–Eval–Print Loop) tool included with Laravel that allows you to interact with your application via the command line. You can use it to run PHP code, test logic, interact with Eloquent models, and create or retrieve data from your database without writing a script or controller.
Q2: How to open Tinker in Laravel 12?
You can open Tinker using the Artisan command:
php artisan tinker
Q3: How to insert dummy data using Tinker in Laravel 12?
If you have already defined factory , you can insert dummy data like this:
User::factory()->count(5)->create();
This will generate and insert 5 dummy user records into the database.
Q4: What is Has Factory in Laravel?
HasFactory is a trait provided by Laravel that must be added to your Eloquent model to use model factories. It links the model to its associated factory and enables the factory() method.
<?php

use Illuminate\Database\Eloquent\Factories\HasFactory;

class Category extends Model
{
    /** @use HasFactory<\Database\Factories\CategoryFactory> */
    use HasFactory;
}
Q5: What is the use of Factory and Seeder in Laravel?
Factory is used to define a blueprint for generating fake data for a model without having to define every field manually.
Seeder is a class, is used to insert predefined or generated data into the database. You can call factories inside seeders for bulk data insertion.
Q6: What is the fake() function in Laravel?
The fake() function is provided by the Faker library and is typically used in model factories to generate random, but realistic data:
'name' => fake()->name,
'email' => fake()->unique()->safeEmail,
Q7: What is the difference between Seeder and Faker in Laravel?
- Seeder: Executes logic to insert data into the database.
- Faker: Is a PHP library used inside factories to generate fake values like names, emails, addresses, etc.
Q8: Why do we use Factory in Laravel?
Factories help automate the process of generating large amounts of test or dummy data, saving time and ensuring consistency during development and testing.
Q9: How to run all seeders in Laravel?
Use the following command: php artisan db:seed Make sure all individual seeders are called from DatabaseSeeder.php.
Q10: What is the difference between Factory and Seeder in Laravel?
- Factory defines how dummy data should look for a model.
- Seeder executes the factory or manual logic to insert data into the database.
- In short, factory creates the data structure, and seeder inserts it into the database.
