
In this Laravel tutorial titled “Laravel 12 guzzle http request tutorial: error handling & timeouts”, you will learn how to make HTTP requests with error handling and timeout in Laravel 12 using Guzzle, with practical examples and best practices.
Guzzle is a powerful PHP HTTP client that ships with Laravel by default, eliminating the need for separate installation in most cases. It provides a clean, expressive API for making HTTP requests to external APIs and web services, handling everything from simple GET requests to complex authentication flows and concurrent batch operations. Whether you’re integrating third-party payment processors, fetching data from external APIs, or building microservices, Guzzle—wrapped in Laravel’s elegant HTTP facade—simplifies the entire process.
In Laravel 12, the HTTP client has been further refined to provide better performance, improved error handling, and more intuitive methods for common tasks. This tutorial walks through every aspect of making HTTP requests with Guzzle in Laravel 12, from basic examples to advanced patterns used in production applications.
Why Use Guzzle in Laravel 12?
Laravel 12 offers a clean wrapper around Guzzle that allows you to:
- Write readable and expressive HTTP code
- Handle JSON APIs easily
- Manage timeouts, retries, and authentication
- Build API-driven applications efficiently
Prerequisites
- Laravel 12 installed
- Basic PHP & Laravel knowledge
- Understanding of HTTP methods (GET, POST, etc.)
Step 1: Create Controller
First, create a new controller in Laravel by running the following command:
php artisan make:controller API/ToDoController
This command creates a controller inside app/Http/Controllers/API/ToDoController.php
Step 2: Making HTTP cURL GET Request
The simplest HTTP operation is a GET request. In this step, you’ll learn how to send an HTTP GET request to fetch data.
routes/web.php
<?php

use Illuminate\Support\Facades\Route;
use App\Http\Controllers\API\ToDoController;

Route::get('/', [ToDoController::class, 'index']);
app/Http/Controllers/API/ToDoController.php
<?php
namespace App\Http\Controllers\API;
use Illuminate\Http\Request;
use App\Http\Controllers\Controller;
use Illuminate\Support\Facades\Http;
class ToDoController extends Controller
{
public function index()
{
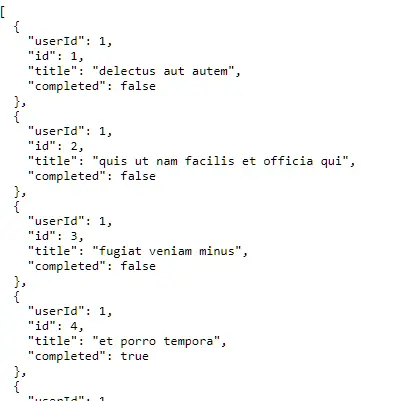
$response = Http::get('https://jsonplaceholder.typicode.com/todos');
if($response->successful()){
$todo = $response->json();
return response()->json($todo);
}
else{
return response()->json([
'error' => 'Todo request failed'
], 500);
}
}
}
Explanation:
- Http::get() sends a GET request to the API endpoint.
- $response->successful() checks whether the request was successful (HTTP status code 200–299).
- $response->json() parses the response body into a JSON array.
Open the URL http://127.0.0.1:8000/ in your browser, and the output will be displayed as shown in the image.
You can also access JSON properties directly using array notation:
$userId = Http::get('https://jsonplaceholder.typicode.com/todos/1')['userId'];
Read Also : Laravel 12 Passport API Refresh Token Tutorial
Step 3: Send a POST Request with Data
Basic POST Request with JSON
In this example you will see how to send post request with data in laravel 12. By default, Laravel sends POST request data as JSON with the application/json content type.
routes/web.php
<?php

use Illuminate\Support\Facades\Route;
use App\Http\Controllers\API\ToDoController;

Route::get('/create-todo', [ToDoController::class, 'createTodo']);
app/Http/Controllers/API/ToDoController.php
<?php
namespace App\Http\Controllers\API;
use Illuminate\Http\Request;
use App\Http\Controllers\Controller;
use Illuminate\Support\Facades\Http;
class ToDoController extends Controller
{
public function createTodo()
{
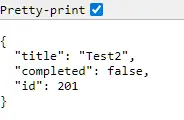
$response = Http::post('https://jsonplaceholder.typicode.com/todos', [
"title"=> "Test2",
"completed"=> false
]);
$createdTodo = $response->json();
if($response->successful()){
$todo = $response->json();
return response()->json($todo,201);
}
else{
return response()->json([
'error' => 'Failed to create Todo'
], 500);
}
}
}
Explanation:
- Http::post() sends a POST request to create a new todo.
- Returns the todo data with HTTP status 201 (Created).
- If the request fails, returns a 500 error with a failure message.
Open the URL http://127.0.0.1:8000/create-todo in your browser, and the output will be displayed as shown in the image.
Step 4: Making HTTP cURL PUT Request
In this example, we will demonstrate how to send an HTTP cURL PUT request in Laravel 12 to update existing data.
routes/web.php
<?php

use Illuminate\Support\Facades\Route;
use App\Http\Controllers\API\ToDoController;

Route::get('/update-todo', [ToDoController::class, 'updateTodo']);
app/Http/Controllers/API/ToDoController.php
<?php
namespace App\Http\Controllers\API;
use Illuminate\Http\Request;
use App\Http\Controllers\Controller;
use Illuminate\Support\Facades\Http;
class ToDoController extends Controller
{
public function updateTodo()
{
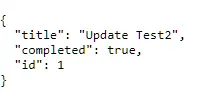
$response = Http::put("https://jsonplaceholder.typicode.com/todos/1", [
"title"=> "Update Test2",
"completed"=> true
]);
if($response->successful()){
$todo = $response->json();
return response()->json($todo);
}
else{
return response()->json([
'error' => 'Failed to update Todo'
], 500);
}
}
}
Explanation:
- Http::put() sends a PUT request to update an existing todo.
- Targets the todo with ID 1.
- $response->json() returns the updated todo data.
Open the URL http://127.0.0.1:8000/update-todo in your browser, and the output will be displayed as shown in the image.
Step 5: Making HTTP cURL DELETE Request
In this example, we will demonstrate how to send an HTTP DELETE request in Laravel 12 to delete data.
routes/web.php
<?php

use Illuminate\Support\Facades\Route;
use App\Http\Controllers\API\ToDoController;

Route::get('/delete-todo/{id}', [ToDoController::class, 'deleteTodo']);
app/Http/Controllers/API/ToDoController.php
<?php
namespace App\Http\Controllers\API;
use Illuminate\Http\Request;
use App\Http\Controllers\Controller;
use Illuminate\Support\Facades\Http;
class ToDoController extends Controller
{
public function deleteTodo($id)
{
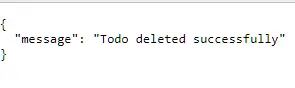
$response = Http::delete("https://jsonplaceholder.typicode.com/todos/".$id );
if($response->successful()){
return response()->json(['message' => 'Todo deleted successfully']);
}
else{
return response()->json([
'error' => 'Failed to Delete Todo'
], 500);
}
}
}
Explanation:
- Http::delete() sends a DELETE request to remove a todo.
- Uses the provided $id to target a specific todo.
- Returns a success message when the todo is deleted.
Open the URL http://127.0.0.1:8000/delete-todo/1 in your browser, and the output will be displayed as shown in the image.
Step 6: Send Request with Headers and Authentication
In this example, we will demonstrate how to send a request with headers and authentication.
<?php

namespace App\Http\Controllers\API;

use Illuminate\Http\Request;
use App\Http\Controllers\Controller;
use Illuminate\Support\Facades\Http;

class ToDoController extends Controller
{

    public function getProtectedData()
    {
        $response = Http::withHeaders([
            'Authorization' => 'Bearer YOUR_ACCESS_TOKEN',
            'Accept' => 'application/json',
        ])->get('https://example.com/todos');

        if($response->successful()){
            return response()->json($response->json());
        }
        else{
            return response()->json([
                'error' => 'Failed to fetch data.'
            ], 500);
        }

    }

}
Explanation:
- Http::withHeaders() adds custom headers to the request.
- Sends an Authorization Bearer token for authentication.
- Http::get() makes a GET request to a protected API endpoint.
Step 7: Making Guzzle Http File Upload
In this Guzzle HTTP file upload example, we will demonstrate two different approaches to uploading files in Laravel. In the first approach, we use Http::attach() to upload a file as multipart form data.
Create the file upload form in resources/views/form.blade.php
<!DOCTYPE html>
<html lang="en">
<head>
    <meta charset="UTF-8">
    <title>Image Upload</title>

    <!-- Bootstrap 5.3 CSS -->
    <link href="https://cdn.jsdelivr.net/npm/bootstrap@5.3.3/dist/css/bootstrap.min.css" rel="stylesheet">
</head>

<body class="bg-light">

    <div class="container d-flex align-items-center justify-content-center min-vh-100">
        <div class="card shadow-sm border-0" style="max-width: 380px; width: 100%;">

            <div class="card-body p-4">
                <h5 class="card-title text-center mb-4">
                    Upload Image
                </h5>

                <form action="{{ route('image.upload') }}"
                      method="POST"
                      enctype="multipart/form-data">
                    @csrf

                    <!-- Image Input -->
                    <div class="mb-3">
                        <label class="form-label">Choose Image</label>
                        <input type="file"
                               name="image"
                               accept="image/*"
                               required
                               class="form-control">
                    </div>

                    <!-- Submit Button -->
                    <button type="submit" class="btn btn-dark w-100">
                        Upload Image
                    </button>
                </form>
            </div>
        </div>
    </div>

    <!-- Bootstrap 5.3 JS (Optional) -->
    <script src="https://cdn.jsdelivr.net/npm/bootstrap@5.3.3/dist/js/bootstrap.bundle.min.js"></script>

</body>
</html>
routes/web.php
<?php

use Illuminate\Support\Facades\Route;
use App\Http\Controllers\API\ToDoController;

Route::post('/image-upload', [ToDoController::class, 'upload'])
    ->name('image.upload');
Route::get('/upload', function () {
    return view('form');
});
app/Http/Controllers/API/ToDoController.php
public function upload(Request $request)
    {
        $request->validate([
            'image' => 'required|image|mimes:jpg,jpeg,png|max:2048',
        ]);

        $file = $request->file('image');
        $response = Http::attach(
            'attachment', file_get_contents($file->getPathname()), $file->getClientOriginalName(), ['Content-Type' => 'image/jpeg']
        )->post('https://httpbin.org/post');


        if ($response->failed()) {
            return back()->withErrors([
                'upload' => 'Upload to httpbin failed with status ' . $response->status(),
            ]);
        }

        $json = $response->json();
        return response()->json($json);

    }
Explanation:
- Validates the uploaded file to ensure it is an image with allowed types and size.
- Retrieves the uploaded image from the request.
- Http::attach() sends the image as multipart form data.
- Uploads the file to an external API endpoint.
- $response->failed() checks if the upload request failed.
- Returns an error message if the upload fails.
- If successful, returns the API response as JSON.
In the second approach, we use Http::asForm()->post() to upload a file, along with an API key required by the dummy testing website.
routes/web.php
<?php

use Illuminate\Support\Facades\Route;
use App\Http\Controllers\API\ToDoController;

Route::post('/image-upload', [ToDoController::class, 'uploadImg'])
    ->name('image.upload');
Route::get('/upload', function () {
    return view('form');
});
app/Http/Controllers/API/ToDoController.php
public function uploadImg(Request $request)
{

     $request->validate([
            'image' => 'required|image|mimes:jpg,jpeg,png|max:2048',
        ]);

    $apiKey   = env('KEY'); // store in config/services.php or .env
    $file = $request->file('image');

    // Read file and encode as base64 (what ImgBB expects)
    $base64Image = base64_encode(file_get_contents($file->getPathname()));

    $response = Http::asForm()->post('https://api.imgbb.com/1/upload', [
        'key'   => $apiKey,
        'image' => $base64Image,
        'name'  => pathinfo($file->getClientOriginalName(), PATHINFO_FILENAME),
    ]);

    if ($response->failed()) {
        // handle error
        return response()->json([
            'success' => false,
            'message' => 'Img upload failed',
            'error'   => $response->json(),
        ], 500);
    }

    $data = $response->json();

    // Public image URL from ImgBB response
    $imageUrl = $data['data']['url'] ?? null;
    return response()->json([
        'success'   => true,
        'image_url' => $imageUrl,
        'data'      => $data,
    ]);
}
Explanation:
- Validates the request to ensure a valid image file is uploaded.
- Retrieves the API key from the environment configuration.
- Reads the image file and encodes it in base64 (required by ImgBB).
- Http::asForm()->post() sends a form-based POST request to the ImgBB API.
- Passes the API key, image data, and image name in the request.
- $response->failed() checks if the upload request failed.
- Extracts and returns the public image URL from the API response on success.
Test Image Upload
Visit http://127.0.0.1:8000/upload in your browser, upload an image, and the image will be submitted to the image.upload route to display the response.
Step 8: Error Handling & Timeouts and Retry Strategies
Checking for Errors
Unlike Guzzle’s default behavior, Laravel’s HTTP client does not throw exceptions on 4xx or 5xx responses automatically. Instead, you must explicitly check:
 public function index()
    {
        $response = Http::put('https://jsonplaceholder.typicode.com/todos');

         // Handle successful response
        if($response->successful()){
             $todo = $response->json();
             return response()->json($todo);
        }
         elseif ($response->clientError()) {
             // Handle 400-level errors
            $error = $response->json();
           return response()->json(['Client error: ' => $response->status()]);
        }
        elseif ($response->serverError()) {
            // Handle 500-level errors
           return response()->json(['Server error: ' => $response->status()]);
        }


    }
Explanation:
- $response->successful() checks for a successful response (2xx).
- $response->clientError() handles client-side errors (4xx).
- $response->serverError() handles server-side errors (5xx).
- Returns appropriate JSON responses based on the HTTP status code.
Setting Timeouts
Control how long Laravel waits for responses:
// Set response timeout (default is 30 seconds)
$response = Http::timeout(5)->get('https://jsonplaceholder.typicode.com/todos');

// Set connection timeout (default is 10 seconds)
$response = Http::connectTimeout(3)->get('https://jsonplaceholder.typicode.com/todos');
If a timeout is exceeded, Laravel throws Illuminate\Http\Client\ConnectionException.
Automatic Retries
Retry failed requests automatically:
 // Retry 3 times with 100ms between attempts
        $response = Http::retry(3, 100)->get('https://jsonplaceholder.typicode.com/todos');

 // Exponential backoff: retry with 100ms, 200ms, 400ms intervals
        $response = Http::retry([100, 200, 400])->get('https://jsonplaceholder.typicode.com/todos');
Explanation:
- Http::retry(3, 100) retries the request 3 times with a 100ms delay between each attempt.
- Helps handle temporary network failures or timeouts.
- Http::retry([100, 200, 400]) uses exponential backoff, increasing the delay after each retry.
- Improves reliability when calling unstable or slow APIs.
Using Guzzle Client Directly
It provides Full Control Over HTTP Requests. Useful when APIs need custom configurations.
  use GuzzleHttp\Client;

    public function index()
    {
       $client = new Client();

       $response = $client->request('GET', 'https://jsonplaceholder.typicode.com/todos');
       $data = json_decode($response->getBody(), true);

       return $data;
    }
Explanation:
- GuzzleHttp\Client is used to make HTTP requests directly.
- Creates a new Guzzle client instance.
- Sends a GET request to the /todos API endpoint.
- Reads the response body and decodes the JSON data.
- Returns the fetched todo list as an array response.
Conclusion
In this tutorial, you explored how to use Laravel 12’s Guzzle-based HTTP client to work confidently with real-world APIs, not just for simple GET and POST calls but also for PUT, DELETE, authenticated requests, and file uploads. By combining expressive methods like get(), post(), put(), delete(), withHeaders(), attach(), and asForm() with structured JSON handling, you saw how to build clean, maintainable integration layers around external services.
Most importantly, you learned how to harden these integrations with proper error handling, timeouts, and retry strategies so that transient failures, slow APIs, or server-side errors do not crash your application or degrade user experience. Adopting these patterns—explicit status checks, timeout() and connectTimeout(), and retry() with backoff—will help you design resilient, production-ready HTTP clients in Laravel 12 that are easier to debug, scale, and extend as your project grows.
