
In this Laravel 12 tutorial you will learn in laravel 12 how to integrate chatGPT API example step by step.
In today’s fast-moving digital world, artificial intelligence is no longer optional—it’s essential. If you’re building modern web applications, learning How to Integrate ChatGPT API with Laravel 12 can give your project a major edge. From chatbots and customer support systems to content generation and smart search, ChatGPT unlocks powerful capabilities with minimal effort.
Laravel 12, the latest evolution of the Laravel framework, offers a clean architecture, strong security, and developer-friendly tools that pair perfectly with AI-driven APIs. This article provides a complete, beginner-friendly yet professional guide to integrating ChatGPT API into Laravel 12 the right way.
By the end, you’ll have a working integration, understand best practices, and know how to scale your AI features confidently.
Table of Contents
What Is ChatGPT and Why Use It in Laravel 12?
ChatGPT is an advanced language model developed by OpenAI. It can generate human-like text, answer questions, summarize content, and even write code.
Key Benefits of Using ChatGPT in Laravel 12
- Automate responses and workflows
- Build AI chatbots and virtual assistants
- Generate dynamic content on demand
- Improve user engagement and retention
- Save development time with smart automation
Laravel 12’s service container, HTTP client, and environment configuration make AI integration clean and maintainable.
Step 1: Set Up Your Laravel 12 Project
If you don’t have a Laravel project yet, create one:
composer create-project laravel/laravel chatgpt-integration
cd chatgpt-integration
Step 2: Install the openai-php/laravel PHP Package
Laravel 12 works best with the official OpenAI PHP SDK. Install it via Composer:
composer require openai-php/laravel
This package provides a convenient Laravel-first interface to the OpenAI API.
Publish Configuration File
Next, publish the OpenAI package configuration file using the Artisan command below. This will create the configuration file in your Laravel project, allowing you to customize the API settings if needed:
php artisan vendor:publish --provider="OpenAI\Laravel\ServiceProvider"
This creates config/openai.php where you can customize default models, timeouts, and other settings.
Step 3: Create OpenAI Account & Generate API Key
Steps to Create an OpenAI Account and Generate an API Key
1. Create an OpenAI Account
First, visit the OpenAI platform at https://platform.openai.com/
Register or log in using your email account. After successful registration, OpenAI provides free trial credits (previously up to $18 for 3 months, subject to availability and policy changes) for testing purposes.
2. Generate an API Key
Once logged in, navigate to the API keys section: https://platform.openai.com/account/api-keys
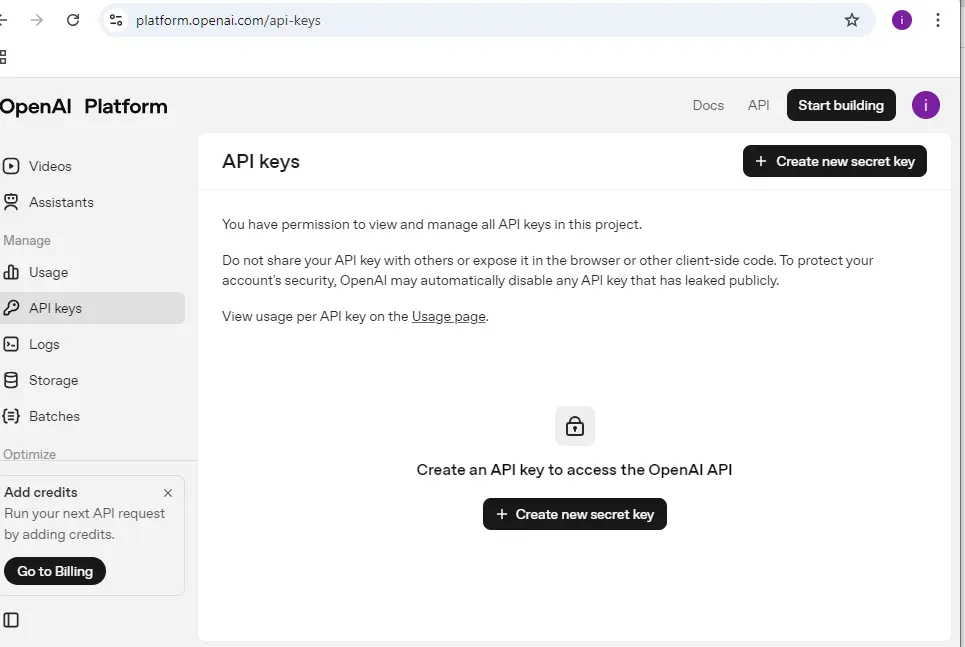
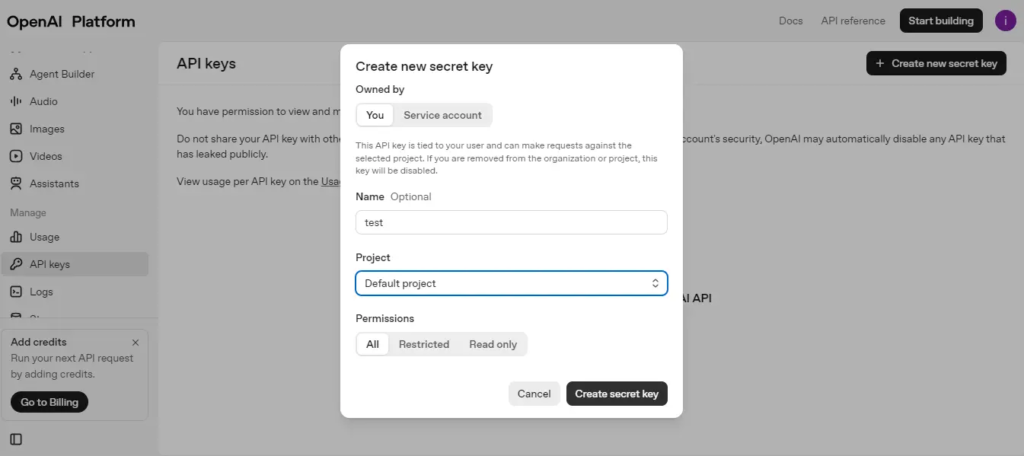
Click on “Create new secret key” to generate your API token.
3. Copy and Secure the API Key
Copy the generated API key immediately. For security reasons, OpenAI will not show the full key again.
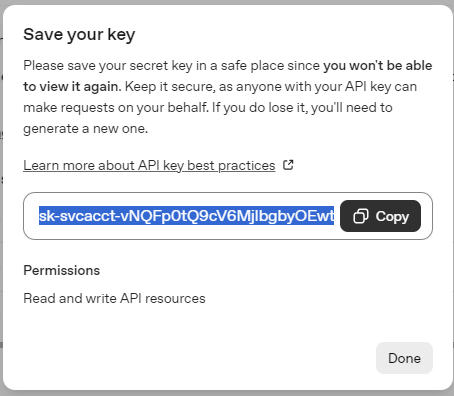
4. Add API Key to Laravel .env File
Paste the copied API key into your Laravel project’s .env file as shown below:
OPENAI_API_KEY=your_api_key_here
Read Also: Laravel 12 Guzzle HTTP Request Tutorial: Error Handling & Timeouts
Step 4: Create a Controller to Handle API Requests
In this step, we will create a ChatController inside the app/Http/Controllers directory to handle the application logic.
<?php

namespace App\Http\Controllers;

use Illuminate\Http\Request;
use Illuminate\Support\Facades\Http;

class ChatController extends Controller
{
    public function formView(Request $request)
    {
        return view('form');
    }
    /**
     * Write code on Method
     *
     * @return response()
     */
    public function chatGPT(Request $request)
    {
        $request->validate([
            'prompt' => 'required|string',
        ]);

        $response = Http::withHeaders([
            'Content-Type' => 'application/json',
            'Authorization' => 'Bearer '.env('OPENAI_API_KEY'),
         ])->post('https://api.openai.com/v1/responses',
         ["model"=> "gpt-4o",
         "input"=>$request->prompt
         ]);

        $output = "";

        if($response->successful()){
            $output = $response->json()['output'][0]['content'][0]['text'];
        }
        else{
          $output = "Something Went Wrong";
        }

         return view('form',compact('output'));


    }

}
Explanation
- Validates the prompt input from the request
- Sends the prompt to OpenAI API using Laravel HTTP client
- Receives and extracts the AI-generated response
- Handles API failure gracefully
- Returns the output to the view for display
Step 5: Create Blade File
Now, create a Blade file at resources/views/form.blade.php. We will use Bootstrap for styling the form layout.
<!DOCTYPE html>
<html>

<head>
    <title>Laravel 12 How to Integrate ChatGPT API Example</title>
    <link href="https://cdn.jsdelivr.net/npm/bootstrap@5.3.8/dist/css/bootstrap.min.css" rel="stylesheet">

</head>

<body>
    <div class="container mt-5">
        <div class="row justify-content-center">
            <div class="col-md-6">
                <div class="card">
                    <div class="card-header bg-primary text-center text-white">
                        Laravel 12 How to Integrate ChatGPT API Example
                    </div>
                    <div class="card-body">

                        <form method="POST" action="{{ route('chatgpt') }}">
                            @csrf

                            <div class="mb-3">
                                <label for="prompt" class="form-label">
                                    Prompt
                                </label>

                                <input type="text" class="form-control" id="prompt" name="prompt"
                                    placeholder="Enter your prompt" required>
                            </div>

                            <button type="submit" class="btn btn-primary">
                                Submit
                            </button>
                        </form>
                        @if (!empty($output))
                            <div class="mt-5">
                                <strong>Result: </strong>
                                {{ $output }}
                            </div>
                        @endif
                    </div>
                </div>
            </div>
        </div>
    </div>


</body>

</html>
Explanation
- Takes user input through the prompt field
- Submits data to the chatgpt route
- Shows the AI response if output is available
Step 6: Define Routes
Add the following routes to routes/web.php:
<?php

use Illuminate\Support\Facades\Route;
use App\Http\Controllers\ChatController;

Route::get('/chatgpt', [ChatController::class, 'formView']);
Route::post('/chatgpt', [ChatController::class, 'chatGPT'])->name('chatgpt');
Step 7: Run The Application
To run the Laravel 12 application and test the ChatGPT integration, Open your terminal and navigate to your Laravel project directory and Start the Laravel development server using Artisan:
php artisan serve
Once the server is running, open the URL shown in the terminal (usually http://127.0.0.1:8000/chatgpt) in your browser to access the ChatGPT form and test prompts.
Enter a prompt, submit the form, and you should see the AI-generated response rendered on the same page.
Conclusion
In this Laravel 12 tutorial you learned step by step how to integrate the ChatGPT API example in a real Laravel 12 application.
You explored how to create a fresh Laravel project, install the openai-php/laravel package, configure the API key, build a controller and Blade view, define routes, and finally run and test the app in the browser.
By connecting Laravel 12’s clean architecture with OpenAI’s ChatGPT, you can now build intelligent features like chatbots, automated support, content generation, and smart tools with minimal extra code.
From here, you can enhance your project further by adding conversation history, role-based prompts, logging, rate limiting, and deploying the application to production for real users.
