In this tutorial Laravel 12 How to Send WhatsApp message using Twilio, I will show you how to send whatsapp messages using twilio api in laravel 12 application.In this example, I’m only showing how to send a simple text message with emojis using WhatsApp. But you can also use the same method to send pictures, documents, or other media if needed.
Twilio is a cloud-based communication platform that enables developers to integrate video, messaging, voice, and email capabilities into their applications. With support for multiple programming languages and a highly scalable infrastructure, Twilio simplifies the process of building real-time communication features such as SMS, phone calls, and two-factor authentication.
To begin integrating WhatsApp messaging in Laravel, you’ll first need to have a Laravel 12 project set up. Once your application is ready, the next step is to create a Twilio account, which will provide the necessary credentials for WhatsApp API access.
After registering on Twilio, install the twilio/sdk package via Composer. Then, copy your Account SID, WhatsApp-enabled phone number , and Auth Token from the Twilio dashboard. These credentials should be securely added to your project’s .env file for configuration.
Next, you’ll define a route and generate a controller to handle the messaging logic. To keep things simple and user-friendly, we’ll use Bootstrap to build a basic form that accepts a phone number and message content. Submitting the form will trigger the controller method to send the WhatsApp message using Twilio’s API.
Integration Steps for WhatsApp API in Laravel 12
Step 1: Set Up a New Laravel 12 Project
Step 2: Register Twilio Account
Step 3: Install the Twilio SDK via Composer
Step 4: Create a Controller
Step 5: Define a Route
Step 6: Create a Blade View for the Input Form
Step 7: Run the Laravel Application
🛠️ Step 1: Set Up a New Laravel 12 Project
We’ll start by creating a fresh Laravel application. If your project is already in place, you may skip this step. Use the command below to generate a new Laravel project:
composer create-project laravel/laravel laravel-send-whatsapp-message-using-twilio
🧑 Step 2: Register Twilio Account
Once Laravel installation is completed, create an account on Twilio.com.Visit twilio.com and sign up for an account. Once registered, you’ll be able to access your Account SID, Auth Token, and Twilio WhatsApp-enabled number. Refer to the images below for guidance.
Follow These Steps to Set Up Your Twilio Account:
Create an Account inside Twilio


Twilio Console
In the Twilio Console, you will get your Account SID and Auth Token.
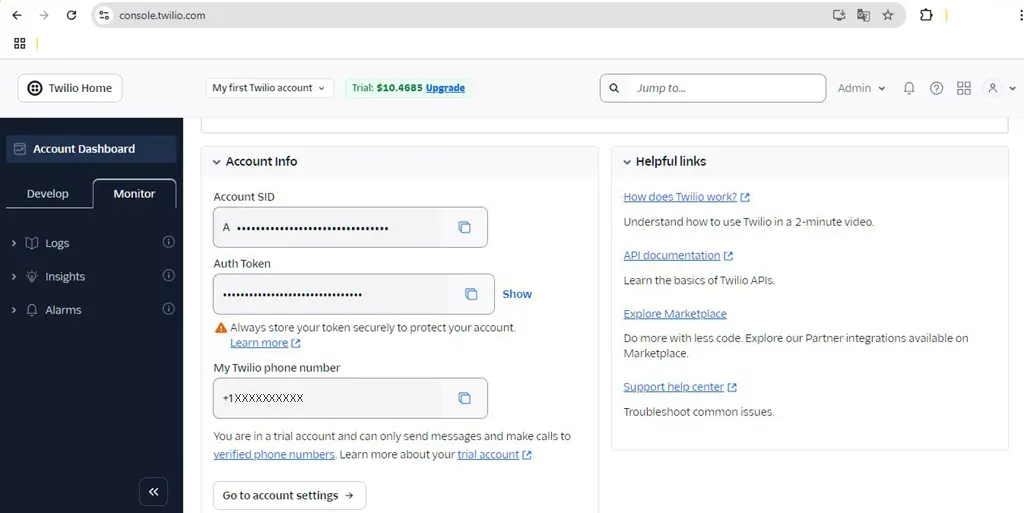
Get Your Credentials
From your Twilio Console Dashboard, you will get the following details:
- Account SID
- Auth Token
- Twilio Phone Number
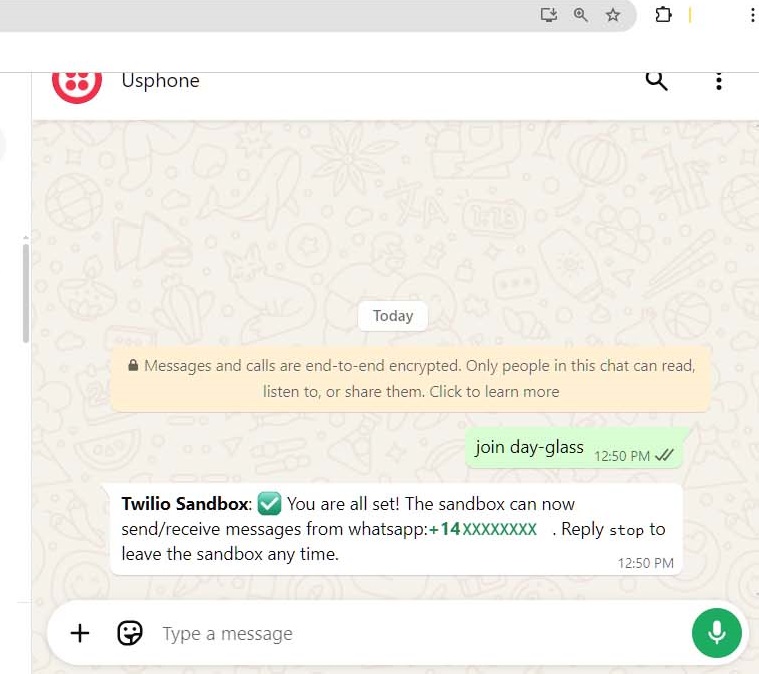
Connect to WhatsApp Sandbox
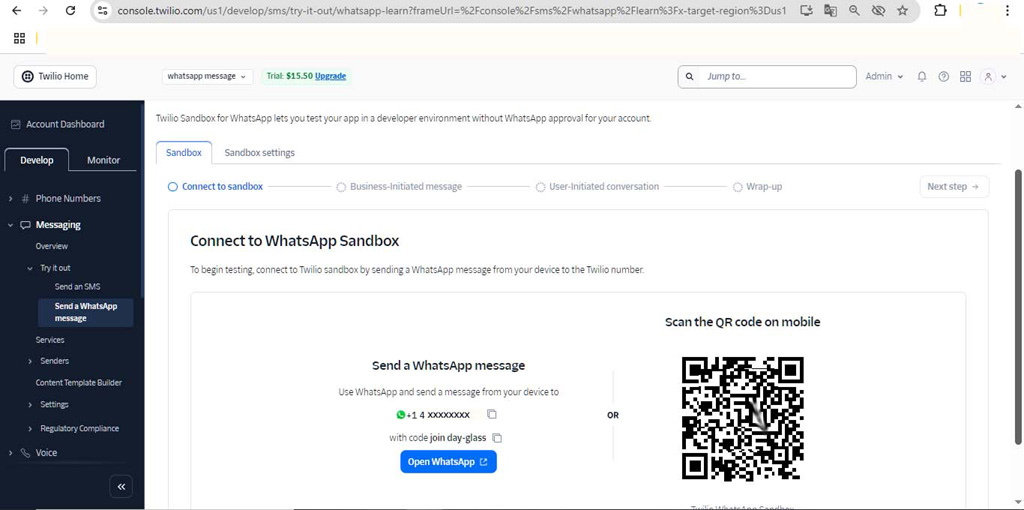
send join code to twilio whatsapp number
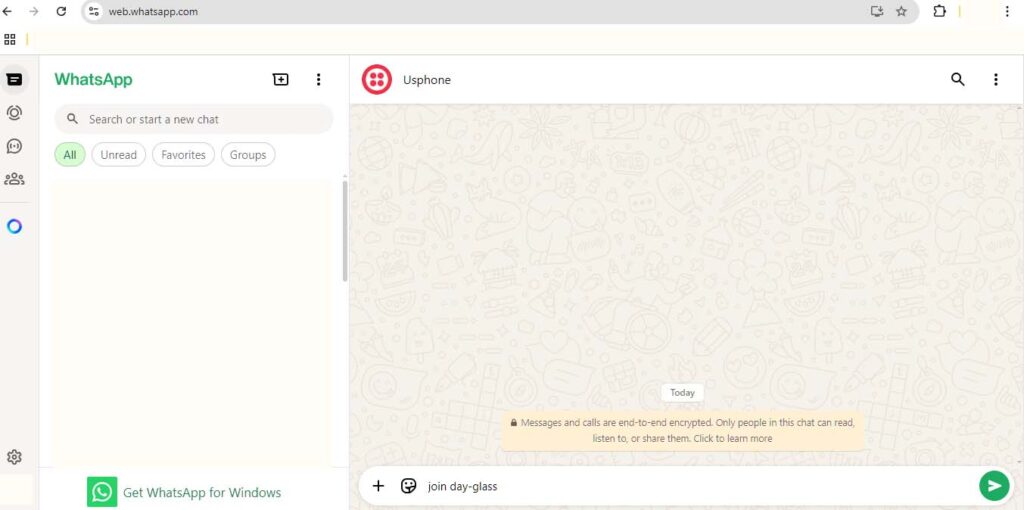
you recieve message from twilio
Step 3: Install the Twilio SDK via Composer
After creating your Twilio account, switch to your Laravel project directory (laravel-send-whatsapp-message-using-twilio) and install the Twilio SDK using the command below:
cd laravel-send-whatsapp-message-using-twilio
composer require twilio/sdk
Copy the necessary credentials—Account SID, Auth Token, and WhatsApp-enabled number—from your Twilio dashboard, and add them to your .env file as demonstrated in the code snippet below..
TWILIO_SID="INSERT YOUR TWILIO SID HERE"
TWILIO_AUTH_TOKEN="INSERT YOUR TWILIO TOKEN HERE"
TWILIO_WHATSAPP_NUMBER="INSERT YOUR TWILIO WHATSAPP NUMBER IN [E.164] FORMAT eg.+14195552671"
🧠 Step 4: Create a Controller
In this step, we will create a WhatsappController. To do this, run the following command:
php artisan make:controller WhatsappController
app/Http/Controllers/WhatsappController.php
<?php

namespace App\Http\Controllers;

use Illuminate\Http\Request;
use Exception;
use Twilio\Rest\Client;

class WhatsappController extends Controller
{
     public function index()
    {
        return view('whatsapp_message');
    }

      public function sendWhatsappMessage(Request $request)
    {

        $request->validate([
            'phone' => 'required ',
            'message' => 'required | max:255',
        ]);

        $receiverNumber = "whatsapp:+".$request->phone;
        $message = $request->message;
        try {

            $account_sid = getenv ("TWILIO_SID");
            $auth_token = getenv("TWILIO_AUTH_TOKEN");
            $twilio_number = getenv("TWILIO_WHATSAPP_NUMBER");

            $client = new Client($account_sid, $auth_token);
            $client->messages->create(  $receiverNumber, // To,
             [
                'from' => "whatsapp:". $twilio_number,
                'body' => $message]);
             return back()->withSuccess('Whatsapp Message Sent Successfully!');
        }
        catch (Exception $e) {
            return back()->with(['error' => $e->getMessage()]);
        }
    }
}
Inside it, we will create the following methods: index() and sendWhatsappMessage(). The sendWhatsappMessage() method will contain the code for sending a WhatsApp message.
One important thing to keep in mind is that the number to which you are sending the WhatsApp message must be in the format whatsapp:+[phone number with country code], otherwise the message will not be sent and an error will occur.
Similarly, make sure to prefix the Twilio number with whatsapp:+ as required by the API format.
🧑 Step 5: Define a Route
In the next step, we’ll define the routes. Open the web.php file and add two routes—one to display the form view and another to handle the form submission.
routes/web.php
<?php

use Illuminate\Support\Facades\Route;
use App\Http\Controllers\WhatsappController;

Route::get('send-whatsapp', [WhatsappController::class, 'index']);
Route::post('send-whatsapp', [WhatsappController::class, 'sendWhatsappMessage'])->name('send.whatsapp');
Step 6: Create a Blade View for the Input Form
In this step, we will create a form for sending a message. For this, we are using Bootstrap 5.3 CDN, and we will create two fields: one input field for the phone number and a textbox for the message.
resources/views/whatsapp_message.blade.php
<!DOCTYPE html>
<html>
<head>
  <meta charset="utf-8">
  <meta name="viewport" content="width=device-width, initial-scale=1">
  <title>Laravel 12 How to Send WhatsApp message using Twilio - itstuffsolutiotions.io</title>
   <link href="https://cdn.jsdelivr.net/npm/bootstrap@5.3.6/dist/css/bootstrap.min.css" rel="stylesheet" >
  <style type="text/css">
    body{
      background: #F8F9FA;
    }
  </style>
</head>
<body>

<section class="bg-light py-3 py-md-5">
  <div class="container">
    <div class="row justify-content-center">
      <div class="col-12 col-sm-10 col-md-8 col-lg-6 col-xl-5 col-xxl-4">
        <div class="card border border-light-subtle rounded-3 shadow-sm mt-5">
          <div class="card-body p-3 p-md-4 p-xl-5">
             @session('success')
                <div class="alert alert-success" role="alert">
                {{ $value }}
                </div>
             @endsession
            <h2 class="text-center mb-4">Laravel 12 How to Send WhatsApp message using Twilio - itstuffsolutiotions.io</h2>
            <form method="POST" action="{{ route('send.whatsapp') }}">
              @csrf

              @session('error')
                  <div class="alert alert-danger" role="alert">
                      {{ session('error') }}
                  </div>
              @endsession

              <div class="row gy-2 overflow-hidden">
                <div class="col-12">
                  <div class="form-floating mb-3">
                    <input type="text" class="form-control @error('phone') is-invalid @enderror" name="phone" id="phone" value="" placeholder="eg. 999876545298" required>
                    <label for="phone" class="form-label">{{ __('Reciever Whatsapp Number') }}</label>
                  </div>
                  @error('phone')
                      <span class="invalid-feedback" role="alert">
                          <strong>{{ $message }}</strong>
                      </span>
                  @enderror
                </div>
                <div class="col-12">
                  <div class="form-floating mb-3">
                    <textarea  type="text" class="form-control @error('message') is-invalid @enderror" name="message" id="message" cols="50" placeholder="your message..." required></textarea>
                    <label for="message" class="form-label">{{ __('Whatsapp Message') }}</label>
                  </div>
                  @error('message')
                      <span class="invalid-feedback" role="alert">
                          <strong>{{ $message }}</strong>
                      </span>
                  @enderror
                </div>
                <div class="col-12">
                  <div class="d-grid my-3">
                    <button class="btn btn-success btn-lg" type="submit">{{ __('Send Whatsapp') }}</button>
                  </div>
                </div>

              </div>
            </form>
          </div>
        </div>
      </div>
    </div>
  </div>
</section>

</body>
</html>
🚀 Step 7: Run the Laravel Application
After completing all the above steps, run the following command to start the application:.
php artisan serve
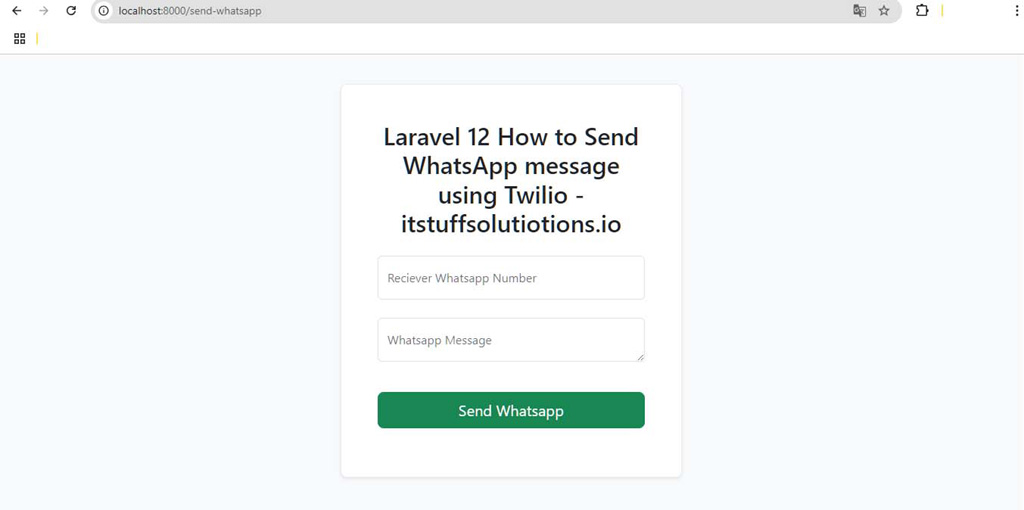
After that, we will open the browser and enter the URL provided below, and the screen will appear as shown in the images below.
http://127.0.0.1:8000/send-whatsapp

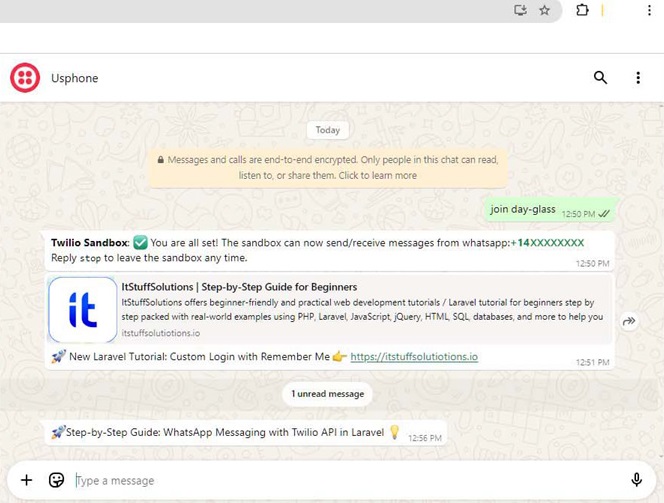
Message Preview on WhatsApp Web
Conclusion
In this tutorial, we have learned how to send whatsapp message to users through Twilio Whatsapp API. he Twilio API integration in Laravel isn’t limited to just text messages—you can also send media files such as images, documents, and audio via WhatsApp. This allows you to create more dynamic and engaging communication experiences within your application.
For the full implementation details, you can explore the complete source code on GitHub.
