
In this laravel 12 tutorial titled “laravel 12 multiple image upload CRUD with preview example”, you will learn how to build a CRUD application in Laravel 12 with the ability to upload multiple images and preview them before saving. This feature is useful in many real-world projects such as e-commerce product galleries, user profile albums, or blog post attachments.
We will cover the entire process step by step — from setting up the laravel 12 project, creating models and migrations, defining relationships, implementing CRUD operations, handling multiple image uploads, to previewing images and deleting them when necessary.
Prerequisites
Before starting, ensure you have Laravel 12 installed with PHP 8.2 or higher.
Steps For Laravel 12 Multiple Image Upload CRUD with Preview Example
- Step 1: Install Laravel 12 Project
- Step 2: Configure Database
- Step 3: Create Migration and Model
- Step 4: Define Relationships
- Step 5: Define Routes
- Step 6: Implement CRUD Methods in Controller
- Step 7: Create Blade Views
- Step 8: Test the Application
Step 1: Install Laravel 12 Project
If you don’t have a fresh Laravel 12 application, create one using Composer:
composer create-project laravel/laravel laravel-multiple-image-crud
Step 2: Configure Database
Open the .env file and update your database details:
DB_CONNECTION=sqlite
DB_HOST=127.0.0.1
DB_PORT=3306
DB_DATABASE=laravel
DB_USERNAME=root
DB_PASSWORD=
Here we are using sqlite database you can use any database it depends on your requirement.
Step 3: Create Migration and Model
Generate a model , migration and resource controller for storing image information and creating logic for image upload with preview CRUD:
php artisan make:model Post -mcr
This command creates:
- A Post model in app/Models.
- A migration file in database/migrations.
- A controller in app/Http/Controllers/PostController.php.
Now, open the migration file database/migrations/2025_xxxx_create_products_table.php and Update the migration file with the required schema:
<?php

use Illuminate\Database\Migrations\Migration;
use Illuminate\Database\Schema\Blueprint;
use Illuminate\Support\Facades\Schema;

return new class extends Migration
{
    /**
     * Run the migrations.
     */
    public function up(): void
    {
        Schema::create('products', function (Blueprint $table) {
            $table->id();
            $table->string("name");
            $table->text("description");
            $table->timestamps();
        });

        Schema::create('images', function (Blueprint $table) {
            $table->id();
            $table->string("name");
            $table->foreignId('product_id');
            $table->timestamps();
        });
    }

    /**
     * Reverse the migrations.
     */
    public function down(): void
    {
        Schema::dropIfExists('products');
        Schema::dropIfExists('images');
    }
};
In this schema we have added products and images table schema. Now, Run migration command given below:
php artisan migrate
Read Also : Laravel 12 Image Validation Rules Example
Step 4: Define Relationships
Now, Run the following command to create the Image model:
php artisan make:model Image
This will generate an Image.php model inside the App/Models folder.
Update the Product Model
Open App/Models/Product.php and update it with the fillable attributes and the relationship with the images table.
<?php

namespace App\Models;

use Illuminate\Database\Eloquent\Model;

class Product extends Model
{
      protected $fillable = [
        'name',
        'description',
    ];

   /**

     * Get the images for the product.

     */

    public function images()
    {

        return $this->hasMany(Image::class);

    }
}
In the Product model, we define an images() function, This function defines a one-to-many relationship between Product and Image. hasMany(Image::class) means one product can have multiple images.
Update the Image Model
Now, open App/Models/Image.php and add the fillable attributes. Also, define the product() function , This function defines a many-to-one relationship: each image belongs to a single product. belongsTo(Product::class) tells Laravel that this model has a foreign key product_id pointing to the products table.
<?php

namespace App\Models;

use Illuminate\Database\Eloquent\Model;

class Image extends Model
{

      protected $fillable = [
        'name',
        'product_id',
    ];

    /**

     * Get the product that owns the images.

     */

    public function product()
    {
        return $this->belongsTo(Product::class);

    }
}
Read Also : Laravel 12 image Upload in public folder with preview
Step 5: Define Routes
Now, open the routes/web.php file and add the product routes. Since we’re using a resource controller, we only need a single line for the entire Product CRUD operation, along with a separate route to handle image deletion via AJAX.
<?php
use Illuminate\Support\Facades\Route;
use App\Http\Controllers\ProductController;

Route::resource('products', ProductController::class);
Route::get ('products/delete-images/{id}', [ProductController::class,'destroyImages'])->name('images.destroy');
Step 6: Implement CRUD Methods in Controller
Let’s open App/Http/Controllers/ProductController.php and update with the following code step by step. The controller handles product CRUD with multi-image upload. It uses a Product model and a Image model that stores each image path with a product_id foreign key.
<?php

namespace App\Http\Controllers;

use App\Models\Product;
use App\Models\Image;
use Illuminate\Http\Request;

class ProductController extends Controller
{
    /**
     * Display a listing of the resource.
     */
    public function index()
    {
        $products = Product::with('images')->latest()->get();
        return view('products.index', compact('products'));
    }

    /**
     * Show the form for creating a new resource.
     */
    public function create()
    {
        return view('products.create');
    }

    /**
     * Store a newly created resource in storage.
     */
    public function store(Request $request)
    {
         $request->validate([
             'name' => 'required|string',
             'description' => 'required|string',
             'images'=>'required|array',
             'images.*'=>'image|mimes:jpeg,png,jpg,svg|max:2048'
        ]);

          $product = Product::create(
            [
                'name' =>$request->name ,
                'description' =>$request->description
            ]);

            foreach($request->file('images') as $key => $file){

               $imageName = time().rand(1,99).'.'.$file->extension();

                $file->move(public_path('uploads'), $imageName);
                $path = '/uploads/'.$imageName;
                $product->images()->create(['name' => $path]);
          }


        return redirect()->route('products.index')->withSuccess( 'Product created successfully');
    }

    /**
     * Display the specified resource.
     */
    public function show(Product $product)
    {
        return view('products.show', compact('product'));
    }

    /**
     * Show the form for editing the specified resource.
     */
    public function edit(Product $product)
    {
        return view('products.edit', compact('product'));
    }

    /**
     * Update the specified resource in storage.
     */
    public function update(Request $request, Product $product)
    {
         $request->validate([
             'name' => 'required|string',
             'description' => 'required|string',
             'images'=>'nullable|array',
             'images.*'=>'image|sometimes|mimes:jpeg,png,jpg,svg|max:2048'
        ]);

           // If new images are uploaded
          if ($request->hasFile('images'))
            {

                   foreach ($request->file('images') as $file) {

                        $imageName = time().rand(1,99).'.'.$file->extension();
                        $file->move(public_path('uploads'), $imageName);
                        $path = '/uploads/'.$imageName;
                        $product->images()->create(['name' => $path]);
                    }
            }

          // Update product fields
            $product->update([
                'name' => $request->name,
                'description' => $request->description,
            ]);

           return redirect()->route('products.index')->with('success', 'Product updated successfully.');
    }

    /**
     * Remove the specified resource from storage.
     */
    public function destroy(Product $product)
    {
         // Delete related images
            foreach ($product->images as $image) {
                $imagePath = public_path($image->name);

                if (file_exists($imagePath)) {
                    unlink($imagePath); // remove from storage
                }

                $image->delete(); // remove from database
            }

           $product->delete();
           return redirect()->route('products.index')->with('success', 'Product deleted successfully');
    }


    /**
     * Remove the specified resource from storage.
     */
    public function destroyImages($id)
    {
        $image  = Image::findOrFail($id);

        $imagePath = public_path($image->name);

         if (file_exists($imagePath))
            {
                unlink($imagePath); // remove from storage
            }
        $image->delete();
        return response()->json(['success' => 'Image Deleted Successfully!']);
    }
}
1. Index (Read all Products With Images)
- Shows all products along with their images.
- In the view, you can loop through $product->images to display them.
Notes: with(‘images’) prevents N+1 queries. Use pagination if many products.
2. Create (Show Product Form)
- Displays a form to add a new product with multiple images.
3. Store (Save Product With Images)
Validate name, description and images, store products in database, store uploaded images in public/uploads folder and save image path with product_id in images table. $product->images() gives you a hasMany relationship object, you can query, attach, or create related records in the images table. The create() method inserts a new record into the related table (images).
Laravel automatically sets the foreign key (product_id) because you are calling create() through the relationship (images()).
4. Show (Show Product Details)
- Display a single product’s details.
- Uses Route Model Binding (Product $product) to fetch the product automatically.
- Show product details on a separate page.
5. Edit (Show Product Edit Form)
- Show a form for editing an existing product with images.
- Fetches the product and passes it to the view.
- Pre-filling the form with the product’s existing data.
6. Update (Save Edited Product)
- This function will save the edited product.
- Handles form submission from the edit view.
- Uses validation before saving changes.
7. Destroy (Delete the product)
Deletes product and all its related images from DB + filesystem.
⚠️ Important : We haven’t added any manual validation here because Laravel automatically handles it. When a request is made, Laravel attempts to find a Product with the given ID. If no product is found, it throws a ModelNotFoundException, which by default displays a 404 Not Found page. Manual checks are not required unless you want to customize this behavior.
8. destroyImages (Delete only the selected image)
Delete single image record and its file (useful for AJAX delete from the edit page).
Store Image in Public Folder
In the above example we have used public folder to store image
// Save in public/uploads
$file->move(public_path('uploads'), $imageName);
Store Image in Storage Folder
You can store image in storage folder using :
 // Save in storage/app/public/uploads
$file->storeAs('uploads', $imageName,'public');
This code stores the image in the storage/app/public/uploads folder. Here, uploads is the folder name and $imageName is the uploaded file name. The public disk ensures the file is publicly accessible; if not specified, Laravel will store the file in the private disk by default. The public parameter in storeAs() is optional — if omitted, Laravel will use the default disk defined in config/filesystems.php.
Store Image in S3
$file->storeAs('uploads', $imageName, 's3');
This uploads file on s3 . for example URL example: https://your-bucket.s3.amazonaws.com/uploads/1726483000.jpg
Step 7: Create Blade Views
Next, let’s create the view for adding a new product with images. We’ll use Bootstrap 5.3.8 CDN for styling we created a master layout File for views resources/views/layouts/master.blade.php.
<!DOCTYPE html>
<html lang="{{ str_replace('_', '-', app()->getLocale()) }}">

<head>
    <meta charset="utf-8">
    <meta name="viewport" content="width=device-width, initial-scale=1">
    <title>Laravel 12 Multiple Image Upload CRUD with Preview Example - ItStuffSolutions</title>
    <link href="https://cdn.jsdelivr.net/npm/bootstrap@5.3.8/dist/css/bootstrap.min.css" rel="stylesheet">
    <link rel="stylesheet" href="https://cdnjs.cloudflare.com/ajax/libs/font-awesome/6.5.1/css/all.min.css" />

  <style type="text/css">


    #image_gallery img, #preview img{

      width: 200px;

      padding: 5px;

    }

  </style>
</head>

<body>
    <div class="container my-4">
      <div class="row justify-content-center">
        <div class="col-md-10 ">
         @yield('content')
        </div>
     </div>
    </div>

    <script src="https://code.jquery.com/jquery-3.6.0.min.js"></script>
    <script src="https://cdn.jsdelivr.net/npm/bootstrap@5.3.8/dist/js/bootstrap.bundle.min.js"></script>

    <script>
        $(document).ready(function(){
            $("#images").on("change", function(){
                var files = $(this)[0].files;
                $("#image_gallery").empty();
                if(files.length > 0){
                    for(var i = 0; i < files.length; i++){
                        $('#image_gallery').append("<img class='img-thumbnail m-3' src='"+URL.createObjectURL(event.target.files[i])+"'>");

                    }
                }
            });

             @stack('script')

        });
    </script>


</body>

</html>
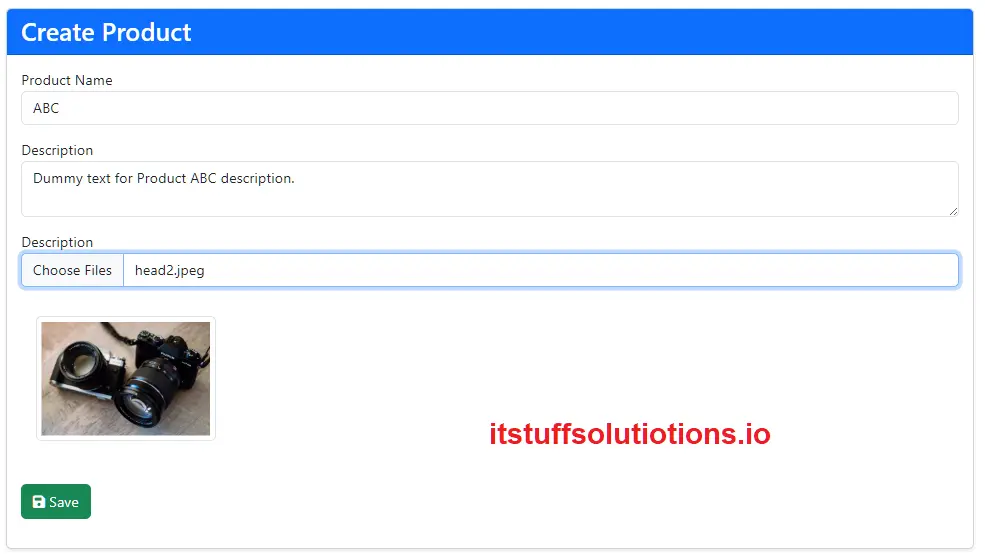
When the you upload images, jQuery is used to show a preview of the selected images. Our input field, which is used for uploading images, has the ID images. Whenever there is any change in the input filed, our jQuery function will run and display all the selected images as a preview inside the div with the ID image_gallery.
Let’s create index.blade.php inside resources/views/layouts folder.
@extends('layouts.app')
@section('content')
<h1 class="text-center">Laravel 12 Multiple Image Upload CRUD with Preview Example</h1>
<a href="{{ route('products.create') }}" class="btn btn-primary btn-sm" style="margin-bottom:15px;">
<span class="glyphicon glyphicon-plus"></span> New Product
</a>
@session('success')
<div class="alert alert-success alert-dismissible fade show">
<strong>Success!</strong> {{ $value }}
<button type="button" class="btn-close" data-bs-dismiss="alert" aria-label="Close"></button>
</div>
@endsession
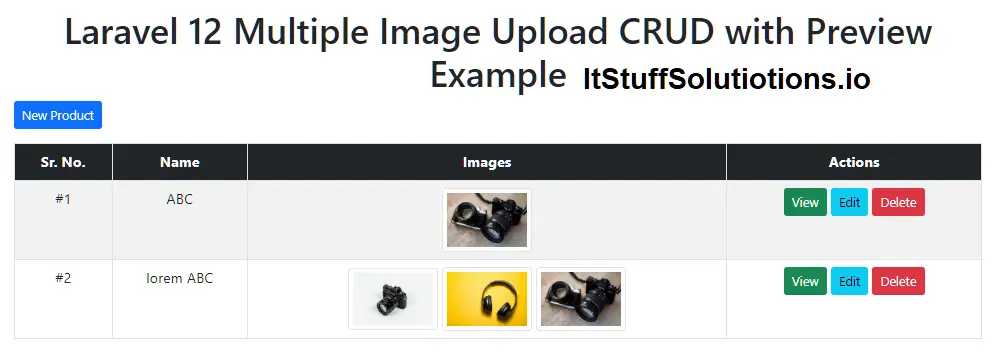
<table class="table table-striped table-bordered table-hover text-center">
<thead class="bg-dark">
<tr>
<th class="text-center text-white">Sr. No.</th>
<th class="text-center text-white">Name</th>
<th class="text-center text-white">Images</th>
<th class="text-center text-white">Actions</th>
</tr>
</thead>
<tbody>
@forelse($products as $key=>$product)
<tr>
<td>#{{ ++$key }}</td>
<td>{{ $product->name }}</td>
<td>
@foreach($product->images as $img)
<img class="img-thumbnail" width="100" src="{{url($img->name)}} "/>
@endforeach
</td>
<td>
<!-- View button -->
<a href="{{ route('products.show', $product) }}" class="btn btn-sm btn-success">
View
</a>
<a href="{{ route('products.edit', $product) }}" class="btn btn-sm btn-info">Edit</a>
<!-- Delete button -->
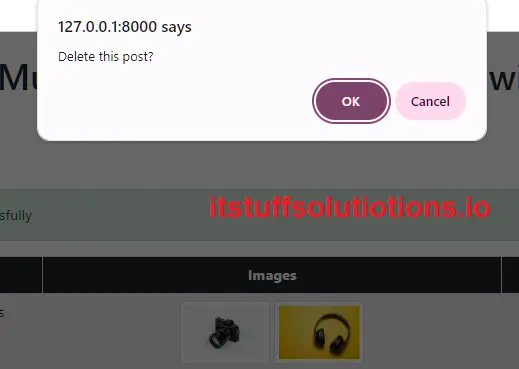
<form action="{{ route('products.destroy', $product) }}" method="POST" style="display:inline;" onsubmit="return confirm('Delete this post?');">
@csrf
@method('DELETE')
<button class="btn btn-sm btn-danger"> Delete</button>
</form>
</td>
</tr>
@empty
<tr>
<td colspan="4" class="fs-3">No Data Found!</td>
</tr>
@endforelse
</tbody>
</table>
@endsection
Let’s create create.blade.php inside resources/views/layouts folder.
@extends('layouts.master')

@section('content')
    <div class="card card-primary mt-3" >
        <div class="card-header bg-primary text-white">
            <h3 class="mb-0">Create Product</h3>
        </div>
        <div class="card-body">

            @if ($errors->any())
                <div class="alert alert-danger">
                    <ul class="mb-0">
                        @foreach ($errors->all() as $error)
                            <li>{{ $error }}</li>
                        @endforeach
                    </ul>
                </div>
            @endif

            <form method="post" action="{{ route('products.store') }}" enctype="multipart/form-data" id="product">
                @csrf
                <div class="form-group">
                    <label>Product Name</label>
                    <input type="text" name="name" class="form-control" value="{{ old('name') }}"/>
                </div>

                <div class="form-group">
                    <label>Description</label>
                    <textarea id="editor" name="description" class="form-control">{{ old('description') }}</textarea>
                </div>
                <div class="form-group">
                    <label>Description</label>
                    <input type="file" name="images[]" id="images" multiple  class="form-control @error('images') is-invalid @enderror">

                    @error('images')
                        <span class="text-danger">{{ $message }}</span>
                    @enderror
                </div>
                <div class="mb-3 image_gallery" id="image_gallery">

                </div>
                <div class="form-group">
                    <button type="submit" class="btn btn-success mt-3"><i class="fa fa-save"></i> Save</button>
                </div>
            </form>

        </div>
    </div>
@endsection
Important : Ensure enctype=”multipart/form-data” and file input name images.
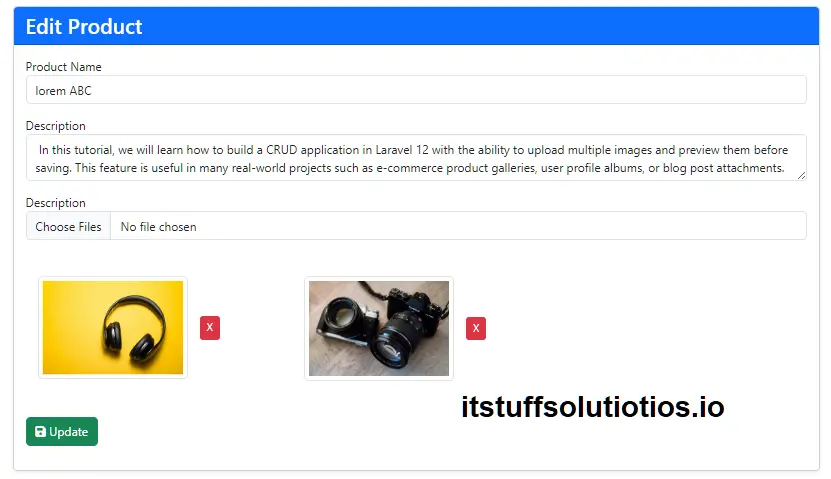
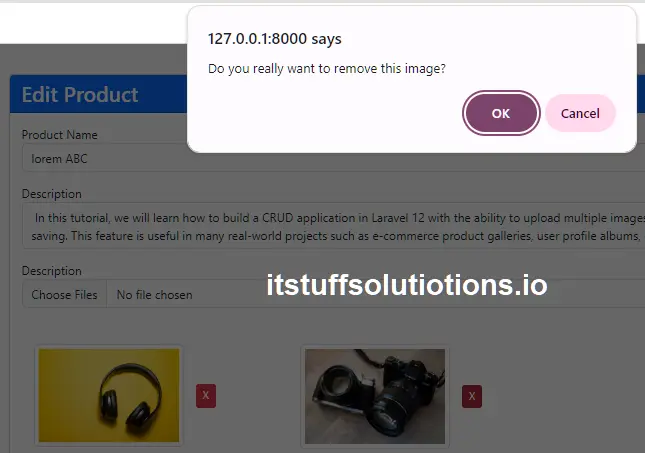
Let’s create edit.blade.php inside resources/views/layouts folder.
@extends('layouts.master')

@section('content')
    <div class="card card-primary mt-3" >
        <div class="card-header bg-primary text-white">
            <h3 class="mb-0">Edit Product</h3>
        </div>
        <div class="card-body">

            @if ($errors->any())
                <div class="alert alert-danger">
                    <ul class="mb-0">
                        @foreach ($errors->all() as $error)
                            <li>{{ $error }}</li>
                        @endforeach
                    </ul>
                </div>
            @endif

            <form method="post" action="{{ route('products.update',$product) }}" enctype="multipart/form-data" id="product">
                @csrf
                @method('PUT')
                <div class="form-group">
                    <label>Product Name</label>
                    <input type="text" name="name" class="form-control" value="{{ old('name', $product->name) }}"/>
                </div>

                <div class="form-group">
                    <label>Description</label>
                    <textarea id="editor" name="description" class="form-control"> {{ old('description', $product->description) }}</textarea>
                </div>
                <div class="form-group">
                    <label>Description</label>
                    <input type="file" name="images[]" id="images" multiple  class="form-control @error('images') is-invalid @enderror">

                    @error('images')
                        <span class="text-danger">{{ $message }}</span>
                    @enderror
                </div>
                 <div class="mb-3 image_gallery row" id="image_gallery">
                 </div>
                <div class="mb-3 preview row" id="preview">
                    @foreach($product->images as $image)
                    <div class="col-md-4"><img class='img-thumbnail m-3' src="{{url($image->name)}}" /><button type="button" class="btn btn-danger btn-sm delete" data-url="{{ route('images.destroy',$image->id) }}">X</button></div>
                    @endforeach
                </div>
                <div class="form-group">
                    <button type="submit" class="btn btn-success mt-3"><i class="fa fa-save"></i> Update</button>
                </div>
            </form>

        </div>
    </div>
@endsection

@push('script')

$('.delete').on('click',function() {

         let button = $(this);
         let url = button.data('url');

        if (confirm("Do you really want to remove this image?") == true) {
            $.ajax({
                url: url,
                type: 'GET',
                dataType: 'json',
                data:{"_token": "{{ csrf_token() }}"},
                success: function(data) {

                    button.closest('.col-md-4').remove();
                }
            });
        }

        });
     @endpush
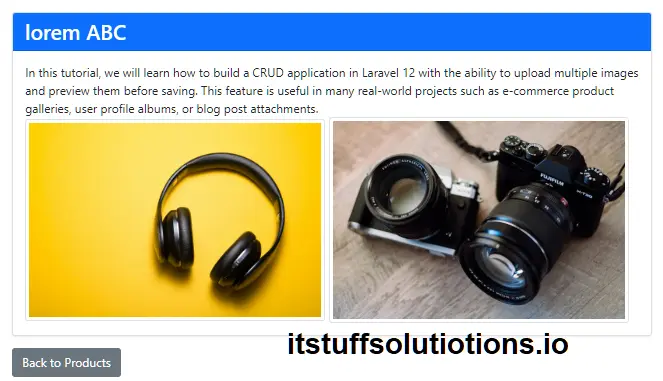
Let’s create show.blade.php inside resources/views/layouts folder.
@extends('layouts.app')

@section('content')
<div class="container my-4">
    <div class="row justify-content-center">
        <div class="col-md-10">

            <div class="card shadow-sm">
                <div class="card-header bg-primary text-white">
                    <h3 class="mb-0">{{ $product->name }}</h3>
                </div>
                <div class="card-body">
                    <div>{!! $product->description !!}</div>
                    <div class="image">
                        @foreach($product->images as $img)
                           <img class="img-thumbnail" width="400" src="{{url($img->name)}} "/>
                        @endforeach
                    </div>
                </div>
            </div>

            <a href="{{ route('products.index') }}" class="btn btn-secondary mt-3">Back to Products</a>

        </div>
    </div>
</div>
@endsection
Step 8: Test the Application
Now that we have successfully completed all the steps, open your command prompt or terminal and run the following command to start the Laravel development server:
php artisan serve
Once the server is running, open your browser and navigate to the product creation page:
http://127.0.0.1:8000/products/create
- Enter a product name and description.
- Upload multiple images and you will see the preview displayed instantly before saving.
- Click on the Save button to store the product along with its images.
- After saving, check the product listing page where you should see the product details along with the uploaded images.
- Try editing a product and update its images to confirm that the edit functionality works properly.
- Also, test deleting single and multiple images to make sure the delete feature removes them both from the database and the preview section.
Conclusion
In this Laravel 12 tutorial, we built a Multiple Image Upload CRUD application with Preview functionality step by step. You learned how to:
- Create migrations, models, and relationships for products and images.
- Implement CRUD operations in a resource controller.
- Upload and store multiple images while linking them to products.
- Show live previews of images before saving using jQuery.
- Edit products and manage their associated images.
- Delete individual images with AJAX or remove entire products along with all related images.
This approach is very useful in real-world applications such as e-commerce product galleries, blog post attachments, or user profile albums.
