
In this comprehensive guide titled “Laravel 12 passport API refresh token tutorial”, we will explore how to implement Refresh Tokens using Laravel 12 and Laravel Passport.
When building secure APIs, you typically want short-lived Access Tokens (for security) and longer-lived Refresh Tokens (for user experience). This ensures that if an access token is stolen, it is only valid for a short window, while the legitimate user can seamlessly stay logged in by swapping their Refresh Token for a new Access Token.
Table of Contents
Prerequisites
- Laravel 12 application installed
- PHP 8.2+
- Basic understanding of REST APIs
Read Also : Laravel 12 REST API Authentication Using Passport Complete Guide
Step 1: Install Laravel Passport
First, install Passport. In Laravel 12, the api.php routes file is not generated automatically. When you install Laravel Passport using the –passport option, the framework sets up everything needed for API authentication in one step:
php artisan install:api --passport
This command handles multiple setup tasks behind the scenes, including:
- Generating and running the required OAuth2 database migrations
- Creating public and private encryption keys for token security
- Automatically adding the routes/api.php file to your project
Next, run the database migrations to create the OAuth tables (clients, access_tokens, refresh_tokens, etc.):
php artisan migrate
Step 2: Configure Authentication
Update the User Model
Open your User model (usually app/Models/User.php) and add the HasApiTokens trait.
<?php

namespace App\Models;

// use Illuminate\Contracts\Auth\MustVerifyEmail;
use Illuminate\Database\Eloquent\Factories\HasFactory;
use Illuminate\Foundation\Auth\User as Authenticatable;
use Illuminate\Notifications\Notifiable;
use Laravel\Passport\HasApiTokens;

class User extends Authenticatable
{
    /** @use HasFactory<\Database\Factories\UserFactory> */
    use HasFactory, Notifiable, HasApiTokens;

    /**
     * The attributes that are mass assignable.
     *
     * @var list<string>
     */
    protected $fillable = [
        'name',
        'email',
        'password',
    ];

    /**
     * The attributes that should be hidden for serialization.
     *
     * @var list<string>
     */
    protected $hidden = [
        'password',
        'remember_token',
    ];

    /**
     * Get the attributes that should be cast.
     *
     * @return array<string, string>
     */
    protected function casts(): array
    {
        return [
            'email_verified_at' => 'datetime',
            'password' => 'hashed',
        ];
    }
}
Configure Auth Guard
Open config/auth.php and set the api driver to passport.
<?php
 // ... other configurations
    'guards' => [
        'web' => [
            'driver' => 'session',
            'provider' => 'users',
        ],
        'api' => [
            'driver' => 'passport',
            'provider' => 'users',
        ],
    ],
// ... other configurations
];
Step 3: Enable Password Grant & Configure Token Lifetimes
To activate the Password Grant feature in Laravel Passport, you need to explicitly enable it within your application’s service provider. This is done by calling the enablePasswordGrant method inside the boot method of the AppServiceProvider.
Open app/Providers/AppServiceProvider.php and add your token configuration in the boot method:
<?php

namespace App\Providers;

use Illuminate\Support\ServiceProvider;
use Laravel\Passport\Passport;

class AppServiceProvider extends ServiceProvider
{
    /**
     * Register any application services.
     */
    public function register(): void
    {
        //
    }

    /**
     * Bootstrap any application services.
     */
    public function boot(): void
    {
        Passport::enablePasswordGrant();

        Passport::tokensExpireIn(now()->addMinutes(5));
        // Refresh tokens expire in 30 days
        //Passport::refreshTokensExpireIn(now()->addDays(30));
    }
}
With this configuration:
- The password grant flow becomes available for API authentication
- Access tokens will expire after 5 minutes
Adjust the expiration periods as needed based on your application’s security requirements.
Step 4: Create a Password Grant Client
To use refresh tokens effectively in a first-party application (like a mobile app or frontend SPA you control), the Resource Owner Password Credentials Grant is often used.
Create a “password grant” client by running:
php artisan passport:client --password
This will output a Client ID and a Client Secret. Copy these down, as you will need them to request tokens. Add these to your .env file:
CLIENT_ID=019b30a9-11cc-725f-bd49-313858ec4a57
CLIENT_SECRET=UOr03sdct5etT1Rx05BaLO3VzIxTWbXsNDGkwKNM
Read Also : How to Upload Multiple Files in Laravel API Using Postman
Step 5: Create the Auth Controller
We will create a controller to handle login (issuing tokens) and refresh (refreshing tokens). A common practice is to proxy the request to the internal /oauth/token route so your frontend doesn’t need to manage the client secret directly if you prefer (though typically the client manages these keys).
php artisan make:controller API/AuthController
Open app/Http/Controllers/API/AuthController.php:
<?php

namespace App\Http\Controllers\API;

use Illuminate\Http\Request;
use App\Models\User;
use Illuminate\Support\Facades\Auth;
use App\Http\Controllers\Controller;
use Illuminate\Http\JsonResponse;
use Illuminate\Support\Facades\Http;

class AuthController extends Controller
{
    /**
     * Login user and create token.
     *
     * @param Request $request
     * @return JsonResponse
     */
    public function login(Request $request): JsonResponse
    {
          $request->validate([
            'email' => 'required|email',
            'password' => 'required|string',
         ]);

        if(Auth::attempt(['email' => $request->email, 'password' => $request->password])){
           $user = Auth::user();

           $response = Http::asForm()->post(url('/oauth/token'), [
            'grant_type' => 'password',
            'client_id' => env("CLIENT_ID"),
            'client_secret' => env("CLIENT_SECRET"),
            'username' => $request->email,
            'password' => $request->password,
            'scope' => '',
             ]);

            $authResponse = $response->json();

            $data= [
                'email' =>  $user->email,
                'expires_in' => $authResponse['expires_in'],
                'access_token' => $authResponse['access_token'],
                'refresh_token' => $authResponse['refresh_token'],
            ];

             return response()->json([
                'status' => true,
                'message' => 'User login successfully.',
                'data' => $data
            ], 200);

        }
        else{
             return response()->json([  'status' => false,'message'=>'Invalid credentials.'],401);
        }
    }

     /**
     * refresh token.
     *
     * @param Request $request
     * @return JsonResponse
     */
    public function refreshToken(Request $request): JsonResponse
    {

        $request->validate([
            'refresh_token' => 'required',
        ]);

         $response = Http::asForm()->post(url('/oauth/token'), [
            'grant_type' => 'refresh_token',
            'refresh_token' => $request->refresh_token,
            'client_id' => env("CLIENT_ID"),
            'client_secret' => env("CLIENT_SECRET"),
            'scope' => '',
             ]);


           return response()->json([
            'status' => true,
            'message' => 'Refreshed token.',
            'data' => $response->json(),
           ], 200);


    }

}
If you encounter the “cURL error 28: Operation timed out” issue, as shown in the image below:

Then, replace Http::asForm()->post(url(‘/oauth/token’), []) with Request::create(url(‘/oauth/token’), ‘POST’, []), as shown in the code below:
<?php

namespace App\Http\Controllers\API;

use Illuminate\Http\Request;
use App\Models\User;
use Illuminate\Support\Facades\Auth;
use App\Http\Controllers\Controller;
use Illuminate\Http\JsonResponse;
use Illuminate\Support\Facades\Http;

class AuthController extends Controller
{
    /**
     * Login user and create token.
     *
     * @param Request $request
     * @return JsonResponse
     */
    public function login(Request $request): JsonResponse
    {
         $request->validate([
            'email' => 'required|email',
            'password' => 'required|string',
         ]);

        if(Auth::attempt(['email' => $request->email, 'password' => $request->password])){
            $user = Auth::user();

            $requests = Request::create(url('/oauth/token'), 'POST', [
                'grant_type' => 'password',
                'client_id' => env("CLIENT_ID"),
                'client_secret' => env("CLIENT_SECRET"),
                'username' => $request->email,
                'password' => $request->password,
                'scope' => '',
            ]);

            $result = app()->handle($requests);
            $response = json_decode($result->getContent(), true);

            $data= [
                'email' =>  $user->email,
                'expires_in' => $response['expires_in'],
                'access_token' => $response['access_token'],
                'refresh_token' => $response['refresh_token'],
            ];

             return response()->json([
                'status' => true,
                'message' => 'User login successfully.',
                'data' => $data
            ], 200);

        }
        else{
             return response()->json([  'status' => false,'message'=>'Invalid credentials.'],401);
        }
    }


    public function refreshToken(Request $request): JsonResponse
    {

        $request->validate([
            'refresh_token' => 'required',
        ]);

        $response = Request::create(url('/oauth/token'),'POST', [
            'grant_type' => 'refresh_token',
            'refresh_token' => $request->refresh_token,
            'client_id' => env("CLIENT_ID"),
            'client_secret' => env("CLIENT_SECRET"),
            'scope' =>'',
        ]);


         $result = app()->handle($response);
         $authResponse = json_decode($result->getContent(), true);
         return response()->json([
            'status' => true,
            'message' => 'Refreshed token.',
            'data' => $authResponse,
         ], 200);


    }

   }
Step 6: Define API Routes
Open routes/api.php and define your endpoints.
<?php

use Illuminate\Http\Request;
use Illuminate\Support\Facades\Route;
use App\Http\Controllers\API\AuthController;


Route::post('login', [AuthController::class, 'login']);
Route::post('refresh-token', [AuthController::class, 'refreshToken']);
Read Also : Laravel 12 Reset Password Using OTP Sanctum API Example
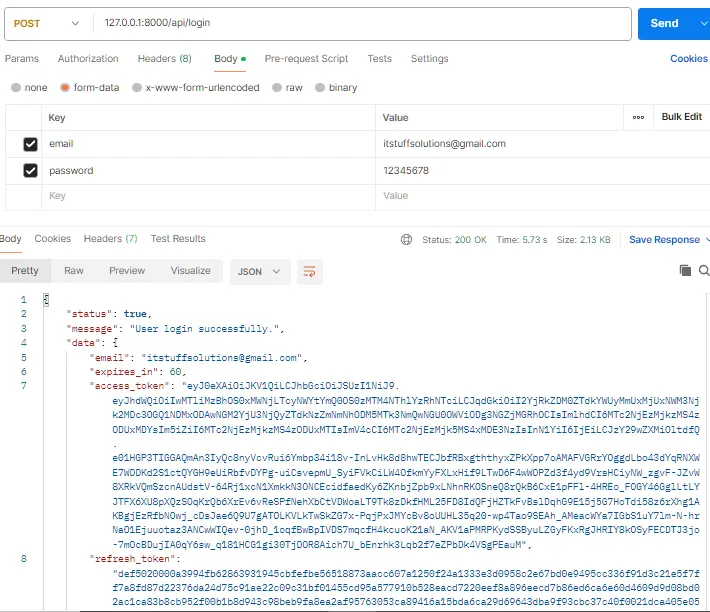
Step 7: Testing with Postman
1. Login Request
Send a POST request to http://127.0.0.1:8000/api/login.
2. Refresh the Token
Once your access token expires (or to test the flow), send a POST request to http://127.0.0.1:8000/api/refresh-token.
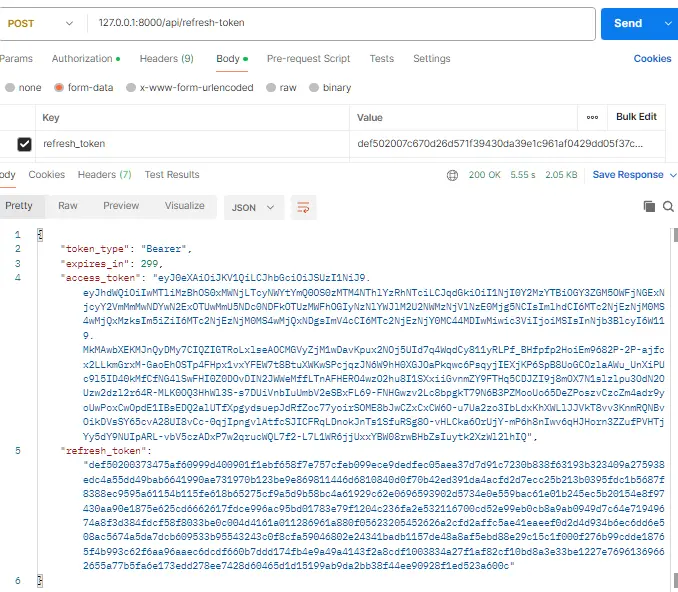
Response:
You will receive a new access_token and a new refresh_token. Your old refresh token is now invalid (revoked), and you must use the new one for the next refresh cycle.
Conclusion
You have successfully implemented a secure authentication flow in Laravel 12 using Passport Refresh Tokens. This setup ensures your API remains secure with short-lived access tokens while providing a smooth user experience through seamless background token refreshing.
