In this laravel 12 tutorial titled “Laravel 12 REST API Authentication Using Passport Complete Guide”, you will learn how to create rest api authentication using passport step by step.
Building secure APIs is an essential part of modern web and mobile development. Laravel Passport provides a powerful OAuth2 authentication system that allows you to implement token-based authentication for your REST API with ease. In this tutorial, we will learn step-by-step how to build a REST API in Laravel 12 using Passport Authentication.
Table of Contents
What is Laravel Passport?
Laravel Passport is an OAuth2 implementation for API authentication. It allows your application to issue access tokens for API clients such as mobile apps, SPA (Vue, React), or other backend systems.
Key Features of Passport
- OAuth2 authorization system
- Personal access tokens
- Password grant & client credentials
- Token revocation
- Middleware protection
- Full integration with Laravel
When to Use Passport vs Sanctum
Laravel offers two authentication packages: Passport and Sanctum. If your application needs OAuth2 support, multiple grant types, or will integrate with third-party applications, use Passport. For simpler SPAs or mobile apps that only need basic token authentication without OAuth2 complexity, Sanctum is more lightweight.
Read Also : Laravel 12 REST API Authentication Using Sanctum with Password Reset
Step 1: Install Laravel 12
Begin by creating a fresh Laravel 12 application using Composer:
composer create-project laravel/laravel laravel-passport-api
Navigate into your project directory:
cd laravel-passport-api
Step 2: Install Laravel Passport
In Laravel 12, the api.php route file is not included by default. Installing Passport with the –passport flag automatically creates this file along with the necessary database migrations:
php artisan install:api --passport
This command performs several important tasks:
- Publishes and runs database migrations for OAuth2 table
- Creates encryption keys required for secure access tokens
- Creates the routes/api.php file
Step 3: Configure Passport
Configuration involves updating the User model and the authentication configuration file.
Update the User Model
Now, Open app/Models/User.php and add the HasApiTokens trait in your User model:
<?php

namespace App\Models;

// use Illuminate\Contracts\Auth\MustVerifyEmail;
use Illuminate\Database\Eloquent\Factories\HasFactory;
use Illuminate\Foundation\Auth\User as Authenticatable;
use Illuminate\Notifications\Notifiable;
use Laravel\Passport\HasApiTokens;

class User extends Authenticatable
{
    /** @use HasFactory<\Database\Factories\UserFactory> */
    use HasFactory, Notifiable, HasApiTokens;

    /**
     * The attributes that are mass assignable.
     *
     * @var list<string>
     */
    protected $fillable = [
        'name',
        'email',
        'password',
    ];

    /**
     * The attributes that should be hidden for serialization.
     *
     * @var list<string>
     */
    protected $hidden = [
        'password',
        'remember_token',
    ];

    /**
     * Get the attributes that should be cast.
     *
     * @return array<string, string>
     */
    protected function casts(): array
    {
        return [
            'email_verified_at' => 'datetime',
            'password' => 'hashed',
        ];
    }
}
Configure the Auth Guard
Update the config/auth.php file to use Passport as the API driver:
<?php
 // ... other configurations
    'guards' => [
        'web' => [
            'driver' => 'session',
            'provider' => 'users',
        ],
        'api' => [
            'driver' => 'passport',
            'provider' => 'users',
        ],
    ],
// ... other configurations
];
It tells Laravel that API authentication must use Passport, links Passport tokens to the users table (User model), and ensures Laravel knows how to validate API access tokens. If you forgot to configure you will got error something like this:

Step 4: Create Post Table and Model
Let’s create a migration and model for the posts table:
php artisan make:model Post -m
This command creates a model and migration for the posts table.
Now Open database/migrations/xxxx_posts.php file and update it with the following code:
<?php

use Illuminate\Database\Migrations\Migration;
use Illuminate\Database\Schema\Blueprint;
use Illuminate\Support\Facades\Schema;

return new class extends Migration
{
    /**
     * Run the migrations.
     */
    public function up(): void
    {
        Schema::create('posts', function (Blueprint $table) {
            $table->id();
            $table->string('title');
            $table->text('content')->nullable();
            $table->string('image')->nullable();
            $table->boolean('status')->default(1); // 1 = published, 0 = draft
            $table->timestamps();
        });
    }

    /**
     * Reverse the migrations.
     */
    public function down(): void
    {
        Schema::dropIfExists('posts');
    }
};
Run the migration:
php artisan migrate
Now Open app/Models/Post.php file and update it with the following code:
<?php

namespace App\Models;

use Illuminate\Database\Eloquent\Model;

class Post extends Model
{
      protected $fillable = [
        'title',
        'content',
        'status',
        'image'
    ];


}
Read Also : Laravel 12 CORS Middleware Configuration Example
Step 5: Create API Routes
Define your API routes in the routes/api.php file:
<?php

use Illuminate\Http\Request;
use Illuminate\Support\Facades\Route;
use App\Http\Controllers\API\AuthController;
use App\Http\Controllers\API\PostController;

// Public routes
Route::post('register', [AuthController::class, 'register']);
Route::post('login', [AuthController::class, 'login']);

// Protected routes
Route::middleware('auth:api')->group(function () {
    Route::get('profile', [AuthController::class, 'profile']);
    Route::post('logout', [AuthController::class, 'logout']);
    Route::resource('posts', PostController::class);
});
Step 6: Create AuthController
Create a dedicated API folder inside the Controllers directory for better organization. Run the given command to create AuthController :
php artisan make:controller API/AuthController
Now ,Open app/Http/Controllers/API/AuthController.php and update:
<?php

namespace App\Http\Controllers;

use Illuminate\Http\Request;
use App\Models\User;
use Illuminate\Support\Facades\Auth;
use Validator;
use Illuminate\Http\JsonResponse;

class AuthController extends Controller
{
        /**
     * Register api
     *
     * @return \Illuminate\Http\Response
     */
    public function register(Request $request): JsonResponse
    {
        $validator = Validator::make($request->all(), [
            'name' => 'required',
            'email' => 'required|email',
            'password' => 'required|string|min:8|confirmed',
        ]);

        if($validator->fails()){
            return response()->json([
            'status' => false,
            'message' => 'Validation Error',
            'errors' => $validator->errors()
        ], 422);
        }

        try{

        $data = $request->all();
        $data['password'] = bcrypt($data['password']);
        $user = User::create($data);

        $result['token'] =  $user->createToken('MyApp')->accessToken;
        $result['name'] =  $user->name;

        return response()->json([
        'status' => true,
        'message' => 'User registered successfully.',
        'data' => $result
        ], 200);


        } catch (QueryException  $e) {
              return response()->json([
                'status' => false,
                'message' => $e->getMessage(),
            ],500);
        }
    }

    /**
     * Login user and create token.
     *
     * @param Request $request
     * @return JsonResponse
     */
    public function login(Request $request): JsonResponse
    {
        if(Auth::attempt(['email' => $request->email, 'password' => $request->password])){
            $user = Auth::user();
            $result['token'] =  $user->createToken('MyApp')->accessToken;
            $result['name'] =  $user->name;

             return response()->json([
                'status' => true,
                'message' => 'User login successfully.',
                'data' => $result
            ], 200);

        }
        else{
             return response()->json([  'status' => false,'message'=>'Invalid credentials.'],401);
        }
    }


      /**
     * User Profile API
     */
    public function profile(Request $request): JsonResponse
    {
         return response()->json([
                'status' => true,
                'message' => 'User data fetched successfully.',
                'data' => $request->user()
            ], 200);


    }

    /**
     * Logout user (Revoke the token).
     *
     * @param Request $request
     * @return JsonResponse
     */
    public function logout(Request $request): JsonResponse
    {
        $token = $request->user()->token();
        $token->revoke();

         return response()->json([
                'status' => true,
                'message' => 'User logged out successfully.',
            ], 200);

    }
}
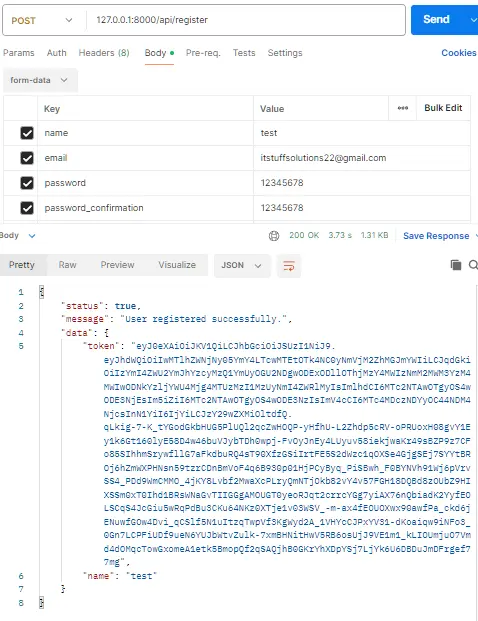
1. register() – User Registration
- Validates name, email, password.
- Hashes password and creates user.
- Generates Passport access token.
- Returns user name + token in JSON.
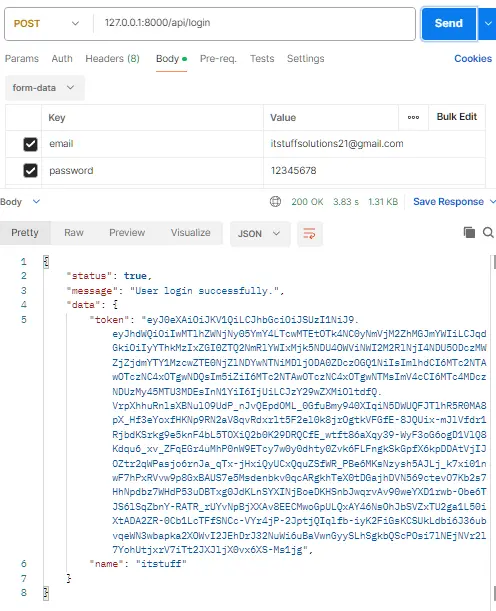
2. login() – User Login
- Checks email & password using Auth::attempt().
- If correct: generates new Passport token.
- Returns login success + token + user name.
- If incorrect: returns “Invalid credentials.”
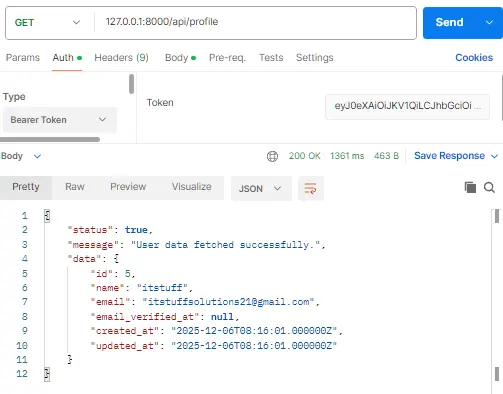
3. profile() – Get Authenticated User Data
- Returns the currently logged-in user’s details.
- Only works when a valid token is provided.
4. logout() – Logout User
- Revokes the user’s current access token.
- Logs the user out from the API.
- Returns logout success message.
Step 7: Create PostController
Run the following command to create the Post controller:
php artisan make:controller API/PostController
Now , Open app/Http/Controllers/API/PostController.php and update with the following code:
<?php

namespace App\Http\Controllers\API;

use Illuminate\Support\Facades\Validator;
use App\Http\Controllers\Controller;
use App\Http\Resources\PostResource;
use Illuminate\Http\JsonResponse;
use Illuminate\Http\Request;
use App\Models\Post;
use File;

class PostController extends Controller
{
      // GET /api/posts
    public function index(): JsonResponse
    {
        $posts = Post::latest()->get();

        return response()->json([
            'success' => true,
            'data'    => PostResource::collection($posts),
            'message' => 'Posts retrieved successfully.',
        ]);
    }

        // POST /api/posts
    public function store(Request $request): JsonResponse
    {
        $validator = Validator::make($request->all(), [
            'title' => 'required|string|max:255',
            'content'  => 'required|string',
            'image'  => 'nullable|image|mimes:jpeg,png,jpg|max:2048',
            'status'  => 'required|digits:1',
        ]);

        if ($validator->fails()) {
            return response()->json([
                'success' => false,
                'message' => 'Validation error.',
                'errors'  => $validator->errors(),
            ], 422);
        }

        $postData = $validator->validated();
         // Handle image upload
        if ($request->hasFile('image')) {

            $image = $request->file('image');

            // Generate a unique name
            $imageName = time() . '.' . $image->getClientOriginalExtension();

            // Define the destination path within the public folder
            $destinationPath = public_path('posts'); // Creates 'public/images'

            // Move the uploaded file to the public folder
            $image->move($destinationPath, $imageName);

            $postData['image'] = 'posts/'.$imageName;
        }

        $post = Post::create($postData);

        return response()->json([
            'success' => true,
            'data'    => new PostResource($post),
            'message' => 'Post created successfully.',
        ], 201);
    }

    // GET /api/posts/{id}
    public function show($id): JsonResponse
    {
        $post = Post::find($id);

        if(is_null($post)){
            return response()->json([
               'success' => false,
               'message' => "Post Not Found.",
            ]);
        }

        return response()->json([
            'success' => true,
            'data'    => new PostResource($post),
            'message' => 'Post retrieved successfully.',
        ]);
    }

    // PUT/PATCH /api/posts/{post}
    public function update(Request $request,$id): JsonResponse
    {
        $validator = Validator::make($request->all(), [
            'title' => 'sometimes|required|string|max:255',
            'content'  => 'sometimes|required|string',
            'image'  => 'nullable|image|mimes:jpeg,png,jpg|max:2048',
            'status'  => 'sometimes|required|digits:1',
        ]);

        if ($validator->fails()) {
            return response()->json([
                'success' => false,
                'message' => 'Validation error.',
                'errors'  => $validator->errors(),
            ], 422);
        }


        $post = Post::find($id);

        if (is_null($post)) {
            return response()->json([
                'status'  => false,
                'message' => 'Post not found'
            ], 404);
        }

        $postData = $validator->validated();

        // Handle image upload
        if ($request->hasFile('image')) {
            $old_image = public_path($post->image);
            // Delete old image if exists
            if (File::exists($old_image)) {
                File::delete($old_image);
            }

            $image = $request->file('image');

            // Generate a unique name
            $imageName = time() . '.' . $image->getClientOriginalExtension();

            // Define the destination path within the public folder
            $destinationPath = public_path('posts'); // Creates 'public/posts'

            // Move the uploaded file to the public folder
            $image->move($destinationPath, $imageName);

            $postData['image'] = 'posts/'.$imageName;
        }


        $post->update($postData);

        return response()->json([
            'success' => true,
            'data'    => new PostResource($post),
            'message' => 'Post updated successfully.',
        ]);
    }

    // DELETE /api/posts/{id}
    public function destroy($id): JsonResponse
    {
        $post = Post::find($id);

        if(is_null($post)){
            return response()->json([
               'success' => false,
               'message' => "Post Not Found.",
            ]);
        }

        $image = public_path($post->image);
          // Delete image if exists
        if ($post->image && File::exists($image)) {
            File::delete($image);
        }

        $post->delete();
        return response()->json([
            'success' => true,
            'data'    => null,
            'message' => 'Post deleted successfully.',
        ]);
    }

}
1. index() – Get All Posts
- Fetches all posts (latest first).
- Converts list using PostResource::collection().
- Returns success message + posts in clean JSON.
2. store() – Create Post
- Validates input (title, content, status, image).
- Uploads image if provided.
- Creates a new post.
- Returns newly created post using PostResource.
3. show() – Get Single Post
- Finds post by ID.
- Returns error if not found.
- Returns single post through PostResource.
4. update() – Update Post
- Validates only fields sent (sometimes).
- Finds existing post.
- Replaces old image if new one is uploaded.
- Updates post data.
- Returns updated post via PostResource.
5. destroy() – Delete Post
- Finds post by ID.
- Deletes image from server if exists.
- Deletes post from database.
- Returns success message.
Step 8: Create Eloquent API Resources
API Resources transform your models into consistent JSON structures. It acts as a bridge between your Eloquent model and the actual JSON response that goes to the client (Postman, mobile app, frontend, etc.).
Benefits of Using Eloquent API Resources
1. Clean and Consistent Response Format
You decide how your API response will look. Every response becomes consistent across the entire API.
2. Security – Hide Sensitive Fields
Resources prevent exposing data like:
- passwords
- internal tracking fields
- fields not meant for users
You only show what you want.
3. Easy Customization
You can modify your API output anytime without touching your controller.
4. Helpful for API Versioning
Tomorrow if you launch v2 API with different fields, you can simply create:
- PostResourceV1
- PostResourceV2
No need to modify existing controllers.
Run the command given below to create a product resource:
php artisan make:resource PostResource
Open app/Http/Resources/PostResource.php
<?php

namespace App\Http\Resources;

use Illuminate\Http\Request;
use Illuminate\Http\Resources\Json\JsonResource;

class PostResource extends JsonResource
{
    /**
     * Transform the resource into an array.
     *
     * @return array<string, mixed>
     */
    public function toArray(Request $request): array
    {
        return [
            'id' => $this->id,
            'title' => $this->title,
            'content' => $this->content,
            'image'   => $this->image ? asset('public/' . $this->image) : null,
            'status' => $this->status,
            'created_at' => $this->created_at->format('d/m/Y'),
            'updated_at' => $this->updated_at->format('d/m/Y'),
        ];
    }
}
Step 8: Configure Token Lifetimes
Customize token expiration times in your AppServiceProvider: Open app/Providers/AppServiceProvider.php
<?php

namespace App\Providers;

use Illuminate\Support\ServiceProvider;
use Laravel\Passport\Passport;
use Carbon\CarbonInterval;

class AppServiceProvider extends ServiceProvider
{
    /**
     * Register any application services.
     */
    public function register(): void
    {
        //
    }

    /**
     * Bootstrap any application services.
     */
    public function boot(): void
    {
        Passport::tokensExpireIn(CarbonInterval::days(15));
        Passport::refreshTokensExpireIn(CarbonInterval::days(30));
        Passport::personalAccessTokensExpireIn(CarbonInterval::months(6));
    }
}
Read Also : How to Fix File Uploads with PUT/PATCH in Laravel API
Step 9: Running the Application
Start the Laravel development server:
php artisan serve
Your API will be available at http://localhost:8000.
Testing with Postman
Required Headers
For all API requests, include these headers:
Accept: application/json
Testing the Register API
Endpoint: POST http://localhost:8000/api/register
Test User Login API
Endpoint: POST http://localhost:8000/api/login
Test User Profile (Protected Route)
Endpoint: GET http://localhost:8000/api/profile
Headers:
Authorization: Bearer {your_token_here}
Accept: application/json
Test Logout API (Protected Route)
Endpoint: POST http://localhost:8000/api/logout
Headers:
Authorization: Bearer {your_token_here}
Accept: application/json
The Logout API is similar to the Login API, with the main difference being that it uses the POST request method.
Test PostController API
Required Headers
For all API requests, include these headers:
Authorization: Bearer {your_token_here}
Accept: application/json
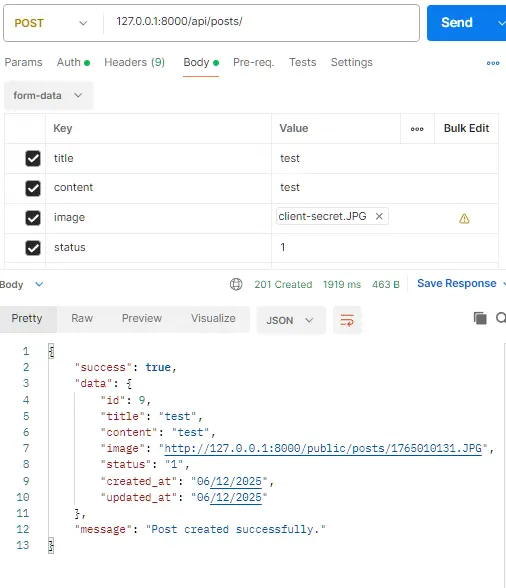
Test Post Create API
Endpoint: POST http://localhost:8000/api/posts
Test Get Posts List API
Endpoint: GET http://localhost:8000/api/posts
Fetches and returns a list of all posts stored in the database.
Test Get Single Post API
Endpoint: GET http://localhost:8000/api/posts/{id}
Returns the complete details of the post associated with the given ID.
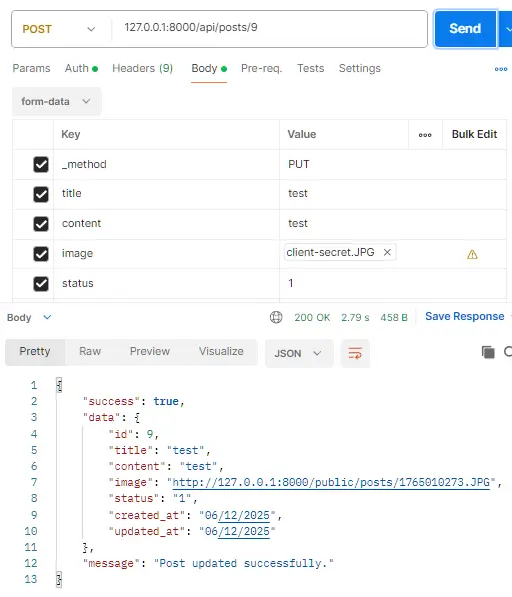
Test Post Update API
Endpoint: POST http://localhost:8000/api/posts/{id}
Updates the post matching the specified ID with the provided data.
In this API, we are using the POST method instead of PUT to update a post because Laravel does not properly handle file uploads or form-data when using PUT/PATCH requests.
When you send data using PUT/PATCH (especially from Postman or frontend forms):
- Form-data fields often do not arrive in the request.
- File uploads are not detected by Laravel.
- The request becomes empty or partially processed.
However, when you send the same data using POST and include:
_method = PUT
Laravel internally treats it as a PUT request, and all form-data + file uploads are received correctly.
Therefore:
- We use POST for sending the request.
- We add _method=PUT to tell Laravel to handle it as an update operation.
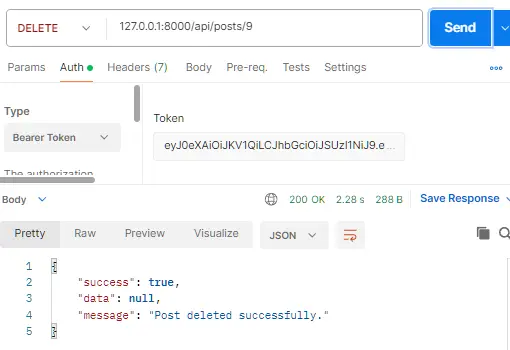
Test Post Delete API
Endpoint: DELETE http://localhost:8000/api/posts/{id}
Deletes the post corresponding to the given ID.
GitHub Repository: https://github.com/itstuffsolutions/laravel-12-rest-api-authentication-using-passport-complete-guide
Conclusion
In this comprehensive Laravel 12 tutorial, you learned how to build a fully secure and production-ready REST API using Laravel Passport. By implementing OAuth2 authentication, you now have a powerful token-based system that ensures only authorized users can access your API resources.
Throughout this guide, we covered every important step—installing Laravel Passport, configuring authentication guards, creating models and migrations, building controllers, structuring API routes, generating access tokens, and protecting endpoints using middleware. You also explored how to manage posts through a complete CRUD API and how to transform responses using Eloquent API Resources for clean, consistent, and secure output.
Laravel Passport is ideal for applications that require OAuth2 support, multi-device authentication, or integration with third-party services. With features like personal access tokens, token expiry customization, and robust middleware protection, it provides everything you need for advanced API security.
