
If you’re working with large datasets, showing everything on a single page is neither user-friendly nor efficient. That’s where Laravel 12 Simple Pagination Step-by-Step Tutorial comes in handy. Pagination helps you break large data into smaller, manageable chunks while improving performance and user experience.
In this tutorial, you’ll learn how to implement simple pagination in Laravel 12 from scratch. We’ll walk through every step clearly, using real examples and best practices. Even if you’re new to Laravel, this guide is written at a Grade 7 reading level so you can follow along with ease.
By the end, you’ll be able to:
- Understand what simple pagination is
- Set up pagination in Laravel 12
- Display paginated data in Blade views
- Customize pagination output
- Avoid common mistakes
Table of Contents
What Is Pagination in Laravel 12?
Pagination is the process of splitting large amounts of data into smaller pages. Instead of loading thousands of records at once, Laravel fetches only the required rows per page.
In Laravel 12 Simple Pagination Step-by-Step Tutorial, we focus on simple pagination, which is faster and ideal when you don’t need the total number of records.
Difference Between Simple & Length-Aware Pagination
Laravel provides two main pagination methods:
Simple Pagination:
User::simplePaginate(5);
- Shows Next and Previous links only
- Faster for large datasets
Use simple pagination when performance is critical.
Length-Aware Pagination
User::paginate(5);
- Shows page numbers
- Executes an extra COUNT(*) query
Prerequisites for Laravel 12 Pagination
Before starting this Laravel 12 Simple Pagination Step-by-Step Tutorial, make sure you have:
- PHP 8.2 or higher
- Laravel 12 installed
- A working database connection
- Basic MVC knowledge
Read Also : Laravel 12 Import Very Large CSV into Database With Seeder
Step 1: Create a New Laravel 12 Project (Optional)
If you don’t already have a project, create one using:
composer create-project laravel/laravel laravel-pagination
Move into the project directory:
cd laravel-pagination
Step 2: Database Setup for Pagination
First, configure your database in the .env file:
DB_DATABASE=laravel_db
DB_USERNAME=root
DB_PASSWORD=
Run migrations:
php artisan migrate
Step 3: Inserting Dummy Data
You can use Tinker to add test data:
php artisan tinker
User::factory()->count(100)->create();
Now you have enough data to test Laravel 12 simple pagination.
Step 4: Create Controller
Create a controller to fetch paginated records:
php artisan make:controller UserController
Open app/Http/Controllers/UserController.php and add:
<?php

namespace App\Http\Controllers;

use Illuminate\Http\Request;
use App\Models\User;

class UserController extends Controller
{
    public function index(){

        $users = User::orderBy("id")->paginate(5);
        return view('list',compact('users'));
    }

}
Here, paginate(5) means 5 records per page.
Customizing Pagination Links (Optional)
You can customize pagination links by passing query parameters. This is especially useful when working with search filters or sorting options.
Why use withQueryString()?
The withQueryString() method preserves the current query parameters—such as search terms—across pagination links. Without it, pagination would reset and the search or filter values would be lost when navigating between pages.
User::simplePaginate(5)->withQueryString();
Or
User::paginate(5)->withQueryString();
With withQueryString(), users can move between pages while keeping their search queries and filters intact, resulting in a smoother and more consistent user experience.
Step 5: Create Route
Open routes/web.php:
<?php

use Illuminate\Support\Facades\Route;
use App\Http\Controllers\UserController;

Route::get('users', [UserController::class,'index']);
Read Also : Laravel 12 Send Email Using Queue: Step-by-Step Guide
Step 6: Create Blade View
Create a new file: resources/views/list.blade.php
Add the following code:
<!DOCTYPE html>
<html>
<head>
    <title>Laravel 12 Simple Pagination Step-by-Step Tutorial</title>
    <link href="https://cdn.jsdelivr.net/npm/bootstrap@5.3.8/dist/css/bootstrap.min.css" rel="stylesheet">
</head>
<body>
    <div class="container mt-5">
        <div class="card">
            <h5 class="card-header bg-primary text-white">Laravel 12 Simple Pagination Step-by-Step Tutorial - ItStuffSolutiotions</h5>
            <div class="card-body">
                <table class="table table-bordered">
                    <thead>
                        <tr>
                            <th>#</th>
                            <th>Name</th>
                            <th>Email</th>
                            <th>Created At</th>
                            <th>Updated At</th>
                        </tr>
                    </thead>
                     @forelse($users as $user)
                    <tr>
                        <td>{{ $user->id }}</td>
                        <td>{{ $user->name }}</td>
                        <td>{{ $user->email }}</td>
                        <td>{{ $user->created_at->format('d M Y') }}</td>
                        <td>{{ $user->updated_at->format('d M Y') }}</td>
                    </tr>
                    @empty
                    <tr>
                        <td colspan="5" class="text-center">No Users Found!!</td>
                    </tr>
                    @endforelse
                </table>
                 <!-- Pagination -->
             {!! $users->withQueryString()->links('pagination::bootstrap-5') !!}
            </div>
        </div>
    </div>
    <script src="https://cdn.jsdelivr.net/npm/bootstrap@5.3.8/dist/js/bootstrap.bundle.min.js"></script>


</body>

</html>
Laravel automatically generates links for you. You can display these links in several ways, and Laravel pagination comes with built-in support for the Tailwind CSS framework, ensuring clean and responsive styling out of the box.
Basic Pagination Links
Use the default pagination view:
{{ $users->links() }}
Bootstrap 5 Pagination with Preserved Query Parameters
This line generates Bootstrap 5–styled pagination links for the $users collection while retaining all existing query parameters, such as search and filters, across pages.
{!! $users->withQueryString()->links('pagination::bootstrap-5') !!}
Using a Custom Pagination View
Render pagination links with a custom view:
{{ $paginator->links('view.name') }}
Pagination with Additional Parameters
Append specific query parameters to pagination links:
{!! $data->appends(['sort' => 'votes'])->links() !!}
Pagination with All Request Parameters
Preserve all existing request parameters while paginating:
{!! $data->appends(Request::all())->links() !!}
Step 7: Run the Application
All required configuration and implementation steps have now been completed. To launch the Laravel application, execute the following command in your terminal:
php artisan serve
After the development server starts successfully, open your web browser and navigate to the following URL to view the application output:
http://localhost:8000/users
The paginated user list should now be rendered and visible in your browser.
Output:
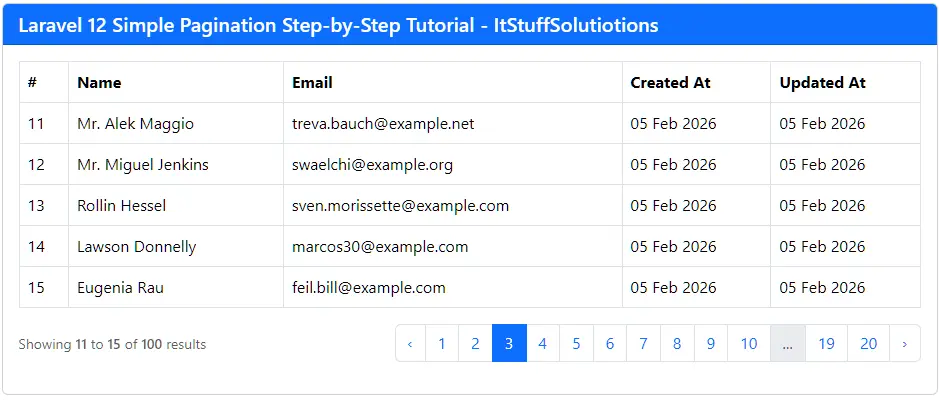
Conclusion
Laravel 12 pagination is powerful, flexible, and incredibly easy to implement. With just one method call, you can paginate thousands of records and generate beautiful pagination links automatically.
This Laravel 12 simple pagination step-by-step tutorial should help you quickly implement pagination in any project.
FAQs – Laravel 12 Simple Pagination Step-by-Step Tutorial
Q1: What is simple pagination in Laravel 12?
It paginates data without counting total records, improving speed.
Q2: How many records should I paginate per page?
Usually 5–15 records work best.
Q3: Can I use pagination with search?
Yes, combine simplePaginate()or paginate() with query strings.
<?php
public function index(Request $request){
$search = $request->search;
if(!empty($search)){
$users = User::when($search, function ($query, $search) {
$query->where('name', 'like', "%{$search}%")
->orWhere('email', 'like', "%{$search}%");
})
->simplePaginate(5)
->withQueryString();
}
else{
$users = User::orderBy("id")->simplePaginate(5)->withQueryString();
}
return view('list',compact('users'));
}
URL: http://127.0.0.1:8000/users?search=Prof
