Learn how to add Toastr JS notifications in Laravel 12 step by step with examples for success, error, and warning messages in your application.
Toastr is a simple JavaScript toast notification library that’s perfect for displaying quick laravel flash messages to users in a clean, non-blocking style. In this tutorial, you’ll learn how to integrate Toastr JS notifications in Laravel 12 step by step using Blade views and session messages.
What Is a Toast Notification?
A toast is a small popup box appears at the corner (usually bottom-right or top-right) , automatically disappears after a few seconds, doesn’t interrupt user actions.
It supports various types of messages like: Success, Info, Warning, Error, It’s lightweight, easy to integrate, and looks great out of the box.
The term “toast” comes from Android’s notification system — like a toast popping out of a toaster visible for a moment, then gone.
Steps For Laravel 12 Toastr JS Notifications Example
- Step 1: Install Laravel 12
- Step 2: Add Toastr Notification CDN (CSS and JS) in Blade File
- Step 3: Create Routes
- Step 4: Add Flash Messages in Controller
- Step 5: Run Laravel App
Step 1: Install Laravel 12
In this we will install laravel 12 project. if you have already installed laravel project , you can skip. use the command given below to create laravel project.
composer create-project laravel/laravel laravel12-toastr-js-notifications-example
Step 2: Add Toastr Notification CDN (CSS and JS) in Blade File
In this step, I will show you how to add toastr js using a CDN and display Toastr notifications in a Blade file.
First, create a master layout file inside the resources/views directory. Then, include the toastr js CDN links in this layout file and add the Toastr notification message code as shown below.
resources/views/app.blade.php
<!doctype html>
<html lang="{{ str_replace('_', '-', app()->getLocale()) }}">

<head>
   <meta charset="utf-8">
    <meta name="viewport" content="width=device-width, initial-scale=1">

    <!-- CSRF Token -->
    <meta name="csrf-token" content="{{ csrf_token() }}">

    <title>{{ config('app.name', 'Laravel') }}</title>
    <title>Laravel 12 Toastr JS Notifications Example</title>
    <link href="https://cdn.jsdelivr.net/npm/bootstrap@5.3.7/dist/css/bootstrap.min.css" rel="stylesheet">
    <link href="https://cdnjs.cloudflare.com/ajax/libs/toastr.js/latest/toastr.min.css" rel="stylesheet" />

    <!-- jQuery -->
    <script src="https://code.jquery.com/jquery-3.6.0.min.js"></script>

    <!-- Toastr JS -->
    <script src="https://cdnjs.cloudflare.com/ajax/libs/toastr.js/latest/toastr.min.js"></script>
</head>

<body>
      <div class="container">
        @yield('content')
       </div>
    <script>

        @session("success")
        toastr.success('{{ session("success") }}');
        @endsession

         @session("info")
        toastr.info('{{ session("info") }}');
        @endsession

         @session("error")
        toastr.error('{{ session("error") }}');
        @endsession

         @session("warning")
        toastr.warning('{{ session("warning") }}');
        @endsession

    </script>

</body>

</html>
In this layout file, we’ve added the toastr js CDN links within the <head> section.
We are using Bootstrap 5.3 along with toastr js. The layout also includes Laravel’s @yield() directive to allow dynamic content inclusion. A <script> tag is added at the bottom to check for session messages (like success, info, warning, or error) and trigger the appropriate Toastr notifications based on the session key.
Next, create a Blade view file at: resources/views/notification.blade.php
@extends('layouts.app')

@section('content')
<div class="card mt-5">
    <div class="card-header">
        <h4>Laravel 12 Toastr JS Notifications Example</h4></div>
    <div class="card-body">
        Welcome to It Stuff Solutions -itstuffsolutiotions.io

        <form method="POST" action="{{route('store')}}" class="mt-3">
            @csrf
            <button type="submit" class="btn btn-primary">check notifications</button>
        </form>
    </div>
</div>
@endsection
This file should extend the main layout (app.blade.php) and include a form. When the form is submitted, it will trigger different types of Toastr notifications depending on the message type returned (e.g., success, info, warning, error).

You can customize the Toastr notifications in the layout file by adding the following code.
<script>
        toastr.options = {
        "closeButton": true,
        "debug": false,
        "newestOnTop": false,
        "progressBar": true,
        "positionClass": "toast-top-center",
        "preventDuplicates": false,
        "onclick": null,
        "showDuration": "300",
        "hideDuration": "1000",
        "timeOut": "5000",
        "extendedTimeOut": "1000",
        "showEasing": "swing",
        "hideEasing": "linear",
        "showMethod": "fadeIn",
        "hideMethod": "fadeOut"
        }

        @session("success")
        toastr.success('{{ session("success") }}');
        @endsession

         @session("info")
        toastr.info('{{ session("info") }}');
        @endsession

         @session("error")
        toastr.error('{{ session("error") }}');
        @endsession

         @session("warning")
        toastr.warning('{{ session("warning") }}');
        @endsession

    </script>
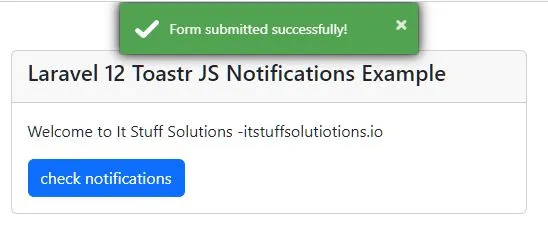
This configuration will display the Toastr notifications in the center of the page and include a progress bar.
The output will look like the image shown below.

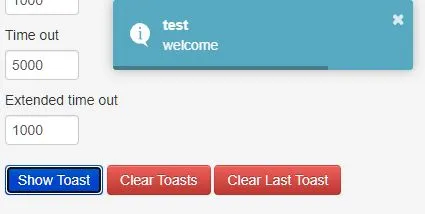
You can customize this code as needed, I’ve provided a link to the official Toastr (CodeSeven) documentation, where you can find options to change the position of the notification (e.g., top-right, top-left, bottom-right, bottom-left, etc.), along with other customization settings.
You can also explore the GitHub repository for more advanced usage and updates.

Read Also : Laravel 12 Clear Cache, Route, Config, Event Command
Step 3: Create Routes
In this step we will create two routes to test the Toastr notifications — one for displaying the view page and another for handling form submission to trigger the notifications.
routes/web.php
<?php

use Illuminate\Support\Facades\Route;
use App\Http\Controllers\ExampleController;

Route::get('/', [ExampleController::class,'viewPage']);
Route::post('/store', [ExampleController::class,'store'])->name('store');
Step 4: Add Flash Messages in Controller
In this step, we’ll create functions to test Toastr notifications using Laravel flash messages. Inside the store method, we’ll define a flash message that will be passed to the notification.blade.php view. The flash message includes the notification type (success) and the corresponding message to display.
<?php

namespace App\Http\Controllers;

use App\Http\Controllers\Controller;
use Illuminate\Http\Request;

class ExampleController extends Controller
{
    public function viewPage(){
        return view('notification');
    }
    public function store(Request $request){
        return redirect()->back()->with('success', 'Form submitted successfully!');
    }
}
Step 5: Run Laravel App
Now, run the application using the following command:
php artisan serve
Open your browser and enter the provided URL. You’ll see the form on the page. Click the Submit button, and the output will appear as shown in the image below.
http://127.0.0.1:8000

💻 Download the Source Code on GitHub
You can download the source code from github link
I trust this information is useful.

