
In this laravel 12 tutorial titled “Laravel 12 Yajra DataTables Tutorial Step-by-Step Guide”, you will learn how to use yajra datatables in your laravel project with practicle example.
Laravel 12 continues the tradition of elegant web development with updated dependencies, quality-of-life improvements, and strong compatibility with popular ecosystem packages like Yajra DataTables. Released as part of the Laravel 12.x cycle, this version supports PHP 8.2+ and offers a smooth upgrade path for existing applications.
Yajra Datatables is a powerful Laravel package that seamlessly integrates jQuery DataTables with Laravel’s backend, handling all the heavy lifting of AJAX communication, data transformation, and server-side processing. Instead of manually managing requests, pagination logic, and database queries, Yajra provides a clean, fluent API that makes implementing advanced data tables straightforward and intuitive.
Table of Contents
What is Yajra DataTables?
Yajra DataTables bridges Laravel and the jQuery DataTables plugin, managing server-side logic (fetching, filtering, pagination) with elegant Laravel code. It supports Eloquent ORM, Query Builder, and Collections, enabling efficient, AJAX-powered tables in your app.
Step 1: Install Laravel 12
If you’re starting fresh:
laravel new laravel12-datatables
cd laravel12-datatables
If you already have a Laravel 12 project, you can skip this step.
Step 2: Install Yajra Datatables Package
Install the core DataTables package via Composer:
composer require yajra/laravel-datatables:"^12.0"
This installs the latest compatible version (v9.18.0+) which fully supports Laravel 12.
Verify the installation:
composer show yajra/laravel-datatables
Laravel’s auto-discovery automatically registers the service provider, so no manual configuration is needed for most cases.
Read Also : Laravel 12 How to Integrate ChatGPT API Example
Step 3: Publish Configuration (Optional)
For advanced customization, publish the configuration file:
php artisan vendor:publish --tag=datatables
This creates config/datatables.php where you can customize:
- Default data source handler (Eloquent, Query Builder, Collection)
- HTML builder settings
- Editor configuration
- Export options
For most implementations, the default configuration works perfectly.
Step 4: Create Sample Database Records
Generate test data using Tinker:
php artisan tinker
Then run the following command:
User::factory()->count(100)->create();
This creates 100 sample users with realistic data from Laravel’s built-in User factory. If you need more test data:
User::factory()->count(1000)->create() // For 1000 records
Step 5: Create the Controller
Generate a new controller:
php artisan make:controller UserController
Open app/Http/Controllers/UserController.php and replace the content with:
<?php

namespace App\Http\Controllers;

use Illuminate\Http\Request;
use App\Models\User;
use Yajra\DataTables\Facades\DataTables;

class UserController extends Controller
{
     public function index()
     {
         if (request()->ajax()) {
            $data = User::select(['id', 'name', 'email', 'created_at', 'updated_at']);

              return DataTables::of($data)
                ->addIndexColumn() // Adds DT_RowIndex for row numbering
                ->editColumn('created_at', function ($row) {
                    return $row->created_at->format('M d, Y h:i A');
                })
                ->editColumn('updated_at', function ($row) {
                    return $row->updated_at->format('M d, Y h:i A');
                })
                ->addColumn('action', function ($row) {
                    // Create action buttons
                    $viewBtn = '<a href="javascript:void(0)" class="btn btn-sm btn-primary view-user" data-id="'.$row->id.'"><i class="fa fa-eye"></i> View</a> ';
                    $editBtn = '<a href="javascript:void(0)" class="btn btn-sm btn-warning edit-user" data-id="'.$row->id.'"><i class="fa fa-edit"></i> Edit</a> ';
                    $deleteBtn = '<a href="javascript:void(0)" class="btn btn-sm btn-danger delete-user" data-id="'.$row->id.'"><i class="fa fa-trash"></i> Delete</a>';

                    return $viewBtn . $deleteBtn;
                })
                ->rawColumns(['action']) // Allow HTML in action column
                ->make(true);

         }
         return view('index');
     }
}
Key Points:
- $request->ajax() checks if the request is from DataTables JavaScript
- User::select() loads only necessary columns for performance
- addIndexColumn() automatically adds row numbering
- editColumn() transforms existing columns (formatting dates)
- addColumn() creates new columns with custom content
- rawColumns([‘action’]) tells DataTables to render HTML without escaping
Read Also: Laravel 12 Guzzle HTTP Request Tutorial: Error Handling & Timeouts
Step 6: Define Routes
Update routes/web.php:
<?php

use Illuminate\Support\Facades\Route;
use App\Http\Controllers\UserController;

Route::get('/users-list', [UserController::class, 'index'])->name('index');
Step 7: Create the Blade Template
Create the views directory and file: resources/views/index.blade.php
<!DOCTYPE html>
<html>
<head>
    <title>Laravel 12 Yajra DataTables Tutorial (Step-by-Step Guide)</title>
    <link href="https://cdn.jsdelivr.net/npm/bootstrap@5.3.8/dist/css/bootstrap.min.css" rel="stylesheet">
</head>
<body>
    <div class="container mt-5">
        <div class="card">
            <h5 class="card-header">Laravel 12 Yajra DataTables Tutorial (Step-by-Step Guide)</h5>
            <div class="card-body">
                <table class="table table-bordered data-table">
                    <thead>
                        <tr>
                            <th>#</th>
                            <th>Name</th>
                            <th>Email</th>
                            <th>Created At</th>
                            <th>Updated At</th>
                            <th width="220px">Actions</th>
                        </tr>
                    </thead>
                </table>
            </div>
        </div>
    </div>
    <script src="https://code.jquery.com/jquery-3.6.0.min.js"></script>
    <script src="https://cdn.jsdelivr.net/npm/bootstrap@5.3.8/dist/js/bootstrap.bundle.min.js"></script>
    <script src="https://cdn.datatables.net/1.13.4/js/jquery.dataTables.min.js"></script>
    <script src="https://cdn.datatables.net/1.13.4/js/dataTables.bootstrap5.min.js"></script>
    <script type="text/javascript">
        $(function() {

            var table = $('.data-table').DataTable({
                processing: true,
                serverSide: true,
                ajax: "{{ route('index') }}",
                columns: [
                    {data: 'id', name: 'id'},
                    {data: 'name', name: 'name'},
                    {data: 'email', name: 'email'},
                    {data: 'created_at', name: 'created_at'},
                    {data: 'updated_at', name: 'updated_at'},
                    {data: 'action', name: 'action', orderable: false, searchable: false},
                ]
            });

        });
    </script>
</body>

</html>
Step 8: Run The Laravel App
Navigate to http://localhost:8000/users-list and you’ll see:
- Complete user listing with server-side pagination
- Full-text search across all columns
- Column sorting (click headers to sort)
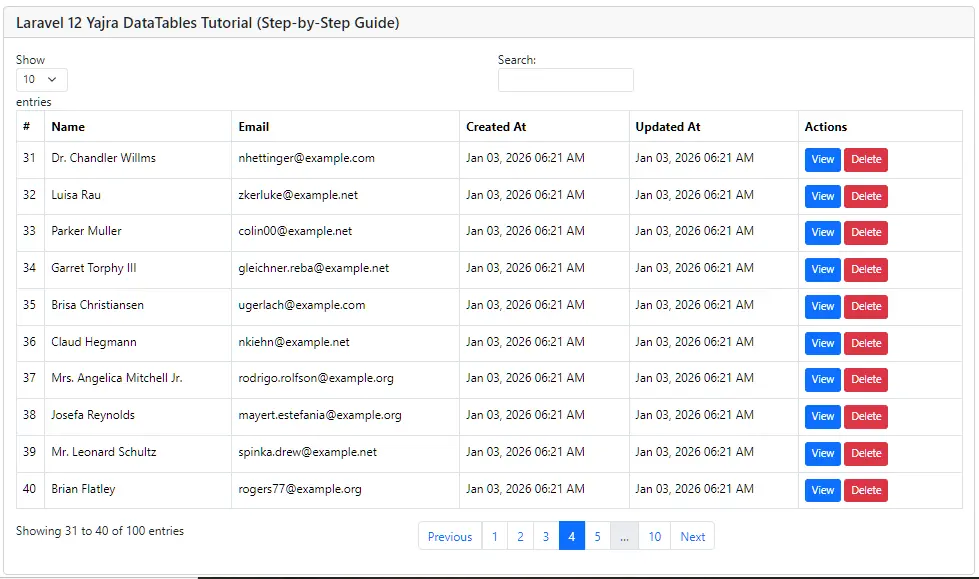
You’ll see an interactive, paginated, sortable, searchable table of users powered by Yajra DataTables.
Conclusion
Integrating Yajra DataTables with Laravel 12 gives your projects powerful data listing features with minimal effort. Whether building admin dashboards, reports, or CRUD listings, this approach scales beautifully. Based on the official DataTables plugin and Laravel’s server-side strengths, it’s the go-to solution for efficient table handling.
FAQ
Q1: Can Yajra handle 100K+ records efficiently?
Yes, through server-side processing. Key is proper database indexing, pagination limits, and eager loading of relationships.
Q2: How do I add custom column filters?
Add filter inputs in your view and apply conditions in the controller before returning DataTables response.
