In this tutorial titled “laravel 12 sweetalert2 delete confirmation example”, you will learn step by step how to integrate SweetAlert2 with AJAX delete confirmation in a Laravel application. We’ll go through setting up a fresh Laravel project, creating a controller, defining routes, and testing the feature with dummy data.
Table of Contents
Step 1: Install Laravel project
First, create a new Laravel project. If you already have one, you can skip this step.
composer create-project laravel/laravel sweetalert-demo
Step 2: Run Migrations
Next, set up your database connection. Open the .env file and update your database details:
DB_DATABASE=your_database_name
DB_USERNAME=your_username
DB_PASSWORD=your_password
Then run the migration command to create the default tables:
php artisan migrate
Read Also :Laravel 12 Bootstrap Multiselect Dropdown with Checkbox Example
Step 3: Create Controller
Now, let’s create a controller named UserController using the following command:
php artisan make:controller UserController
This command will create a new file at: app/Http/Controllers/UserController.php Open the file and update it with the following code.
<?php

namespace App\Http\Controllers;

use Illuminate\Http\Request;
use App\Models\User;

class UserController extends Controller
{
    // Display user list
    public function index()
    {
        $users = User::all();
        return view('list', compact('users'));
    }

    // Delete user record
    public function destroy($id)
    {
        User::find($id)->delete();
        return response()->json(['success' => 'User deleted successfully.']);
    }
}
In this controller, we’ll use two methods one to display the user list and another to handle user deletion.
Step 4: Define Routes
Next, define the routes for displaying and deleting users in your routes/web.php file.
<?php

use Illuminate\Support\Facades\Route;
use App\Http\Controllers\UserController;

Route::get('/users', [UserController::class, 'index']);
Route::delete('/users/{id}', [UserController::class, 'destroy'])->name('users.destroy');
Read Also : Laravel 12 Toastr JS Notifications Example
Step 5: Set Up SweetAlert2 with AJAX in Blade
Now, create a Blade file named list.blade.php inside the resources/views directory. Now open resources/views/list.blade.php Add the following code to display users and handle delete confirmation using SweetAlert2 with AJAX.
Always make sure this meta tag is present inside your <head> section:
<meta name="csrf-token" content="{{ csrf_token() }}">
This CSRF token is essential for security it allows your AJAX DELETE requests (like those using SweetAlert or jQuery) to work properly.
⚠️ If you forget to include it, you’ll run into a 419 “Page Expired” error during delete or post requests.
<!DOCTYPE html>
<html lang="en">
<head>
<title>Laravel 12 Sweet Alert Delete Confirmation Example - ItStuffSolutiotions</title>
<meta charset="utf-8">
<meta http-equiv="X-UA-Compatible" content="IE=edge">
<meta name="viewport" content="width=device-width, initial-scale=1">
<meta name="csrf-token" content="{{ csrf_token() }}">
<!-- Bootstrap 5.3.8 CSS -->
<link href="https://cdn.jsdelivr.net/npm/bootstrap@5.3.8/dist/css/bootstrap.min.css" rel="stylesheet">
<link href="https://cdn.jsdelivr.net/npm/sweetalert2@11.26.2/dist/sweetalert2.min.css" rel="stylesheet">
</head>
<body>
<div class="container">
<div class="card mt-5 shadow-lg border-0">
<h3 class="card-header p-3 bg-primary text-white">
Laravel 12 Sweet Alert Delete Confirmation Example - ItStuffSolutiotions
</h3>
<div class="card-body">
<table class="table table-striped">
<tr>
<th>ID</th>
<th>Name</th>
<th>Email</th>
<th>Action</th>
</tr>
@foreach($users as $user)
<tr id="row-{{ $user->id }}">
<td>{{ $user->id }}</td>
<td>{{ $user->name }}</td>
<td>{{ $user->email }}</td>
<td>
<button class="btn btn-sm btn-danger deleteBtn" data-id="{{ $user->id }}">Delete</button>
</td>
</tr>
@endforeach
</table>
</div>
</div>
</div>
<!-- Bootstrap 5.3.8 JS (with Popper) -->
<script src="https://code.jquery.com/jquery-3.6.0.min.js"></script>
<script src="https://cdn.jsdelivr.net/npm/bootstrap@5.3.8/dist/js/bootstrap.bundle.min.js"></script>
<script src="https://cdn.jsdelivr.net/npm/sweetalert2@11.26.2/dist/sweetalert2.all.min.js"></script>
<script>
$(document).on('click', '.deleteBtn', function() {
var id = $(this).data('id');
var token = $('meta[name="csrf-token"]').attr('content');
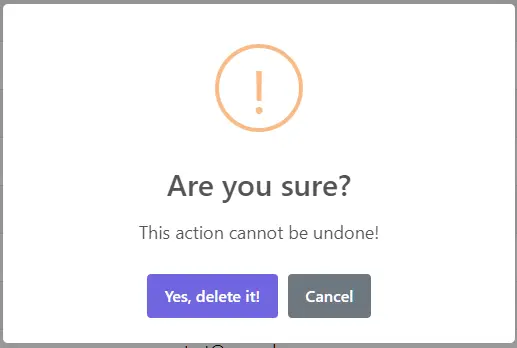
Swal.fire({
title: 'Are you sure?',
text: "This action cannot be undone!",
icon: 'warning',
showCancelButton: true,
confirmButtonText: 'Yes, delete it!',
cancelButtonText: 'Cancel'
}).then((result) => {
if (result.isConfirmed) {
$.ajax({
url: "/users/" + id,
type: 'DELETE',
data: { "_token": token },
success: function(response) {
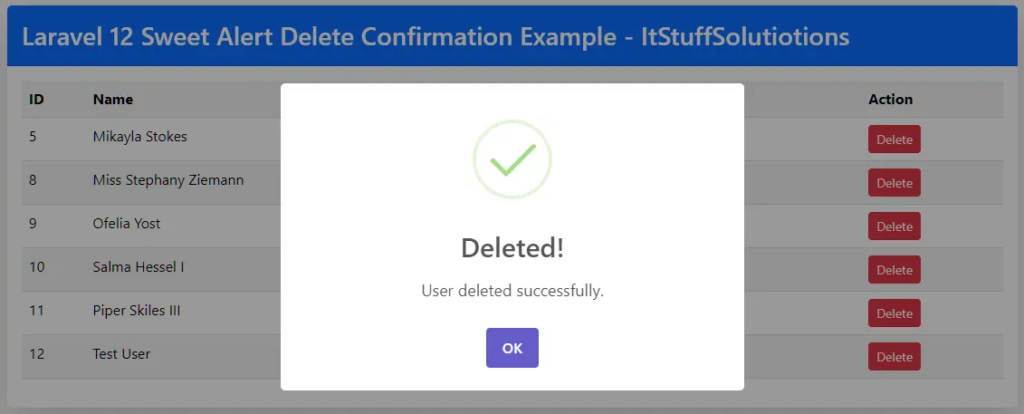
$("#row-" + id).remove();
Swal.fire('Deleted!', response.success, 'success');
}
});
}
});
});
</script>
</body>
</html>
Explanation
- when any delete button with the class .deleteBtn is clickedthen.
- $(this).data(‘id’); Gets the user ID stored in the button’s data-id attribute.
- var token Retrieves the CSRF token for secure AJAX requests.
- Swal.fire({…}) : Displays a SweetAlert2 confirmation popup asking if the user really wants to delete.
- if (result.isConfirmed) : Runs the AJAX request only if the user confirms the action.
- $.ajax({…}) : Sends a DELETE request to /users/{id} with the CSRF token.
- $(“#row-” + id).remove(); : Removes the deleted user’s row from the table dynamically without page reload.
- Swal.fire(‘Deleted!’, response.success, ‘success’); : Shows a success alert once the record is deleted.
You can customize SweetAlert2 in many ways , Here’s a quick overview with examples :
1. Basic Alert
Simplest form of SweetAlert just show a message.
Swal.fire('Are you sure?', 'This action cannot be undone!', 'warning')
Output: Green success popup with message.
2. Custom Title, Text, and Icon
You can change title, text, and choose icons like success, error, warning, info, or question.
Swal.fire({
  title: 'Delete Confirmation',
  text: 'Are you sure you want to delete this item?',
  icon: 'warning'
});
3. Add Buttons (Confirm/Cancel)
Control what happens on confirm or cancel.
Swal.fire({
  title: 'Are you sure?',
  text: 'This action cannot be undone!',
  icon: 'warning',
  showCancelButton: true,
  confirmButtonText: 'Yes, Delete it!',
  cancelButtonText: 'Cancel'
}).then((result) => {
  if (result.isConfirmed) {
    Swal.fire('Deleted!', 'Your file has been deleted.', 'success');
  }
});
4. Timer / Auto-Close Alert
Automatically closes after a few seconds.
Swal.fire({
  position: "top-end",
  icon: "success",
  title: "Your work has been saved",
  showConfirmButton: false,
  timer: 1500
})
Step 6: Insert Fake Data
To test the application, let’s insert some dummy users. Laravel includes a default user seeder for this purpose. Navigate to the database/seeders folder and open the DatabaseSeeder.php file. Uncomment the following line:
User::factory(10)->create();
You can adjust the number of records (e.g., change 10 to 20 or any number you prefer). Then, run the following command to seed your database:
php artisan db:seed
Alternatively, if you want to generate custom fake users manually, use Tinker:
php artisan tinker
User::factory()->count(5)->create();
This command will insert 5 fake user records into the users table feel free to increase or decrease the count as needed.
Step 7: Run the Application
Finally, start the Laravel development server:
php artisan serve
Open your browser and navigate to: http://127.0.0.1:8000/users , You should see a list of users. When you click the Delete button, a SweetAlert2 confirmation popup will appear. Once confirmed, the user will be deleted using AJAX without reloading the page.
Conclusion
In this tutorial, we walked through a complete Laravel 12 SweetAlert2 delete confirmation example. You learned how to:
- Set up a fresh Laravel project and run migrations.
- Create a UserController to display users and handle deletion.
- Define proper routes for listing and deleting records.
- Integrate SweetAlert2 with AJAX for interactive delete confirmation.
- Ensure CSRF protection using the <meta name=”csrf-token”> tag.
- Test the feature with dummy data using Laravel seeders or Tinker.
- Customize SweetAlert2 with various options such as titles, icons, confirm/cancel buttons, and auto-close timers.
By following these steps, you can implement a modern, user-friendly delete feature in your Laravel applications allowing users to confirm actions safely and providing immediate feedback without page reloads.
